The second tutorial will be about making a simple puzzle Android game. The idea is simple: you choose one image from a list, or you take a photo using the camera, which is then divided into several puzzle pieces, and you have to put it back. To check the app before you build it, you can download it from the Google Play Store: Puzzle – use your own images or choose from ours.
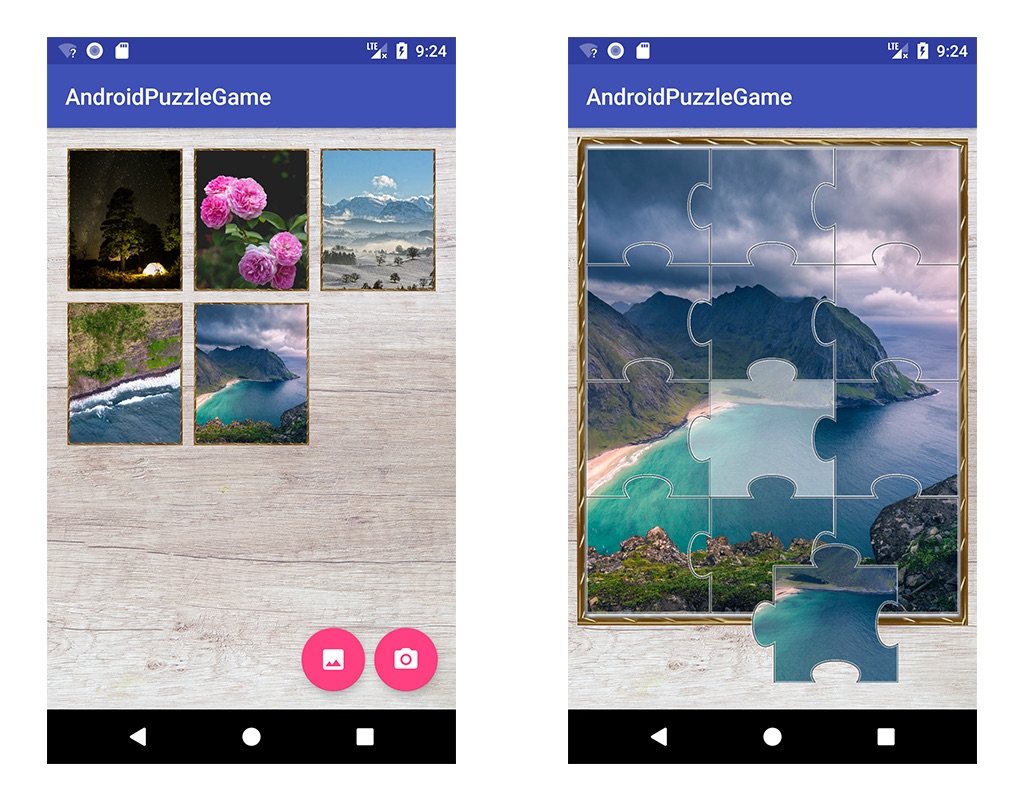
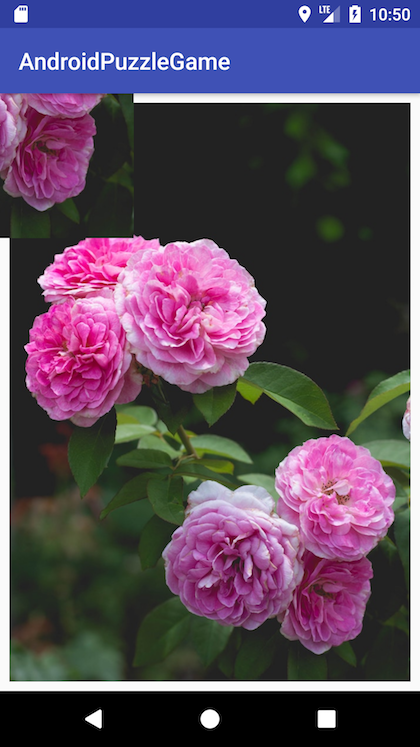
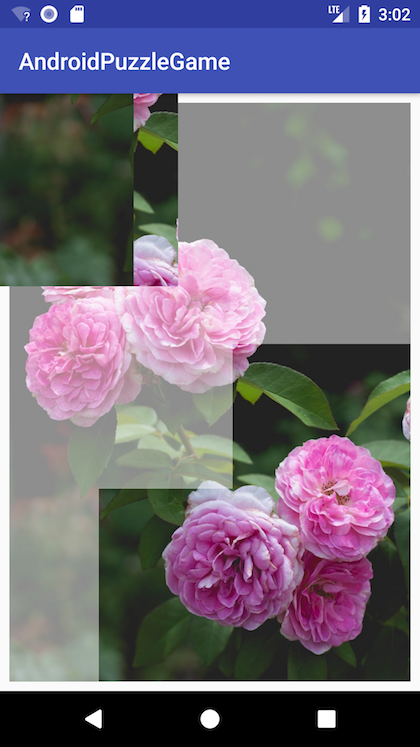
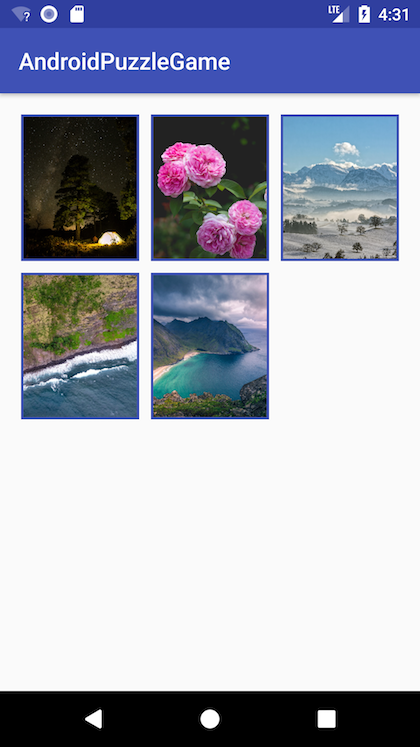
Here’s how the app will look in the end:
Projet Setup
Open Android Studio and create a new project. Name it AndroidPuzzleGame, enter your company or personal domain in reverse order (com.dragosholban in my case) and choose the location for it to be saved to.
In the next dialog, check only the Phone and Tablet form factor and set the minimum SDK to API 16. Click Next, then select an Empty Activity. Click one more time on the Next button. You can keep the MainActivity as the name for the first activity and click Finish to have Android Studio generate our project files.
Let’s also restrict the MainActivity’s orientation to portrait before we go any further. Open the AndroidManifest.xml file and add this restriction like below:
<?xml version="1.0" encoding="utf-8"?>
<manifest
    ... >
    <application
        ... >
        <activity android:name=".MainActivity"
            android:screenOrientation="portrait">
            ...
        </activity>
    </application>

</manifest>
Split the Image in Pieces
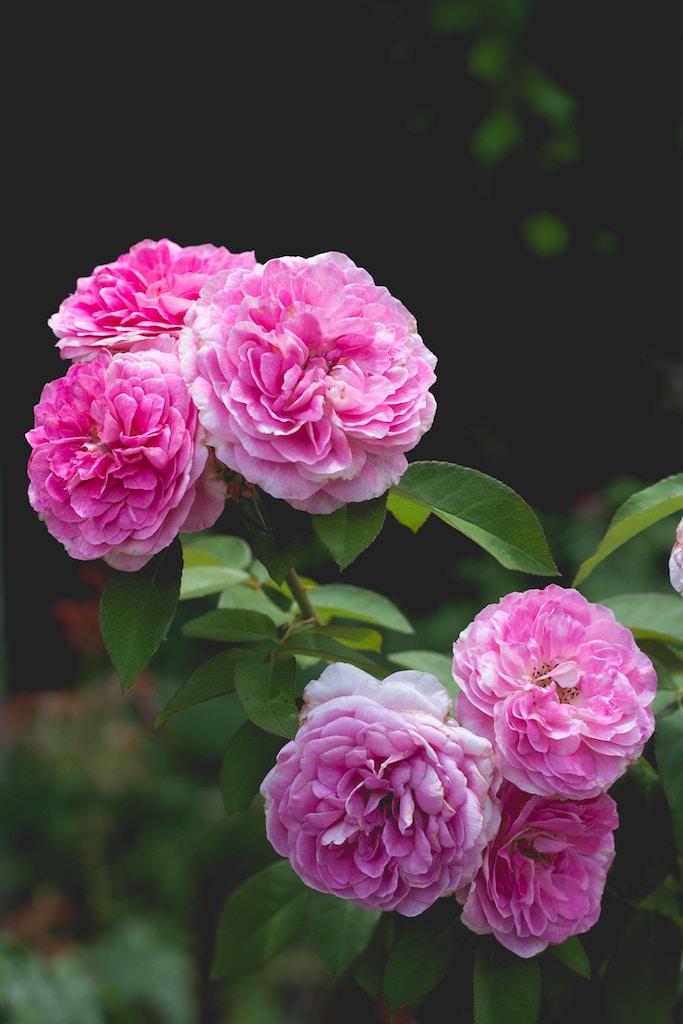
We will start by loading an image on the screen and split it into several rectangular pieces. Download an image from the internet, I recommend the Unsplash site, but you can choose whatever you want. I will start with this photo, by Macie Jones:
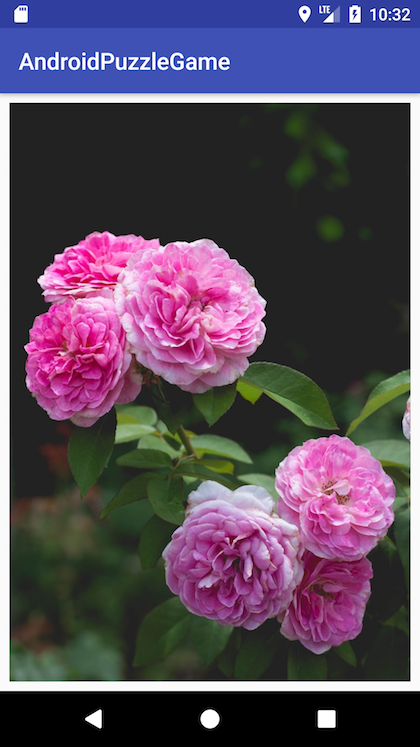
Resize it to something smaller, like 683 x 1024 px. Now copy and paste it into the res/drawable folder in your project. Also rename it to something simpler, like photo.jpg.
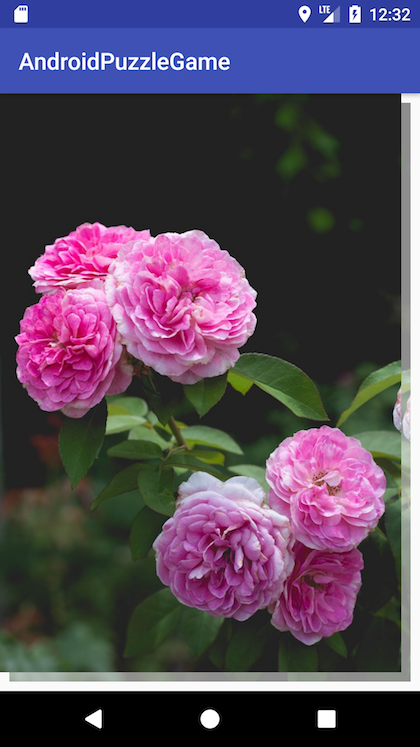
Now open the main_activity.xml layout file, from the res/layout folder, and, using the Design tab, select and delete the Hello World! TextView. Next, drag an ImageView into the center of the layout and, when prompted, select the photo we added earlier to be loaded into it. Set the ImageView constraints to 8dp to all the sides of the layout, the layout_weight and layout_height to match_constraint and the scaleType to centerCrop (this way the image will be cropped to fill all the available space). This is what you should see right now if you run the app:
Next is the XML code for the layout, in case something goes wrong. Please notice that I also added and ID for the ConstraintLayout, so we can access it from the code later:
<?xml version="1.0" encoding="utf-8"?>
<android.support.constraint.ConstraintLayout xmlns:android="http://schemas.android.com/apk/res/android"
    xmlns:app="http://schemas.android.com/apk/res-auto"
    xmlns:tools="http://schemas.android.com/tools"
    android:layout_width="match_parent"
    android:layout_height="match_parent"
    tools:context="dragosholban.com.androidpuzzlegame.MainActivity"
    android:id="@+id/layout">

    <ImageView
        android:id="@+id/imageView"
        android:layout_width="0dp"
        android:layout_height="0dp"
        android:layout_marginBottom="8dp"
        android:layout_marginEnd="8dp"
        android:layout_marginStart="8dp"
        android:layout_marginTop="8dp"
        android:scaleType="centerCrop"
        app:layout_constraintBottom_toBottomOf="parent"
        app:layout_constraintEnd_toEndOf="parent"
        app:layout_constraintLeft_toLeftOf="parent"
        app:layout_constraintRight_toRightOf="parent"
        app:layout_constraintStart_toStartOf="parent"
        app:layout_constraintTop_toTopOf="parent"
        app:srcCompat="@drawable/photo" />
</android.support.constraint.ConstraintLayout>
Having the image loaded into the app, let’s write the code to split it into smaller pieces. Open the MainActivity.java file and add the following code:
public class MainActivity extends AppCompatActivity {
    ArrayList<Bitmap> pieces;

    @Override
    protected void onCreate(Bundle savedInstanceState) {
        super.onCreate(savedInstanceState);
        setContentView(R.layout.activity_main);

        final ConstraintLayout layout = findViewById(R.id.layout);
        ImageView imageView = findViewById(R.id.imageView);

        // run image related code after the view was laid out
        // to have all dimensions calculated
        imageView.post(new Runnable() {
            @Override
            public void run() {
                pieces = splitImage();
                for(Bitmap piece : pieces) {
                    ImageView iv = new ImageView(getApplicationContext());
                    iv.setImageBitmap(piece);
                    layout.addView(iv);
                }
            }
        });
    }

    private ArrayList<Bitmap> splitImage() {
        int piecesNumber = 12;
        int rows = 4;
        int cols = 3;

        ImageView imageView = findViewById(R.id.imageView);
        ArrayList<Bitmap> pieces = new ArrayList<>(piecesNumber);

        // Get the bitmap of the source image
        BitmapDrawable drawable = (BitmapDrawable) imageView.getDrawable();
        Bitmap bitmap = drawable.getBitmap();

        // Calculate the with and height of the pieces
        int pieceWidth = bitmap.getWidth()/cols;
        int pieceHeight = bitmap.getHeight()/rows;

        // Create each bitmap piece and add it to the resulting array
        int yCoord = 0;
        for (int row = 0; row < rows; row++) {
            int xCoord = 0;
            for (int col = 0; col < cols; col++) {
                pieces.add(Bitmap.createBitmap(bitmap, xCoord, yCoord, pieceWidth, pieceHeight));
                xCoord += pieceWidth;
            }
            yCoord += pieceHeight;
        }

        return pieces;
    }
}
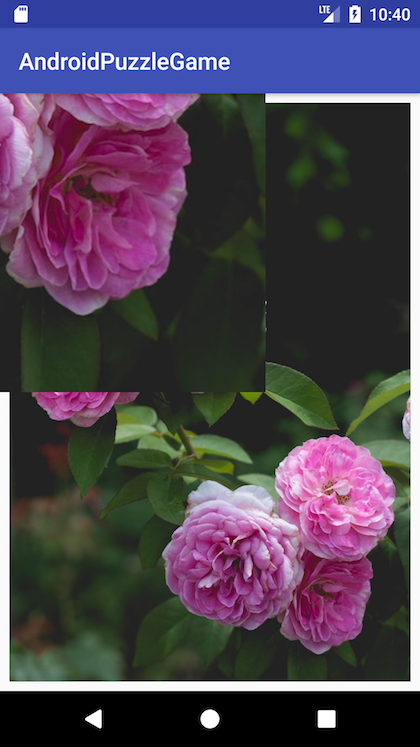
If run the app now you will notice that the image is divided into 12 pieces (you only see one because al the other pieces are behind it). But the piece you see is way larger than it should. That’s because the code above does not take into account the scaled down size of the image you see on the screen, but the actual, much larger, size of the original image. We need to add more code to make the pieces smaller.
The following method will calculate the scaled image dimensions and its position into the ImageView:
private int[] getBitmapPositionInsideImageView(ImageView imageView) {
    int[] ret = new int[4];

    if (imageView == null || imageView.getDrawable() == null)
        return ret;

    // Get image dimensions
    // Get image matrix values and place them in an array
    float[] f = new float[9];
    imageView.getImageMatrix().getValues(f);

    // Extract the scale values using the constants (if aspect ratio maintained, scaleX == scaleY)
    final float scaleX = f[Matrix.MSCALE_X];
    final float scaleY = f[Matrix.MSCALE_Y];

    // Get the drawable (could also get the bitmap behind the drawable and getWidth/getHeight)
    final Drawable d = imageView.getDrawable();
    final int origW = d.getIntrinsicWidth();
    final int origH = d.getIntrinsicHeight();

    // Calculate the actual dimensions
    final int actW = Math.round(origW * scaleX);
    final int actH = Math.round(origH * scaleY);

    ret[2] = actW;
    ret[3] = actH;

    // Get image position
    // We assume that the image is centered into ImageView
    int imgViewW = imageView.getWidth();
    int imgViewH = imageView.getHeight();

    int top = (int) (imgViewH - actH)/2;
    int left = (int) (imgViewW - actW)/2;

    ret[0] = left;
    ret[1] = top;

    return ret;
}
Now change the splitImage code to use the method we just added, to create a scaled image, then split it in pieces:
private ArrayList<Bitmap> splitImage() {
    int pecesNumber = 12;
    int rows = 4;
    int cols = 3;

    ImageView imageView = findViewById(R.id.imageView);
    ArrayList<Bitmap> pieces = new ArrayList<>(piecesNumber);

    // Get the scaled bitmap of the source image
    BitmapDrawable drawable = (BitmapDrawable) imageView.getDrawable();
    Bitmap bitmap = drawable.getBitmap();

    int[] dimensions = getBitmapPositionInsideImageView(imageView);
    int scaledBitmapLeft = dimensions[0];
    int scaledBitmapTop = dimensions[1];
    int scaledBitmapWidth = dimensions[2];
    int scaledBitmapHeight = dimensions[3];

    int croppedImageWidth = scaledBitmapWidth - 2 * abs(scaledBitmapLeft);
    int croppedImageHeight = scaledBitmapHeight - 2 * abs(scaledBitmapTop);

    Bitmap scaledBitmap = Bitmap.createScaledBitmap(bitmap, scaledBitmapWidth, scaledBitmapHeight, true);
    Bitmap croppedBitmap = Bitmap.createBitmap(scaledBitmap, abs(scaledBitmapLeft), abs(scaledBitmapTop), croppedImageWidth, croppedImageHeight);

    // Calculate the with and height of the pieces
    int pieceWidth = croppedImageWidth/cols;
    int pieceHeight = croppedImageHeight/rows;

    // Create each bitmap piece and add it to the resulting array
    int yCoord = 0;
    for (int row = 0; row < rows; x++) {
        int xCoord = 0;
        for (int col = 0; col < cols; y++) {
            pieces.add(Bitmap.createBitmap(croppedBitmap, xCoord, yCoord, pieceWidth, pieceHeight));
            xCoord += pieceWidth;
        }
        yCoord += pieceHeight;
    }

    return pieces;
}
Run the code again and see how the pieces are a lot smaller that before, matching the on screen image size:
Drag the Image Pieces Around
Now, that we have the pieces, let’s make them draggable around the screen with our finger. For this we will need to add a touch listener to all the image views that hold our pieces.
First, create a new TouchListener Java class to hold the touch listener:
public class TouchListener implements View.OnTouchListener {
    private float xDelta;
    private float yDelta;

    @Override
    public boolean onTouch(View view, MotionEvent motionEvent) {
        float x = motionEvent.getRawX();
        float y = motionEvent.getRawY();
        RelativeLayout.LayoutParams lParams = (RelativeLayout.LayoutParams) view.getLayoutParams();
        switch (motionEvent.getAction() & MotionEvent.ACTION_MASK) {
            case MotionEvent.ACTION_DOWN:
                xDelta = x - lParams.leftMargin;
                yDelta = y - lParams.topMargin;
                break;
            case MotionEvent.ACTION_MOVE:
                lParams.leftMargin = (int) (x - xDelta);
                lParams.topMargin = (int) (y - yDelta);
                view.setLayoutParams(lParams);
                break;
        }

        return true;
    }
}
Next, add it to the image views we create in the main activity:
// ...
public void run() {
    pieces = splitImage();
    TouchListener touchListener = new TouchListener();
    for(Bitmap piece : pieces) {
        ImageView iv = new ImageView(getApplicationContext());
        iv.setImageBitmap(piece);
        iv.setOnTouchListener(touchListener);
        layout.addView(iv);
    }
}
Finally, to be able to change the images position, we need to add a new relative layout into our main layout. Open the activity_main.xml layout and add it using the text editor:
<?xml version="1.0" encoding="utf-8"?>
<android.support.constraint.ConstraintLayout
    ...>

    <ImageView
        ... />

    <RelativeLayout
        android:id="@+id/layout"
        android:layout_width="match_parent"
        android:layout_height="match_parent"
        app:layout_constraintBottom_toBottomOf="parent"
        app:layout_constraintLeft_toLeftOf="parent"
        app:layout_constraintRight_toRightOf="parent"
        app:layout_constraintTop_toTopOf="parent">
    </RelativeLayout>
</android.support.constraint.ConstraintLayout>
Notice that we had to move the layout ID from the main container layout to the new relative one. We also need change the type of the layout to RelativeLayout, in the main activity:
final RelativeLayout layout = findViewById(R.id.layout);
That’s it. Run the app again and try to drag the pieces around. It should work without any issues.
Make the Pieces Snap into Place
Now that we can move the pieces around, let’s make them snap into place when they are close enough to their original position.
We’ll first create a new PuzzlePiece class, to hold our pieces and related information, like the original position and dimensions:
public class PuzzlePiece extends android.support.v7.widget.AppCompatImageView {
    public int xCoord;
    public int yCoord;
    public int pieceWidth;
    public int pieceHeight;
    public boolean canMove = true;

    public PuzzlePiece(Context context) {
        super(context);
    }
}
Now, change the code in the MainActivity to use this new class and to set each piece object the original x and y coordinates and dimensions:
public class MainActivity extends AppCompatActivity {
    ArrayList<PuzzlePiece> pieces;

    @Override
    protected void onCreate(Bundle savedInstanceState) {
        // ...

        imageView.post(new Runnable() {
            @Override
            public void run() {
                pieces = splitImage();
                TouchListener touchListener = new TouchListener();
                for(PuzzlePiece piece : pieces) {
                    piece.setOnTouchListener(touchListener);
                    layout.addView(piece);
                }
            }
        });
    }

    private ArrayList<PuzzlePiece> splitImage() {
        // ...
        ArrayList<PuzzlePiece> pieces = new ArrayList<>(piecesNumber);

        // ...

        // Create each bitmap piece and add it to the resulting array
        int yCoord = 0;
        for (int row = 0; row < rows; row++) {
            int xCoord = 0;
            for (int col = 0; col < cols; col++) {
                Bitmap pieceBitmap = Bitmap.createBitmap(croppedBitmap, xCoord, yCoord, pieceWidth, pieceHeight);
                PuzzlePiece piece = new PuzzlePiece(getApplicationContext());
                piece.setImageBitmap(pieceBitmap);
                piece.xCoord = xCoord;
                piece.yCoord = yCoord;
                piece.pieceWidth = pieceWidth;
                piece.pieceHeight = pieceHeight;
                pieces.add(piece);
                xCoord += pieceWidth;
            }
            yCoord += pieceHeight;
        }

        return pieces;
    }

    // ...

}
All we have to do now is to change the touch listener to snap the piece into place, if it is close enough, and to disable the drag by setting the canMove property to false.
public class TouchListener implements View.OnTouchListener {
    private float xDelta;
    private float yDelta;

    @Override
    public boolean onTouch(View view, MotionEvent motionEvent) {
        float x = motionEvent.getRawX();
        float y = motionEvent.getRawY();
        final double tolerance = sqrt(pow(view.getWidth(), 2) + pow(view.getHeight(), 2)) / 10;

        PuzzlePiece piece = (PuzzlePiece) view;
        if (!piece.canMove) {
            return true;
        }

        RelativeLayout.LayoutParams lParams = (RelativeLayout.LayoutParams) view.getLayoutParams();
        switch (motionEvent.getAction() & MotionEvent.ACTION_MASK) {
            case MotionEvent.ACTION_DOWN:
                xDelta = x - lParams.leftMargin;
                yDelta = y - lParams.topMargin;
                piece.bringToFront();
                break;
            case MotionEvent.ACTION_MOVE:
                lParams.leftMargin = (int) (x - xDelta);
                lParams.topMargin = (int) (y - yDelta);
                view.setLayoutParams(lParams);
                break;
            case MotionEvent.ACTION_UP:
                int xDiff = abs(piece.xCoord - lParams.leftMargin);
                int yDiff = abs(piece.yCoord - lParams.topMargin);
                if (xDiff <= tolerance && yDiff <= tolerance) {
                    lParams.leftMargin = piece.xCoord;
                    lParams.topMargin = piece.yCoord;
                    piece.setLayoutParams(lParams);
                    piece.canMove = false;
                    sendViewToBack(piece);
                }
                break;
        }

        return true;
    }

    public void sendViewToBack(final View child) {
        final ViewGroup parent = (ViewGroup)child.getParent();
        if (null != parent) {
            parent.removeView(child);
            parent.addView(child, 0);
        }
    }
}
Here we first calculated a tolerance of 10% of the diagonal size of the piece. If the piece is closer than this to the original position, it will snap into place and its canMove property will be set to false. This way, the next time the user tries to move it, it won’t work anymore.
We also made the piece came to the front of the others when touched, in case it is partially obscured by other pieces, and be sent to the back of the stack when it snaps into place, so it does not cover any other piece that can be moved.
Try to run the app and put the pieces in their original position. It will help if we make the original image a little faded: open the activity_main.xml layout and add this to the ImageView:
android:alpha="0.5"
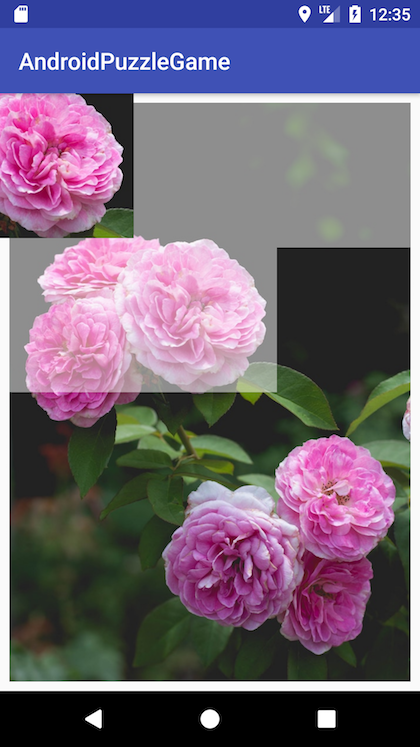
You will notice something strange, the pieces will not snap in place in their original position, but a little off to the left and to the top:
That’s because when we check the original position of the piece, we check the x and y coordinates relatively to the layout the pieces are in, not to the original image from the ImageView. And because the image has some margins that difference is not taken into account. Let’s fix this by adding the ImageView’s left and right margin to the x and y coordinates for each piece when you define it, in the MainActivity.java file:
piece.xCoord = xCoord + imageView.getLeft();
piece.yCoord = yCoord + imageView.getTop();
Try the app again. Now everything should fit in nicely.
Cut the Puzzle Pieces
We almost have a puzzle game here, but our pieces do not look anything like a jigsaw puzzle piece. In the next part we will make them look like regular puzzle pieces that everybody loves.
First we will need to make our pieces bigger, because, if you take two puzzle pieces and imagine a rectangle around each them, you will see that the rectangles actually overlap. We will make this overlap to be one third of the piece width or height. This part will be cut off to give the piece the specific puzzle form. The pieces will have to grow by one third on the left and/or top side, except when they are on left/right outer side of the image.
// Create each bitmap piece and add it to the resulting array
int yCoord = 0;
for (int row = 0; row < rows; row++) {
    int xCoord = 0;
    for (int col = 0; col < cols; col++) {
        // calculate offset for each piece
        int offsetX = 0;
        int offsetY = 0;
        if (col > 0) {
            offsetX = pieceWidth / 3;
        }
        if (row > 0) {
            offsetY = pieceHeight / 3;
        }

        // apply the offset to each piece
        Bitmap pieceBitmap = Bitmap.createBitmap(croppedBitmap, xCoord - offsetX, yCoord - offsetY, pieceWidth + offsetX, pieceHeight + offsetY);
        PuzzlePiece piece = new PuzzlePiece(getApplicationContext());
        piece.setImageBitmap(pieceBitmap);
        piece.xCoord = xCoord - offsetX + imageView.getLeft();
        piece.yCoord = yCoord - offsetY + imageView.getTop();
        piece.pieceWidth = pieceWidth + offsetX;
        piece.pieceHeight = pieceHeight + offsetY;
        pieces.add(piece);
        xCoord += pieceWidth;
    }
    yCoord += pieceHeight;
}
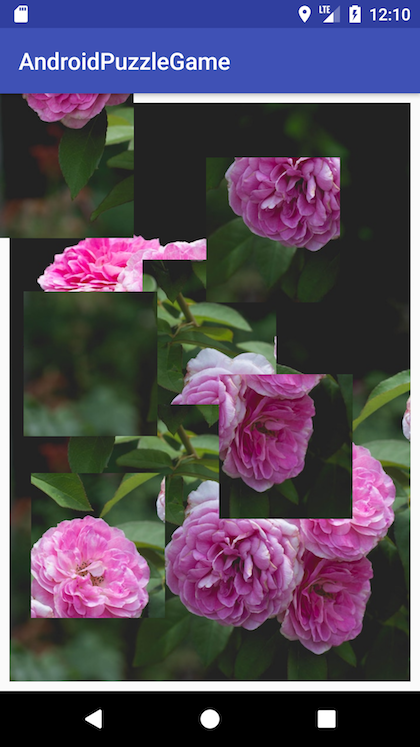
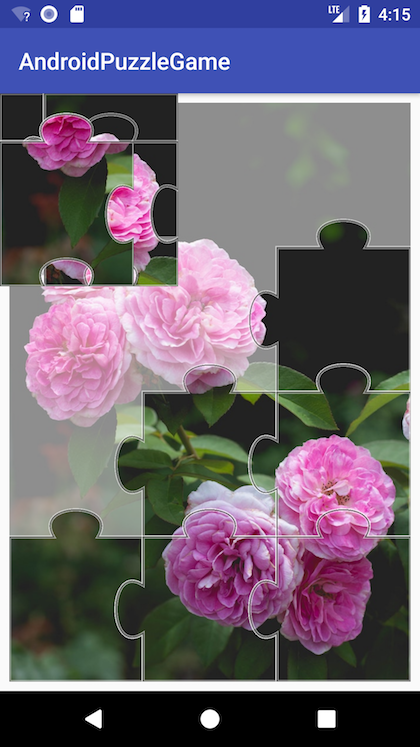
Run the app again and notice how pieces overlap each other on the left and/or top inner sides.
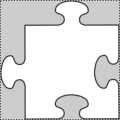
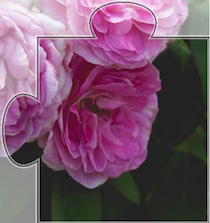
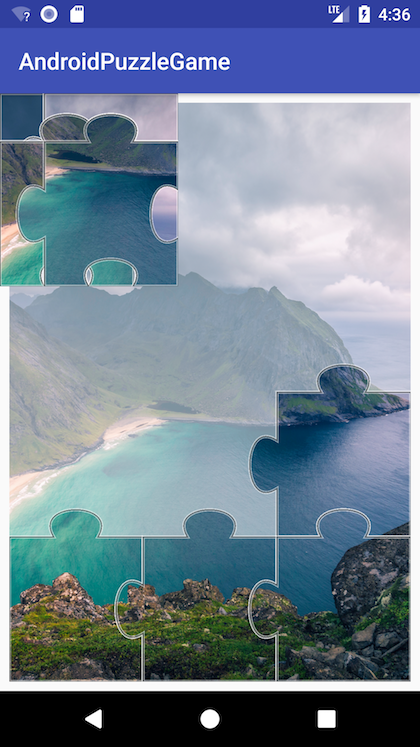
Now it’s time to give them the puzzle-like form. We will need to draw a path using code then mask the piece to end up with this:
// ...
piece.xCoord = xCoord - offsetX + imageView.getLeft();
piece.yCoord = yCoord - offsetY + imageView.getTop();
piece.pieceWidth = pieceWidth + offsetX;
piece.pieceHeight = pieceHeight + offsetY;

// this bitmap will hold our final puzzle piece image
Bitmap puzzlePiece = Bitmap.createBitmap(pieceWidth + offsetX, pieceHeight + offsetY, Bitmap.Config.ARGB_8888);

// draw path
int bumpSize = pieceHeight / 4;
Canvas canvas = new Canvas(puzzlePiece);
Path path = new Path();
path.moveTo(offsetX, offsetY);
if (row == 0) {
    // top side piece
    path.lineTo(pieceBitmap.getWidth(), offsetY);
} else {
    // top bump
    path.lineTo(offsetX + (pieceBitmap.getWidth() - offsetX) / 3, offsetY);
    path.cubicTo(offsetX + (pieceBitmap.getWidth() - offsetX) / 6, offsetY - bumpSize, offsetX + (pieceBitmap.getWidth() - offsetX) / 6 * 5, offsetY - bumpSize, offsetX + (pieceBitmap.getWidth() - offsetX) / 3 * 2, offsetY);
    path.lineTo(pieceBitmap.getWidth(), offsetY);
}

if (col == cols - 1) {
    // right side piece
    path.lineTo(pieceBitmap.getWidth(), pieceBitmap.getHeight());
} else {
    // right bump
    path.lineTo(pieceBitmap.getWidth(), offsetY + (pieceBitmap.getHeight() - offsetY) / 3);
    path.cubicTo(pieceBitmap.getWidth() - bumpSize,offsetY + (pieceBitmap.getHeight() - offsetY) / 6, pieceBitmap.getWidth() - bumpSize, offsetY + (pieceBitmap.getHeight() - offsetY) / 6 * 5, pieceBitmap.getWidth(), offsetY + (pieceBitmap.getHeight() - offsetY) / 3 * 2);
    path.lineTo(pieceBitmap.getWidth(), pieceBitmap.getHeight());
}

if (row == rows - 1) {
    // bottom side piece
    path.lineTo(offsetX, pieceBitmap.getHeight());
} else {
    // bottom bump
    path.lineTo(offsetX + (pieceBitmap.getWidth() - offsetX) / 3 * 2, pieceBitmap.getHeight());
    path.cubicTo(offsetX + (pieceBitmap.getWidth() - offsetX) / 6 * 5,pieceBitmap.getHeight() - bumpSize, offsetX + (pieceBitmap.getWidth() - offsetX) / 6, pieceBitmap.getHeight() - bumpSize, offsetX + (pieceBitmap.getWidth() - offsetX) / 3, pieceBitmap.getHeight());
    path.lineTo(offsetX, pieceBitmap.getHeight());
}

if (col == 0) {
    // left side piece
    path.close();
} else {
    // left bump
    path.lineTo(offsetX, offsetY + (pieceBitmap.getHeight() - offsetY) / 3 * 2);
    path.cubicTo(offsetX - bumpSize, offsetY + (pieceBitmap.getHeight() - offsetY) / 6 * 5, offsetX - bumpSize, offsetY + (pieceBitmap.getHeight() - offsetY) / 6, offsetX, offsetY + (pieceBitmap.getHeight() - offsetY) / 3);
    path.close();
}
Now we mask the piece with the resulting path:
// mask the piece
Paint paint = new Paint();
paint.setColor(0XFF000000);
paint.setStyle(Paint.Style.FILL);

canvas.drawPath(path, paint);
paint.setXfermode(new PorterDuffXfermode(PorterDuff.Mode.SRC_IN));
canvas.drawBitmap(pieceBitmap, 0, 0, paint);
Finally, we draw some borders around the puzzle piece to make it look better and set the resulting bitmap to the piece object:
// draw a white border
Paint border = new Paint();
border.setColor(0X80FFFFFF);
border.setStyle(Paint.Style.STROKE);
border.setStrokeWidth(8.0f);
canvas.drawPath(path, border);

// draw a black border
border = new Paint();
border.setColor(0X80000000);
border.setStyle(Paint.Style.STROKE);
border.setStrokeWidth(3.0f);
canvas.drawPath(path, border);

// set the resulting bitmap to the piece
piece.setImageBitmap(puzzlePiece);

pieces.add(piece);
xCoord += pieceWidth;
Run the app now and… enjoy your little puzzle game!
Adding More Images
We did it! We can now generate puzzle pieces from any image we want. Let’s now add more images to our app so the users have more options to play with this.
First, we have to move everything from the MainActivity into a new PuzzleActivity to make room for the list of images.
From the File menu, choose New -> Activity -> Empty Activity and give it the PuzzleActivity name. Then move all the code we added in the MainActivity to this one. The MainActivity should only have left the onCreate method:
@Override
protected void onCreate(Bundle savedInstanceState) {
    super.onCreate(savedInstanceState);
    setContentView(R.layout.activity_main);
}
Also cut and paste the ImageView and the RelativeLayout from the activity_main.xml layout file to the new activity_puzzle.xml one.
Now download more images from https://unsplash.com/ or any other source. When you’re done, back in Android Studio, select the File menu then New -> Folder -> Assets Folder. Leave the default options and click Finish. From the left panel, select the new Assets folder then right click on it and create a new Directory named img. Here copy and paste all your downloaded images. These files will be included in the app and we will use them in the code to allow the users choose them and make puzzle pieces.
Open the activity_main.xml and add a GridView to it:
<GridView
    android:id="@+id/grid"
    android:layout_width="0dp"
    android:layout_height="0dp"
    android:layout_marginBottom="8dp"
    android:layout_marginEnd="8dp"
    android:layout_marginStart="8dp"
    android:layout_marginTop="8dp"
    android:horizontalSpacing="10dp"
    android:numColumns="3"
    android:paddingHorizontal="10dp"
    android:paddingVertical="10dp"
    android:verticalSpacing="10dp"
    app:layout_constraintBottom_toBottomOf="parent"
    app:layout_constraintEnd_toEndOf="parent"
    app:layout_constraintStart_toStartOf="parent"
    app:layout_constraintTop_toTopOf="parent" />
This will list our images. In the MainActivity class, add the following code to make it work:
// ...
protected void onCreate(Bundle savedInstanceState) {
    super.onCreate(savedInstanceState);
    setContentView(R.layout.activity_main);

    AssetManager am = getAssets();
    try {
        final String[] files  = am.list("img");

        GridView grid = findViewById(R.id.grid);
        grid.setAdapter(new ImageAdapter(this));
    } catch (IOException e) {
        Toast.makeText(this, e.getLocalizedMessage(), Toast.LENGTH_SHORT);
    }
}
The GridView we set up above uses an ImageAdapter we still have to define. Create a new java class named ImageAdapter and add the following:
public class ImageAdapter extends BaseAdapter {
    private Context mContext;
    private AssetManager am;
    private String[] files;

    public ImageAdapter(Context c) {
        mContext = c;
        am = mContext.getAssets();
        try {
            files  = am.list("img");
        } catch (IOException e) {
            e.printStackTrace();
        }
    }

    public int getCount() {
        return files.length;
    }

    public Object getItem(int position) {
        return null;
    }

    public long getItemId(int position) {
        return 0;
    }

    // create a new ImageView for each item referenced by the Adapter
    public View getView(final int position, View convertView, ViewGroup parent) {
        if (convertView == null) {
            final LayoutInflater layoutInflater = LayoutInflater.from(mContext);
            convertView = layoutInflater.inflate(R.layout.grid_element, null);
        }

        final ImageView imageView = convertView.findViewById(R.id.gridImageview);
        imageView.setImageBitmap(null);
        // run image related code after the view was laid out
        imageView.post(new Runnable() {
            @Override
            public void run() {
                new AsyncTask<Void, Void, Void>() {
                    private Bitmap bitmap;
                    @Override
                    protected Void doInBackground(Void... voids) {
                        bitmap = getPicFromAsset(imageView, files[position]);
                        return null;
                    }

                    @Override
                    protected void onPostExecute(Void aVoid) {
                        super.onPostExecute(aVoid);
                        imageView.setImageBitmap(bitmap);
                    }
                }.execute();
            }
        });

        return convertView;
    }

    private Bitmap getPicFromAsset(ImageView imageView, String assetName) {
        // Get the dimensions of the View
        int targetW = imageView.getWidth();
        int targetH = imageView.getHeight();

        if(targetW == 0 || targetH == 0) {
            // view has no dimensions set
            return null;
        }

        try {
            InputStream is = am.open("img/" + assetName);
            // Get the dimensions of the bitmap
            BitmapFactory.Options bmOptions = new BitmapFactory.Options();
            bmOptions.inJustDecodeBounds = true;
            BitmapFactory.decodeStream(is, new Rect(-1, -1, -1, -1), bmOptions);
            int photoW = bmOptions.outWidth;
            int photoH = bmOptions.outHeight;

            // Determine how much to scale down the image
            int scaleFactor = Math.min(photoW/targetW, photoH/targetH);

            is.reset();

            // Decode the image file into a Bitmap sized to fill the View
            bmOptions.inJustDecodeBounds = false;
            bmOptions.inSampleSize = scaleFactor;
            bmOptions.inPurgeable = true;

            return BitmapFactory.decodeStream(is, new Rect(-1, -1, -1, -1), bmOptions);
        } catch (IOException e) {
            e.printStackTrace();

            return null;
        }
    }
}
This will load each image from the assets when needed and setup a grid_element layout to be used by the GridView for each cell.
We still have to create the new grid_element layout, so let’s get to it. Create a new layout resource file named grid_element.xml, with this content:
<android.support.constraint.ConstraintLayout xmlns:android="http://schemas.android.com/apk/res/android"
    xmlns:app="http://schemas.android.com/apk/res-auto"
    android:orientation="vertical" android:layout_width="match_parent"
    android:layout_height="match_parent"
    android:gravity="center"
    android:padding="2dp"
    android:background="@color/colorPrimary"
    >

    <ImageView
        android:id="@+id/gridImageview"
        android:layout_width="0dp"
        android:layout_height="0dp"
        android:scaleType="centerCrop"
        app:layout_constraintDimensionRatio="H,4:5"
        app:layout_constraintTop_toTopOf="parent"
        app:layout_constraintStart_toStartOf="parent"
        app:layout_constraintEnd_toEndOf="parent"
        />
</android.support.constraint.ConstraintLayout>
This should be it. Run the app and check that the images you added are listed on the main screen:
Ok, now we have to open the PuzzleActivity with the new image, when the user clicks on one of the grid elements. To do this, first add a item click listener to the grid view after you load it in the onCreate method:
grid.setOnItemClickListener(new AdapterView.OnItemClickListener() {
    @Override
    public void onItemClick(AdapterView<?> adapterView, View view, int i, long l) {
        Intent intent = new Intent(getApplicationContext(), PuzzleActivity.class);
        intent.putExtra("assetName", files[i % files.length]);
        startActivity(intent);
    }
});
This will create an Intent to open the PuzzleActivity activity and send the asset’s name as an intent extra.
Next, open the PuzzleActivity and add the code to load the corresponding asset instead of the image we loaded in the first part of this tutorial. First, get the asset name from the intent, then, using a new setPicFromAsset method, load it in the ImageView and split it into pieces:
protected void onCreate(Bundle savedInstanceState) {
    super.onCreate(savedInstanceState);
    setContentView(R.layout.activity_puzzle);

    final RelativeLayout layout = findViewById(R.id.layout);
    final ImageView imageView = findViewById(R.id.imageView);

    Intent intent = getIntent();
    final String assetName = intent.getStringExtra("assetName");

    // run image related code after the view was laid out
    // to have all dimensions calculated
    imageView.post(new Runnable() {
        @Override
        public void run() {
            if (assetName != null) {
                setPicFromAsset(assetName, imageView);
            }
            pieces = splitImage();
            TouchListener touchListener = new TouchListener();
            for(PuzzlePiece piece : pieces) {
                piece.setOnTouchListener(touchListener);
                layout.addView(piece);
            }
        }
    });
}

private void setPicFromAsset(String assetName, ImageView imageView) {
    // Get the dimensions of the View
    int targetW = imageView.getWidth();
    int targetH = imageView.getHeight();

    AssetManager am = getAssets();
    try {
        InputStream is = am.open("img/" + assetName);
        // Get the dimensions of the bitmap
        BitmapFactory.Options bmOptions = new BitmapFactory.Options();
        bmOptions.inJustDecodeBounds = true;
        BitmapFactory.decodeStream(is, new Rect(-1, -1, -1, -1), bmOptions);
        int photoW = bmOptions.outWidth;
        int photoH = bmOptions.outHeight;

        // Determine how much to scale down the image
        int scaleFactor = Math.min(photoW/targetW, photoH/targetH);

        is.reset();

        // Decode the image file into a Bitmap sized to fill the View
        bmOptions.inJustDecodeBounds = false;
        bmOptions.inSampleSize = scaleFactor;
        bmOptions.inPurgeable = true;

        Bitmap bitmap = BitmapFactory.decodeStream(is, new Rect(-1, -1, -1, -1), bmOptions);
        imageView.setImageBitmap(bitmap);
    } catch (IOException e) {
        e.printStackTrace();
        Toast.makeText(this, e.getLocalizedMessage(), Toast.LENGTH_SHORT).show();
    }
}
Run the app now, select any image and see how it is transformed into puzzle pieces for you to match. There is still work to do though.
Shuffle the Pieces and Check for End Game
Right now, all the puzzle pieces are stacked one over the other, in the right order for you to take them and put in the right place. Let’s make the game harder by shuffling their position and order:
public void run() {
    if (assetName != null) {
        setPicFromAsset(assetName, imageView);
    }
    pieces = splitImage();
    TouchListener touchListener = new TouchListener();
    // shuffle pieces order
    Collections.shuffle(pieces);
    for(PuzzlePiece piece : pieces) {
        piece.setOnTouchListener(touchListener);
        layout.addView(piece);
        // randomize position, on the bottom of the screen
        RelativeLayout.LayoutParams lParams = (RelativeLayout.LayoutParams) piece.getLayoutParams();
        lParams.leftMargin = new Random().nextInt(layout.getWidth() - piece.pieceWidth);
        lParams.topMargin = layout.getHeight() - piece.pieceHeight;
        piece.setLayoutParams(lParams);
    }
}
If you complete the puzzle, nothing happens. You have to manually press the back button to return to the list and choose another image. It will be better to make the app detect that the puzzle is completed and return you to the main screen. Checking that the game is over is as simple as checking that each piece is not movable anymore:
public void checkGameOver() {
    if (isGameOver()) {
        finish();
    }
}

private boolean isGameOver() {
    for (PuzzlePiece piece : pieces) {
        if (piece.canMove) {
            return false;
        }
    }

    return true;
}
We will need to call the checkGameOver method from the touch listener, after the user makes a move. This means we need to have access to the activity, so we need, first, to add a constructor, then call the activity’s checkGameOver method:
public class TouchListener implements View.OnTouchListener {
    // ...
    private PuzzleActivity activity;

    public TouchListener(PuzzleActivity activity) {
        this.activity = activity;
    }

    @Override
    public boolean onTouch(View view, MotionEvent motionEvent) {
        // ...

        switch (motionEvent.getAction() & MotionEvent.ACTION_MASK) {
            // ...
            case MotionEvent.ACTION_UP:
                int xDiff = abs(piece.xCoord - lParams.leftMargin);
                int yDiff = abs(piece.yCoord - lParams.topMargin);
                if (xDiff <= tolerance && yDiff <= tolerance) {
                    lParams.leftMargin = piece.xCoord;
                    lParams.topMargin = piece.yCoord;
                    piece.setLayoutParams(lParams);
                    piece.canMove = false;
                    sendViewToBack(piece);
                    activity.checkGameOver();
                }
                break;
        }

        return true;
    }

    // ...
}
For this to work, you need to send the activity instance when defining the touchListener, in the PuzzleActivity class:
TouchListener touchListener = new TouchListener(PuzzleActivity.this);
Run the app now and check that everything works. When you finish a puzzle, you will be returned to the main screen to start a new one.
Getting Images from the Camera
Wouldn’t it be cool to be able to take photos with your camera and transform them into puzzles? Let’s do this next.
First we need our app to be able to write files on the user’s device. This means we need to edit the AndroidManifest.xml file to declare this:
<?xml version="1.0" encoding="utf-8"?>
<manifest ...>

    <uses-permission android:name="android.permission.WRITE_EXTERNAL_STORAGE" />

    <application
        ...>
        <provider
            android:name="android.support.v4.content.FileProvider"
            android:authorities="${applicationId}.fileprovider"
            android:exported="false"
            android:grantUriPermissions="true">
            <meta-data
                android:name="android.support.FILE_PROVIDER_PATHS"
                android:resource="@xml/file_paths"></meta-data>
        </provider>
    </application>

</manifest>
We also need to define a file provider so we can send files between activities. This provider needs a new resource xml file named file_paths.xml, where we will define the path to our files (create a new resource directory named xml for it):
<?xml version="1.0" encoding="utf-8"?>
<paths xmlns:android="http://schemas.android.com/apk/res/android">
    <external-path name="my_images" path="." />
</paths>
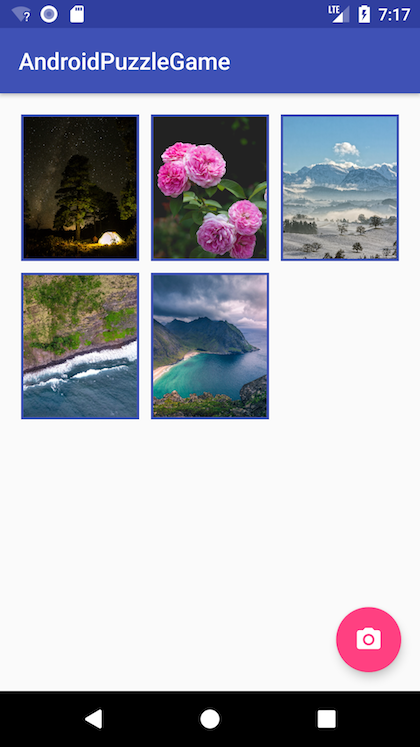
Now, open the activity_main.xml layout file and add a FloatingActionButton with a camera icon:
<android.support.design.widget.FloatingActionButton
    android:id="@+id/cameraButton"
    android:layout_width="wrap_content"
    android:layout_height="wrap_content"
    android:layout_marginBottom="16dp"
    android:layout_marginEnd="16dp"
    android:layout_marginRight="16dp"
    android:clickable="true"
    android:onClick="onImageFromCameraClick"
    android:src="@drawable/ic_photo_camera_black_24dp"
    android:tint="@android:color/white"
    app:layout_constraintBottom_toBottomOf="parent"
    app:layout_constraintEnd_toEndOf="parent" />
This button uses the ic_photo_camera_black_24dp drawable resource, for the camera icon, that we have to add to our project. From the File menu select New -> Vector Asset, then click on the “android” icon and search for the “photo camera”. Select the icon, then click on Next and then Finish. You should now have a new ic_photo_camera_black_24dp.xml file in the res/drawable folder.
In the main activity, define the method called by the camera button and the method to create the file to save the image to. Notice that we also need to check and request the WRITE_EXTERNAL_STORAGE permission, if not granted:
String mCurrentPhotoPath;
private static final int REQUEST_PERMISSION_WRITE_EXTERNAL_STORAGE = 2;
private static final int REQUEST_IMAGE_CAPTURE = 1;
public void onImageFromCameraClick(View view) {
    Intent intent = new Intent(MediaStore.ACTION_IMAGE_CAPTURE);
    if (intent.resolveActivity(getPackageManager()) != null) {
        File photoFile = null;
        try {
            photoFile = createImageFile();
        } catch (IOException e) {
            Toast.makeText(this, e.getMessage(), Toast.LENGTH_LONG);
        }

        if (photoFile != null) {
            Uri photoUri = FileProvider.getUriForFile(this, getApplicationContext().getPackageName() + ".fileprovider", photoFile);
            intent.putExtra(MediaStore.EXTRA_OUTPUT, photoUri);
            startActivityForResult(intent, REQUEST_IMAGE_CAPTURE);
        }
    }
}

private File createImageFile() throws IOException {
    if (ContextCompat.checkSelfPermission(this, Manifest.permission.WRITE_EXTERNAL_STORAGE) != PackageManager.PERMISSION_GRANTED) {
        // permission not granted, initiate request
        ActivityCompat.requestPermissions(this, new String[]{Manifest.permission.WRITE_EXTERNAL_STORAGE}, REQUEST_PERMISSION_WRITE_EXTERNAL_STORAGE);
    } else {
        // Create an image file name
        String timeStamp = new SimpleDateFormat("yyyyMMdd_HHmmss").format(new Date());
        String imageFileName = "JPEG_" + timeStamp + "_";
        File storageDir = Environment.getExternalStoragePublicDirectory(Environment.DIRECTORY_PICTURES);
        File image = File.createTempFile(
                imageFileName,  /* prefix */
                ".jpg",         /* suffix */
                storageDir      /* directory */
        );
        mCurrentPhotoPath = image.getAbsolutePath(); // save this to use in the intent

        return image;
    }

    return null;
}

@Override
public void onRequestPermissionsResult(int requestCode, @NonNull String[] permissions, @NonNull int[] grantResults) {
    switch (requestCode) {
        case REQUEST_PERMISSION_WRITE_EXTERNAL_STORAGE: {
            if (grantResults.length > 0 && grantResults[0] == PackageManager.PERMISSION_GRANTED) {
                onImageFromCameraClick(new View(this));
            }

            return;
        }
    }
}
Now, that we can capture the image from the camera, we need to receive it and send it to the PuzzleActivity using an intent extra:
@Override
protected void onActivityResult(int requestCode, int resultCode, Intent data) {
    if (requestCode == REQUEST_IMAGE_CAPTURE && resultCode == RESULT_OK) {
        Intent intent = new Intent(this, PuzzleActivity.class);
        intent.putExtra("mCurrentPhotoPath", mCurrentPhotoPath);
        startActivity(intent);
    }
}
The last thing to to is to change the PuzzleActivity to check for and use the received image in the intent:
String mCurrentPhotoPath;

@Override
protected void onCreate(Bundle savedInstanceState) {
    // ...

    Intent intent = getIntent();
    final String assetName = intent.getStringExtra("assetName");
    mCurrentPhotoPath = intent.getStringExtra("mCurrentPhotoPath");

    // run image related code after the view was laid out
    // to have all dimensions calculated
    imageView.post(new Runnable() {
        @Override
        public void run() {
            if (assetName != null) {
                setPicFromAsset(assetName, imageView);
            } else if (mCurrentPhotoPath != null) {
                setPicFromPath(mCurrentPhotoPath, imageView);
            }

            // ...
We now need to add the new setPicFromPath method:
private void setPicFromPath(String mCurrentPhotoPath, ImageView imageView) {
    // Get the dimensions of the View
    int targetW = imageView.getWidth();
    int targetH = imageView.getHeight();

    // Get the dimensions of the bitmap
    BitmapFactory.Options bmOptions = new BitmapFactory.Options();
    bmOptions.inJustDecodeBounds = true;
    BitmapFactory.decodeFile(mCurrentPhotoPath, bmOptions);
    int photoW = bmOptions.outWidth;
    int photoH = bmOptions.outHeight;

    // Determine how much to scale down the image
    int scaleFactor = Math.min(photoW/targetW, photoH/targetH);

    // Decode the image file into a Bitmap sized to fill the View
    bmOptions.inJustDecodeBounds = false;
    bmOptions.inSampleSize = scaleFactor;
    bmOptions.inPurgeable = true;

    Bitmap bitmap = BitmapFactory.decodeFile(mCurrentPhotoPath, bmOptions);
    Bitmap rotatedBitmap = bitmap;

    // rotate bitmap if needed
    try {
        ExifInterface ei = new ExifInterface(mCurrentPhotoPath);
        int orientation = ei.getAttributeInt(ExifInterface.TAG_ORIENTATION, ExifInterface.ORIENTATION_UNDEFINED);
        switch (orientation) {
            case ExifInterface.ORIENTATION_ROTATE_90:
                rotatedBitmap = rotateImage(bitmap, 90);
                break;
            case ExifInterface.ORIENTATION_ROTATE_180:
                rotatedBitmap = rotateImage(bitmap, 180);
                break;
            case ExifInterface.ORIENTATION_ROTATE_270:
                rotatedBitmap = rotateImage(bitmap, 270);
                break;
        }
    } catch (IOException e) {
        Toast.makeText(this, e.getLocalizedMessage(), Toast.LENGTH_SHORT).show();
    }

    imageView.setImageBitmap(rotatedBitmap);
}

public static Bitmap rotateImage(Bitmap source, float angle) {
    Matrix matrix = new Matrix();
    matrix.postRotate(angle);
    return Bitmap.createBitmap(source, 0, 0, source.getWidth(), source.getHeight(),
            matrix, true);
}
That’s it! Run the app now and you will be able to take pictures with the phone’s camera that will be transformed into puzzles.
If you get an error at this point, java.lang.ClassNotFoundException: Didn't find class "android.support.design.widget.FloatingActionButton", you need to edit the app/build.gradle file and add:
dependencies {
    ...
    implementation 'com.android.support:design:26.1.0'
}
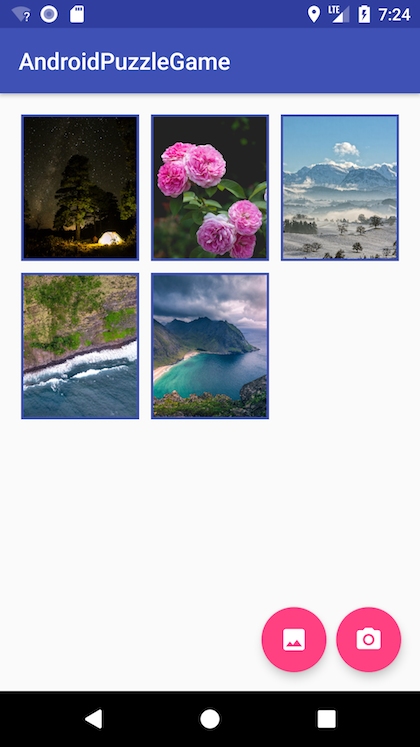
Getting Images from the Gallery
The last “piece” of our puzzle game is to allow the user to choose images from the phone’s gallery. Let’s first add a new FloatingActionButton with a image icon:
<android.support.design.widget.FloatingActionButton
    android:id="@+id/galleryButton"
    android:layout_width="wrap_content"
    android:layout_height="wrap_content"
    android:layout_marginBottom="16dp"
    android:layout_marginEnd="8dp"
    android:layout_marginRight="8dp"
    android:clickable="true"
    android:onClick="onImageFromGalleryClick"
    android:src="@drawable/ic_image_black_24dp"
    android:tint="@android:color/white"
    app:layout_constraintBottom_toBottomOf="parent"
    app:layout_constraintEnd_toStartOf="@id/cameraButton" />
Add the ic_image_black_24dp drawable resource like we did before with the camera icon. This time search for the “image” icon.
Now, let’s add the onImageFromGalleryClick that is called when the button is clicked, in the MainActivity class:
static final int REQUEST_PERMISSION_READ_EXTERNAL_STORAGE = 3;
static final int REQUEST_IMAGE_GALLERY = 4;

public void onImageFromGalleryClick(View view) {
    if (ContextCompat.checkSelfPermission(this, Manifest.permission.READ_EXTERNAL_STORAGE) != PackageManager.PERMISSION_GRANTED) {
        ActivityCompat.requestPermissions(this, new String[] {Manifest.permission.READ_EXTERNAL_STORAGE}, REQUEST_PERMISSION_READ_EXTERNAL_STORAGE);
    } else {
        Intent intent = new Intent(Intent.ACTION_GET_CONTENT);
        intent.setType("image/*");
        startActivityForResult(intent, REQUEST_IMAGE_GALLERY);
    }
}
Now we need to be ready to receive the image the user selected:
@Override
protected void onActivityResult(int requestCode, int resultCode, Intent data) {
    // ...

    if (requestCode == REQUEST_IMAGE_GALLERY && resultCode == RESULT_OK) {
        Uri uri = data.getData();

        Intent intent = new Intent(this, PuzzleActivity.class);
        intent.putExtra("mCurrentPhotoUri", uri.toString());
        startActivity(intent);
    }
}
Finally, in the PuzzleActivity class, we need to be able to load the image using the Uri send by the main activity:
String mCurrentPhotoUri;

@Override
protected void onCreate(Bundle savedInstanceState) {
    // ...
    mCurrentPhotoUri = intent.getStringExtra("mCurrentPhotoUri");

    // run image related code after the view was laid out
    // to have all dimensions calculated
    imageView.post(new Runnable() {
        @Override
        public void run() {
            if (assetName != null) {
                setPicFromAsset(assetName, imageView);
            } else if (mCurrentPhotoPath != null) {
                setPicFromPath(mCurrentPhotoPath, imageView);
            } else if (mCurrentPhotoUri != null) {
                imageView.setImageURI(Uri.parse(mCurrentPhotoUri));
            }
            pieces = splitImage();
            // ...
That’s it! Run the app now and try selecting images from your phone’s gallery.
Final Touches
Our puzzle game is ready. You can choose one of the existing images or import new ones from the camera or from the device gallery. But we can still add some improvements.
In the PuzzleActivity, the image takes over all the available space. It will be nicer to leave some space at the bottom, where we put the puzzle pieces at the start of the game. Let’s add a aspect ratio constraint of 4:5 to the images to accomplish this:
<ImageView
    android:id="@+id/imageView"
    android:layout_width="0dp"
    android:layout_height="0dp"
    android:layout_marginEnd="8dp"
    android:layout_marginStart="8dp"
    android:layout_marginTop="8dp"
    android:scaleType="centerCrop"
    app:layout_constraintDimensionRatio="H,4:5"
    app:layout_constraintEnd_toEndOf="parent"
    app:layout_constraintLeft_toLeftOf="parent"
    app:layout_constraintRight_toRightOf="parent"
    app:layout_constraintStart_toStartOf="parent"
    app:layout_constraintTop_toTopOf="parent"
    app:srcCompat="@drawable/photo"
    android:alpha="0.5" />
Notice that we had to remove the bottom margin and the bottom constraint that were conflicting with this new requirement.
Next, let’s add a nice background to our app. Download the background image from here and add it to a new res/drawable-xxhdpi directory. Now, in both activity_main.xml and activity_puzzle.xml files, set the background of the main ConstraintLayout to it:
android:background="@drawable/table_background"
The last this we will do is to add a frame to our images. Download the frame image from here, add it to same res/drawable-xxhdpi as before, then set it as a background for the ConstraintLayout from the grid_element.xml file:
android:background="@drawable/puzzle_frame"
For the PuzzleActivity, we will add another ImageView behind the existing one holding the semi-transparent image, with the frame. Also change the existing ImageView margins to make it fit inside the frame:
<?xml version="1.0" encoding="utf-8"?>
<android.support.constraint.ConstraintLayout
    ...>

    <ImageView
        android:layout_width="0dp"
        android:layout_height="0dp"
        android:layout_marginEnd="8dp"
        android:layout_marginStart="8dp"
        android:layout_marginTop="8dp"
        android:alpha="1.0"
        app:layout_constraintDimensionRatio="H,4:5"
        app:layout_constraintLeft_toLeftOf="parent"
        app:layout_constraintRight_toRightOf="parent"
        app:layout_constraintTop_toTopOf="parent"
        app:srcCompat="@drawable/puzzle_frame" />

    <ImageView
        android:id="@+id/imageView"
        android:layout_width="0dp"
        android:layout_height="0dp"
        android:layout_marginEnd="16dp"
        android:layout_marginStart="16dp"
        android:layout_marginTop="18dp"
        android:scaleType="centerCrop"
        app:layout_constraintDimensionRatio="H,4:5"
        app:layout_constraintEnd_toEndOf="parent"
        app:layout_constraintLeft_toLeftOf="parent"
        app:layout_constraintRight_toRightOf="parent"
        app:layout_constraintStart_toStartOf="parent"
        app:layout_constraintTop_toTopOf="parent"
        app:srcCompat="@drawable/photo"
        android:alpha="0.5" />

    ...

</android.support.constraint.ConstraintLayout>
We’re done. You should now have a nice Jigsaw Puzzle Android Application to play with. I hope you enjoyed building this and learned a lot along the way. Please let me know in the comments how it was for you, if you found any problems or if you have any improvements to suggest. Also, if this tutorial helped you build some other Android apps, please add some links in the comments and tell all of us about them.
You can get the final code from GitHub, in case something goes terribly wrong and you don’t manage to fix it. See you at the next tutorial!
When i am adding multiple pictures in gridview say 100 pictures then whenever i scroll it refreshes the images which looks very odd.
Overall very nice tutorial and very helpful.
That’s because it re-scales the image each time it has to show it. This can be improved, of course, but I wanted to keep the things as simple as possible to show how to build a puzzle game. Thanks for your appreciation!
Then maybe you can write another tutorial. It will be very helpful.
Waiting for update.
I have uploaded the app on play store. Check it out.
https://play.google.com/store/apps/details?id=com.applified.apps.jigsaw
Hey! Glad it was of help! I have a few suggestions though: try to make it your own, change the colors, the background, don’t just copy everything 🙂
I like the fact that you added the option to choose the number of pieces, it would be great if you could fix the problem with the GridView too. Maybe, if you mange to fix it, you can write a comment about how to do it.
Thanks!
I just kept the same design to save some time for learning more. I’ll surely change it in next version. I tried to fix the gridview problem. Firstly, I thought using thumbnail but the problem of loading different image in different grid and then refreshing to original one still persists. I have used the same code for Adapter. It would be very helpful if you can write a tutorial on making efficient gridview.
Thanks again for your response.
Hey! whenever i paste the MainActivity.java code the code doesnt work. I get things like ‘cannot resolve symbol’ with red ink on ImageView, pieces, and Bitmap. How did you go through it?
You have to cache the images in an array/list so that they only load once. Any subsequent loads while scrolling should pull from your cache
can u add more of this turorial? it’s really great and helpful but as for me, i am a beginner in android programming and i want to break the puzzle pieces into different ones and i don’t know how to do that. it would be really nice to make a part 2 of this puzzle. thanks and stay awesome.
Hello! I’m not sure I understand exactly what do you need to do. The code to break an image into pieces is included in the tutorial, you can customize it to genereat as many pieces you need.
https://cdn.pixabay.com/photo/2017/09/17/15/54/jigsaw-2758828_960_720.jpg
like this one sir. i mean the jigsaw puzzle pieces should be different from each other. can you write another tutorial for these?
I cannot see the image you linked 🙁
It shows an error.
https://cdn.pixabay.com/photo/2017/09/17/15/54/jigsaw-2758828_960_720.jpg
like this one sir. i mean the jigsaw puzzle pieces should be different from each other.
Hi, I found your tutorial very helpful for a project I’m working on – thank you! – However, in Android Studio emulator there is no issues taking the image and rendering to the puzzle activity. But if running app from the mobile, the app closes after taking the image from camera which is due to the image size being to large to load into the Puzzle Activity. Is there any advise you can give on where in your tutorial can I resize the image to < = 600 Kb?
hi with ur tuto it only take the same forme for all pieces is there a way to change it so i would have differents pieces.
i tryed to change a bit but i end up not getting the result i want . help plz 🙂
Hi i want to change the shape of the piece but i cant beause ur code only show the change on the top and left side when i try to put the curvre on the rigth or on the buttom side but i cant . it would very nice of u if you help me.
thank you in advance 🙂
Sir,
Please I’m getting error when I press gallery and camera button, how I can fixed please.
thanks
hey guys
in android 6.0 (api 23) puzzle piece just vertically moved
how to resolve it?
Hello I’m very excited this post!
So could you teach me how I can auto arrange picture puzzle like a video?
Thanks you so much!
Bravo! Bravo! Bravo!
Best ever toturial on this theme.
Can we use this on our own projects?
Best Regards,
Danilo
Yes, sure you can 🙂
Dragos,
excellent tutorial, but I think I should warn you about a weird behavior I am getting compiling your code. Using Android 28.0.0 API(PIE) when I run the app, the images of the pieces got twisted, turning impossible to assemble the jigsaw. Using Oreo, Nougat, and others, I don’t get the same behavior.
Lousy tutorial. I couldn’t follow it at all.
As all ways the Author assumes the audience is following and that they know without step by step instruction what is being created or modified.
I give you a hint, NO!
Everything should be step by step, no short cuts no modifying anything without explicit direction..
what file is left out too many times
the section if the file is assumed (NO!)
You cant assume anything, you cant jump for fileA to fileC to fileD to fileG to fileF to fileA
every step should be covered.
Hi Dragos,
thank you for the tutorial. I want to make some changing at the end of puzzle, how can I make after finish you will be returned not to the main screen but to the other activity I want?
Thank you!
Hello! I’m having a problem here… in step one, when you add the code for the piece to be smaller and match the on screen image size, it doesn’t work. It works in the Android studio simulator, but when i open the app in my phone it doesn’t.
I think it’s due to the Android version, but i don’t know how to solve it :((
I had a similar issue to Paul’s: when using the latest version of Android Studio, the pieces were huge, like after the first step. I ran it in Nougat which seems to fix the problem, but how can this code be adapted to run on a later os?
Really enjoying this tutorial so far! I am wondering, however, if there is a way to set a path (or one of several randomly generated paths), then divide the pieces so each piece is unique?
thank you very much indeed