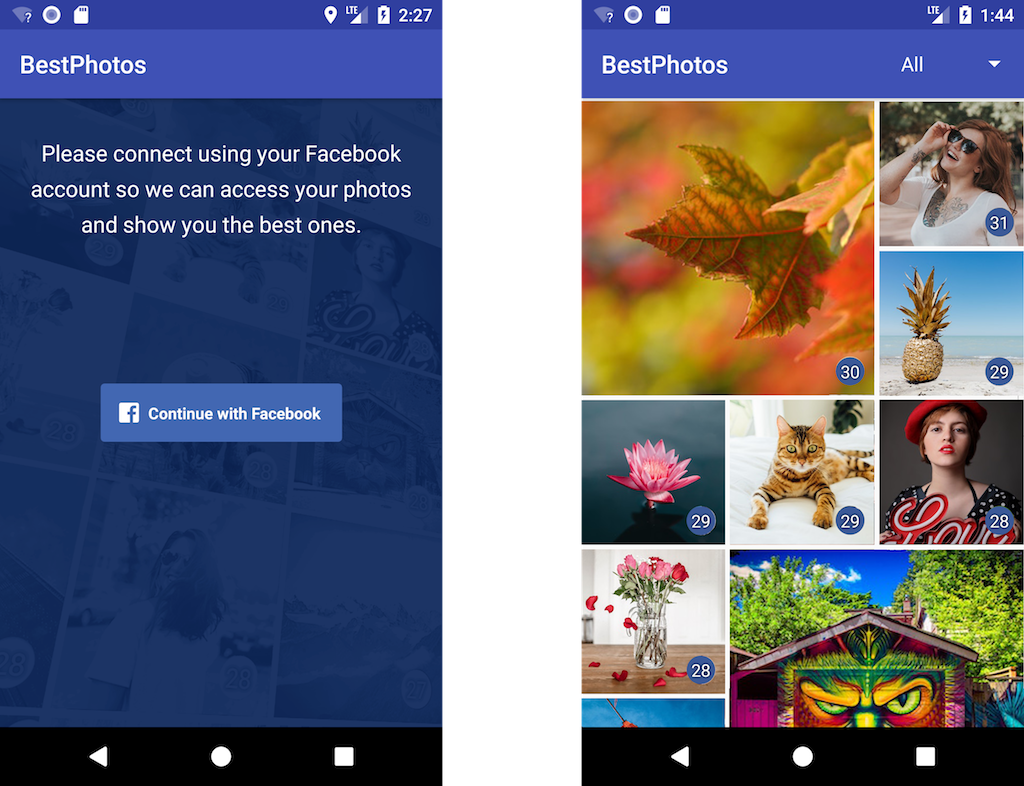
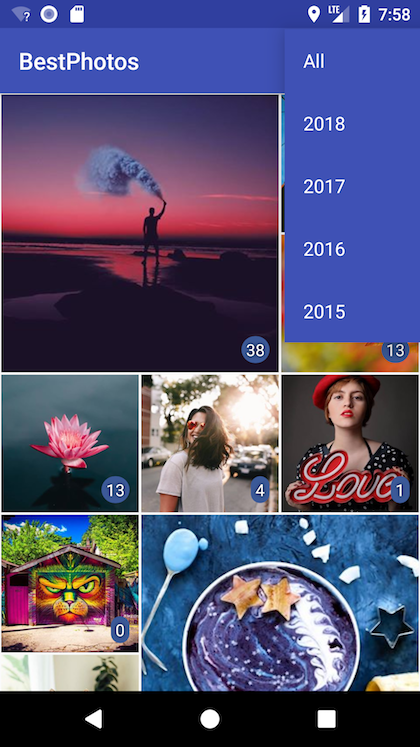
Welcome to the third tutorial on how to build an Android application! This time, we will build an application using the Facebook SDK to get the user’s images and show them ordered by the number of reactions received on the platform. Here’s how the app will look in the end:
If you want to check it before you build it, you can download it from Google Play right now: BestPhotos – your most appreciated Facebook photos.
Project Setup
Like before, we will create a new project using Android Studio. Let’s name it BestPhotos, choose the Phone and Tablet form factor and set the minimum SDK to API 16. Use a new Empty Activity named MainActivity as a starting point.
Restrict the activity orientation to portrait:
<?xml version="1.0" encoding="utf-8"?>
<manifest
    ... >
    <application
        ... >
        <activity android:name=".MainActivity"
            android:screenOrientation="portrait">
            ...
        </activity>
    </application>

</manifest>
Add Facebook SKD
The first thing we need to to in our app is to add Facebook Login. For this we need the Facebook SDK. You can find a guide on how to do this on Facebook’s developers website, but we’ll do it together in the following lines.
First, you need to have a Facebook Application to be able to use the Facebook SDK. You can create one here, by selecting the My Apps menu from the top-right of the mage and then Add a New App. Give your new app a name and enter a contact email, then click on Create App ID. Copy the App ID from the top of the page, then go back to the Getting Started Android SDK page and click on the Quick Start for Android button.
Select your new application, then in your project, in the app/build.gradle file, add the Facebook SDK:
dependencies {
    ...
    compile 'com.facebook.android:facebook-android-sdk:[4,5)'
}
In the main project’s build.gradle, add the Maven Central repository:
buildscript {

    repositories {
        ...
        mavenCentral()
    }
Now, click on the Sync Now link that should appear in Android Studio, on the top-right, to update the project with the new dependencies.
Next, we need to edit the AndroidManifest.xml file to add the following:
<?xml version="1.0" encoding="utf-8"?>
<manifest ...>
    <uses-permission android:name="android.permission.INTERNET"/>
    <application ...>
        <meta-data android:name="com.facebook.sdk.ApplicationId" android:value="@string/facebook_app_id"/>
        <activity android:name=".MainActivity"
            ... >
            ...
        </activity>
        <activity android:name="com.facebook.FacebookActivity"
            android:configChanges=
                "keyboard|keyboardHidden|screenLayout|screenSize|orientation"
            android:label="@string/app_name" />
        <activity
            android:name="com.facebook.CustomTabActivity"
            android:exported="true">
            <intent-filter>
                <action android:name="android.intent.action.VIEW" />
                <category android:name="android.intent.category.DEFAULT" />
                <category android:name="android.intent.category.BROWSABLE" />
                <data android:scheme="@string/fb_login_protocol_scheme" />
            </intent-filter>
        </activity>
    </application>

</manifest>
The above code needs two new strings values with your Facebook App ID to be defined in the res/values/strings.xml file:
<string name="facebook_app_id">YOUR_FACEBOOK_APP_ID</string>
<string name="fb_login_protocol_scheme">fbYOUR_FACEBOOK_APP_ID</string>
Back to the Facebook’s Android Quick Start, fill in the package name and the default activity name. In my case those are com.dragosholban.bestphotos and com.dragosholban.bestphotos.MainActivity. You should use your own. Then click on the Next button. If your app is not available in Google Play, as is probably the case right now, just click on the Use this package name button from the warning Facebook gives you.
You should now enter the development key hash, follow the instructions to generate it and add it to the Key Hashes field and click on Next one more time.
That’s it. We’re now done adding Facebook SDK to our project and we are ready to add the Facebook Login functionality.
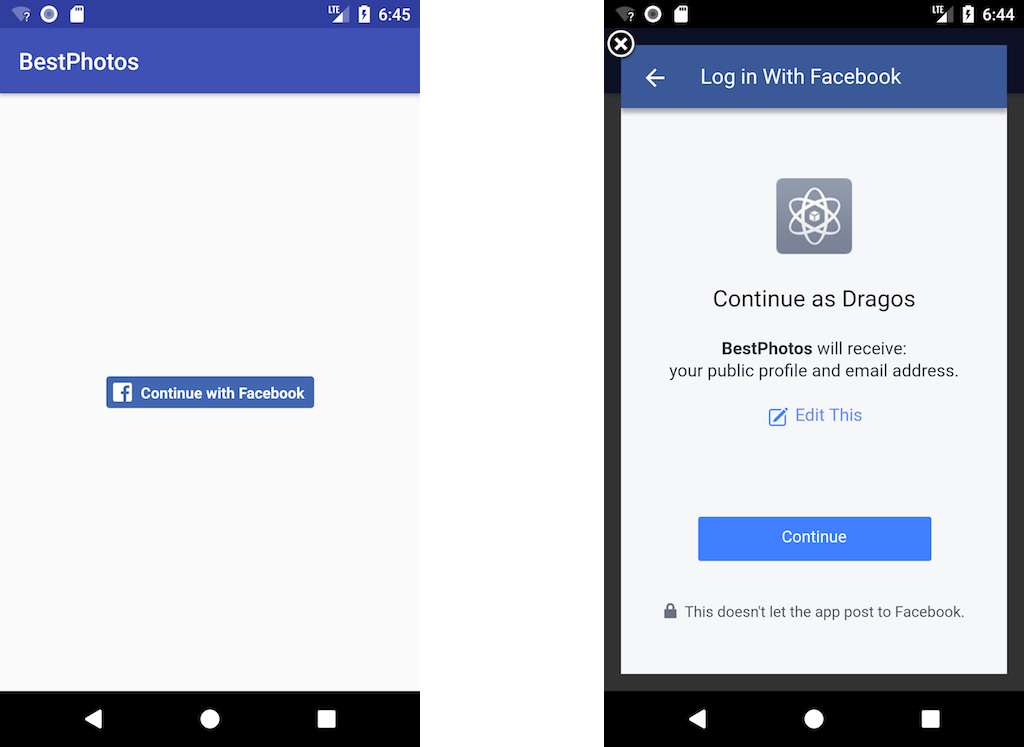
Add Facebook Login
Adding the Facebook Login button and related code is quite simple, after we did the setup above. Open the activity_main.xml layout file, remove the existing TextView and add the Facebook Login button:
<?xml version="1.0" encoding="utf-8"?>
<android.support.constraint.ConstraintLayout ...>

    <com.facebook.login.widget.LoginButton
        android:id="@+id/login_button"
        android:layout_width="wrap_content"
        android:layout_height="wrap_content"
        app:layout_constraintBottom_toBottomOf="parent"
        app:layout_constraintLeft_toLeftOf="parent"
        app:layout_constraintRight_toRightOf="parent"
        app:layout_constraintTop_toTopOf="parent" />

</android.support.constraint.ConstraintLayout>
In the MainActivity, add the code to request Facebook permissions (we will start with email) and to retrieve the token, if the user allows this:
public class MainActivity extends AppCompatActivity {
    private static final String TAG = MainActivity.class.getName();
    private CallbackManager callbackManager;

    @Override
    protected void onCreate(Bundle savedInstanceState) {
        super.onCreate(savedInstanceState);
        setContentView(R.layout.activity_main);

        LoginButton loginButton = findViewById(R.id.login_button);
        loginButton.setReadPermissions(Arrays.asList("email"));

        // Callback registration
        callbackManager = CallbackManager.Factory.create();
        loginButton.registerCallback(callbackManager, new FacebookCallback<LoginResult>() {
            @Override
            public void onSuccess(LoginResult loginResult) {
                Log.d(TAG, "Facebook login token: " + loginResult.getAccessToken().getToken());
            }

            @Override
            public void onCancel() {
                Log.d(TAG, "Facebook login canceled.");
            }

            @Override
            public void onError(FacebookException error) {
                Log.d(TAG, "Facebook login error: " + error.getMessage());
            }
        });
    }

    @Override
    protected void onActivityResult(int requestCode, int resultCode, Intent data) {
        if (callbackManager != null) {
            callbackManager.onActivityResult(requestCode, resultCode, data);
        }
        super.onActivityResult(requestCode, resultCode, data);
    }
}
If you run now the app, you should be asked by Facebook to allow your app to access the email and, if you allow it, you will see the Facebook token printed in the Logcat window.
Get the User’s Photos
Now, that we can use the Facebook login, we will go further and get the user’s uploaded photos. For this, we need to request the user_photos permission when the user logs in. Replace the email permission with this one, in the main activity code:
loginButton.setReadPermissions(Arrays.asList("user_photos"));
You should be aware that requesting this permission will need you to submit your app to Facebook for approval before you can make it public. You can still use it with your own developer account or with your test users, but the general public will not be able to use it until approved by Facebook. You can find more details about this here.
If the user grants us the user_photos permission, we can request the uploaded images using a Facebook GraphRequest:
Log.d(TAG, "Facebook login token: " + loginResult.getAccessToken().getToken());

// Check permissions
Boolean granted = false;
Set<String> permissions = AccessToken.getCurrentAccessToken().getPermissions();
for (String permission : permissions) {
    if (permission.equals("user_photos")) {
        granted = true;
    }
}

if (granted) {
    GraphRequest.Callback callback = new GraphRequest.Callback() {

        @Override
        public void onCompleted(GraphResponse response) {
            JSONObject json = response.getJSONObject();
            Log.d(TAG, "Photos: " + json.toString());
        }
    };

    GraphRequest request = new GraphRequest(AccessToken.getCurrentAccessToken(), "me/photos?fields=picture,reactions.limit(1).summary(true),link,images,created_time&type=uploaded&limit=500", null, HttpMethod.GET, callback);
    request.executeAsync();
}
Run the app now and you should see in the Logcat window part of a JSON containing the first 500 images, similar to this (you can also user the Facebook Graph Explorer to test the API call and see the response):
{
    "data": [
        {
            "picture": "https://scontent.xx.fbcdn.net/...",
            "reactions": {
                "data": [
                    {
                        "id": "1234",
                        "name": "Some Name",
                        "type": "LIKE"
                    }
                ],
                "paging": {
                    "cursors": {
                        "before": "TVRBd...",
                        "after": "TVRBd..."
                    },
                    "next": "https://graph.facebook.com/..."
                },
                "summary": {
                    "total_count": 74,
                    "viewer_reaction": "NONE"
                }
            },
            "link": "https://www.facebook.com/...",
            "images": [
                {
                    "height": 2048,
                    "source": "https://scontent.xx.fbcdn.net/...",
                    "width": 2048
                },
                {
                    "height": 960,
                    "source": "https://scontent.xx.fbcdn.net/...",
                    "width": 960
                },
                ...
            ],
            "created_time": "2018-01-01T00:00:00+0000",
            "id": "1234"
        }
    ],
    "paging": {
        "cursors": {
            "before": "MTAx...",
            "after": "MTAx..."
        },
        "next": "https://graph.facebook.com/..."
    }
}
Here we have everything we need to show the best photos (those with the most reactions):
imagesarray contains different thumbnails for the image, we will choose the appropriate size laterlinkhas the URL to the image, we will send the user to this URL when clicking on the photoreactionshas thesummarykey, which gives us thetotal_countof reactions the image received- the
created_timewill allow us to filter images by year
Convert JSON string to POJO (plain old Java objects)
To show the photos we get from Facebook, we will need a new activity. So let’s create one named ImagesActivity, of type EmptyActivity.
Move the code that loads the images JSON from the MainActivity to the new ImagesActivity‘s onCreate method:
public class ImagesActivity extends AppCompatActivity {
    private static final String TAG = ImagesActivity.class.getName();

    @Override
    protected void onCreate(Bundle savedInstanceState) {
        super.onCreate(savedInstanceState);
        setContentView(R.layout.activity_images);

        GraphRequest.Callback callback = new GraphRequest.Callback() {
            @Override
            public void onCompleted(GraphResponse response) {
                JSONObject json = response.getJSONObject();
                Log.d(TAG, "Photos: " + json.toString());
            }
        };

        GraphRequest request = new GraphRequest(AccessToken.getCurrentAccessToken(), "me/photos?fields=picture,reactions.limit(1).summary(true),link,images,created_time&type=uploaded&limit=500", null, HttpMethod.GET, callback);
        request.executeAsync();
    }
}
In the MainActivity, start the ImagesActivity if the user grants the user_photos permission:
@Override
protected void onCreate(Bundle savedInstanceState) {
    // ...

    final Activity activity = this;

    // Callback registration
    callbackManager = CallbackManager.Factory.create();
    loginButton.registerCallback(callbackManager, new FacebookCallback<LoginResult>() {
        @Override
        public void onSuccess(LoginResult loginResult) {
            Log.d(TAG, "Facebook login token: " + loginResult.getAccessToken().getToken());

            // ...

            if (granted) {
                Intent intent = new Intent(activity, ImagesActivity.class);
                activity.startActivity(intent);
            } else {
                Toast.makeText(activity, "Please allow us to access your Facebook photos in order to show you the best ones.", Toast.LENGTH_LONG).show();
            }
        }

        // ...
    });
}
Run the app now to test that everything works fine and you still get the photos JSON in the Logcat window, but this time from the new ImagesActivity.
To parse the JSON string we get from Facebook, and to transform the data into JAVA objects, we will use the google-gson library. Add the following dependency to your app/build.gradle file and sync the project when prompted by Android Studio:
dependencies {
    ...
    compile 'com.facebook.android:facebook-android-sdk:[4,5)'
    compile 'com.google.code.gson:gson:2.8.2'
}
Next, we need to create some “plain old java objects”, or POJO, that replicate the JSON structure. The Gson library will use them to parse the JSON string. You can use a tool like http://www.jsonschema2pojo.org/ to help you generate Java classes from JSON data. I used it for this example, but I changed the resulting code as you will see below.
Create a new FacebookPhotos.java file and add the following code to it:
public class FacebookPhotos {

    public class Datum {

        public class Reactions {

            public class Datum_ {

                public String id;
                public String name;
                public String type;

            }

            public class Paging {

                public class Cursors {

                    public String before;
                    public String after;

                }

                public Cursors cursors;
                public String next;

            }

            public class Summary {

                public Integer total_count;
                public String viewer_reaction;

            }

            public List<Datum_> data = null;
            public Paging paging;
            public Summary summary;

        }

        public class Image {

            public Integer height;
            public String source;
            public Integer width;

        }

        public String picture;
        public Reactions reactions;
        public String link;
        public List<Image> images = null;
        public String created_time;
        public String id;

    }

    public class Paging_ {

        public class Cursors_ {

            public String before;
            public String after;

        }

        public Cursors_ cursors;
        public String next;

    }

    public List<Datum> data = null;
    public Paging_ paging;

}
Now, to actually convert the JSON string to our POJO objects, we need this code:
@Override
protected void onCreate(Bundle savedInstanceState) {
    // ...

    GraphRequest.Callback callback = new GraphRequest.Callback() {

        @Override
        public void onCompleted(GraphResponse response) {
            JSONObject json = response.getJSONObject();
            Log.d(TAG, "Photos: " + json.toString());

            Gson gson = new Gson();
            FacebookPhotos fbPhotos =  gson.fromJson(json.toString(), FacebookPhotos.class);
            for (FacebookPhotos.Datum datum : fbPhotos.data) {
                Log.d(TAG, "Image URL: " + datum.picture);
            }
        }
    };
Here we iterated through all the images and logged the URLs, just to make sure everything works fine. Run the app and test for yourself.
In order to hold the data Gson builds from the JSON string, we will need another POJO. Create a new FacebookImage class with the following structure:
public class FacebookImage {
    public String fbId;
    public String url;
    public String link;
    public long createdAt;
    public int reactions;
}
Now, for each image data we get from Facebook, we need to build a new FacebookImage object and add it to an ArrayList:
public class ImagesActivity extends AppCompatActivity {
    private ArrayList<FacebookImage> images = new ArrayList<>();
    // ...

    @Override
    protected void onCreate(Bundle savedInstanceState) {
        // ...

        GraphRequest.Callback callback = new GraphRequest.Callback() {

            @Override
            public void onCompleted(GraphResponse response) {
                JSONObject json = response.getJSONObject();
                Log.d(TAG, "Photos: " + json.toString());

                Gson gson = new Gson();
                FacebookPhotos fbPhotos =  gson.fromJson(json.toString(), FacebookPhotos.class);
                for (FacebookPhotos.Datum datum : fbPhotos.data) {
                    Log.d(TAG, "Image URL: " + datum.picture);

                    FacebookImage image = new FacebookImage();
                    image.fbId = datum.id;
                    image.reactions = datum.reactions.summary.total_count;
                    image.link = datum.link;
                    image.url = datum.picture;

                    SimpleDateFormat format = new SimpleDateFormat("yyyy-MM-dd'T'HH:mm:ss+SSSS");
                    Date date = new Date();
                    try {
                        date = format.parse(datum.created_time);
                    } catch (ParseException e) {
                        e.printStackTrace();
                    }
                    image.createdAt = date.getTime();

                    // find the closest image to 300x300px
                    FacebookPhotos.Datum.Image imageSource = null;
                    for (FacebookPhotos.Datum.Image im : datum.images) {
                        if (imageSource == null) {
                            imageSource = im;
                        } else {
                            if (imageSource.width < imageSource.height) {
                                if (imageSource.width <= 300 && imageSource.width < im.width || imageSource.width > 300 && im.width > 300 && imageSource.width > im.width) {
                                    imageSource = im;
                                }
                            } else {
                                if (imageSource.height <= 300 && imageSource.height < im.height || imageSource.height > 300 && im.height > 300 && imageSource.height > im.height) {
                                    imageSource = im;
                                }
                            }
                        }
                    }
                    if (imageSource != null) {
                        image.url = imageSource.source;
                    }

                    images.add(image);
                }
You probably noticed that we limited the results returned by the Facebook graph API call to 500. If the user has more images, we need to load all of them, so let’s do that next:
@Override
public void onCompleted(GraphResponse response) {
    // ...
    for (FacebookPhotos.Datum datum : fbPhotos.data) {
        Log.d(TAG, "Image URL: " + datum.picture);
        // ...
    }

    if (fbPhotos.paging != null && fbPhotos.paging.cursors.after != null) {
        GraphRequest request = new GraphRequest(AccessToken.getCurrentAccessToken(), "me/photos?fields=picture,reactions.limit(1).summary(true),link,images,created_time&type=uploaded&limit=500&after=" + fbPhotos.paging.cursors.after, null, HttpMethod.GET, this);
        request.executeAsync();
    }
}
Here we just check if the fbPhotos object has paging with an after value and, if true, we run another the Graph API call using that value for the next 500 images. This will happen until we get all the images from Facebook.
After this last change, we should have all the user’s images in our images array. Run the app to be sure everything still works before proceeding to the next part.
Show the User Images
To show the user’s images we get from Facebook, we will create a list using a RecyclerView. First, we need to add the recycler view support library to the dependencies section of the the build.gradle file for your app module:
dependencies {
    ...
    compile 'com.google.code.gson:gson:2.8.2'
    compile 'com.android.support:recyclerview-v7:26.1.+'
}
We will also use the Picasso library, to load images from the internet, so we need to add this too, in the same file:
dependencies {
    ...
    compile 'com.android.support:recyclerview-v7:26.1.+'
    implementation 'com.squareup.picasso:picasso:2.71828'
}
Next, we need a RecylerView Adapter class to feed the data to our list. Create a new ImageRecyclerViewAdapter java class that extends the RecyclerView.Adapter for this:
public class ImageRecyclerViewAdapter extends RecyclerView.Adapter {
    private static final int TYPE_SQUARE = 0;
    private static final int TYPE_VERTICAL = 1;

    public static class SquareImageViewHolder extends RecyclerView.ViewHolder {

        ImageView imageView;
        TextView likesTextView;

        public SquareImageViewHolder(View itemView) {
            super(itemView);
            imageView = itemView.findViewById(R.id.gridImageview);
            likesTextView = itemView.findViewById(R.id.likesCount);
        }
    }

    public static class VerticalImagesViewHolder extends RecyclerView.ViewHolder {

        ImageView imageView1;
        ImageView imageView2;
        TextView likesTextView1;
        TextView likesTextView2;

        public VerticalImagesViewHolder(View itemView) {
            super(itemView);
            imageView1 = itemView.findViewById(R.id.gridImageview1);
            likesTextView1 = itemView.findViewById(R.id.likesCount1);
            imageView2 = itemView.findViewById(R.id.gridImageview2);
            likesTextView2 = itemView.findViewById(R.id.likesCount2);
        }
    }

    private static class MyImage {
        FacebookImage image;
        int span = 1;

        public MyImage(FacebookImage image, int span) {
            this.image = image;
            this.span = span;
        }
    }

    private Context mContext;
    private ArrayList<ArrayList<MyImage>> images = new ArrayList<>();

    public ImageRecyclerViewAdapter(Context context, ArrayList<FacebookImage> images) {
        this.mContext = context;
        distributeImages(images);
    }

    private void distributeImages(ArrayList<FacebookImage> images) {
        ArrayList<MyImage> arrayOfImages = new ArrayList<>();
        int i = 0;
        int rightPos = 0;
        boolean left = true;
        int span;
        for (FacebookImage image : images) {
            i++;
            span = 1;
            if (left) {
                if (i % 6 == 1) {
                    span = 2;
                    rightPos = i + 8;
                }
                arrayOfImages.add(new MyImage(image, span));
                if (i % 6 == 2) {
                    left = false;
                    continue;
                }
            } else {
                if (i % rightPos == 0) {
                    span = 2;
                    left = true;
                }
                arrayOfImages.add(new MyImage(image, span));
                if (i % rightPos == rightPos - 2) {
                    continue;
                }
            }
            this.images.add(arrayOfImages);
            arrayOfImages = new ArrayList<>();
        }

        if(arrayOfImages.size() > 0) {
            this.images.add(arrayOfImages);
        }
    }

    @Override
    public void onAttachedToRecyclerView(RecyclerView recyclerView) {
        super.onAttachedToRecyclerView(recyclerView);

        GridLayoutManager layoutManager = new GridLayoutManager(mContext, 3);

        // Create a custom SpanSizeLookup where the first item spans both columns
        layoutManager.setSpanSizeLookup(new GridLayoutManager.SpanSizeLookup() {
            @Override
            public int getSpanSize(int position) {
                return images.get(position).get(0).span;
            }
        });

        recyclerView.setLayoutManager(layoutManager);
    }

    @Override
    public RecyclerView.ViewHolder onCreateViewHolder(ViewGroup parent, int viewType) {
        if(viewType == TYPE_VERTICAL) {
            LayoutInflater inflater = (LayoutInflater) parent.getContext().getSystemService(Context.LAYOUT_INFLATER_SERVICE);
            View view = inflater.inflate(R.layout.vertical_square_images, parent, false);
            VerticalImagesViewHolder holder = new VerticalImagesViewHolder(view);

            return holder;
        } else {
            LayoutInflater inflater = (LayoutInflater) parent.getContext().getSystemService(Context.LAYOUT_INFLATER_SERVICE);
            View view = inflater.inflate(R.layout.square_image, parent, false);
            SquareImageViewHolder holder = new SquareImageViewHolder(view);

            return holder;
        }
    }

    @Override
    public void onBindViewHolder(RecyclerView.ViewHolder holder, int position) {
        ArrayList<MyImage> imgs = images.get(position);
        if (imgs.size() > 1) {
            VerticalImagesViewHolder myHolder = (VerticalImagesViewHolder) holder;
            Picasso.get().load(imgs.get(0).image.url).into(myHolder.imageView1);
            myHolder.likesTextView1.setText(String.valueOf(imgs.get(0).image.reactions));
            myHolder.imageView1.setTag(imgs.get(0).image.link);

            Picasso.get().load(imgs.get(1).image.url).into(myHolder.imageView2);
            myHolder.likesTextView2.setText(String.valueOf(imgs.get(1).image.reactions));
            myHolder.imageView2.setTag(imgs.get(1).image.link);
        } else {
            SquareImageViewHolder myHolder = (SquareImageViewHolder) holder;
            Picasso.get().load(imgs.get(0).image.url).into(myHolder.imageView);
            myHolder.likesTextView.setText(String.valueOf(imgs.get(0).image.reactions));
            myHolder.imageView.setTag(imgs.get(0).image.link);
        }
    }

    @Override
    public int getItemViewType(int position) {
        if (images.get(position).size() > 1) {
            return TYPE_VERTICAL;
        }

        return TYPE_SQUARE;
    }

    @Override
    public int getItemCount() {
        return images.size();
    }
}
We also need two layouts for our images, one that holds a single, square image, and the other to be used when we need to display two vertical images.
For the first one, the simple square image, add a new square_image.xml file in the res/layout folder:
<android.support.constraint.ConstraintLayout xmlns:android="http://schemas.android.com/apk/res/android"
    xmlns:app="http://schemas.android.com/apk/res-auto"
    android:orientation="vertical"
    android:layout_width="match_parent"
    android:layout_height="wrap_content"
    app:layout_constraintDimensionRatio="H,1:1"
    android:gravity="center"
    android:layout_margin="1dp"
    >

    <ImageView
        android:id="@+id/gridImageview"
        android:layout_width="0dp"
        android:layout_height="0dp"
        android:onClick="onImageClick"
        android:scaleType="centerCrop"
        app:layout_constraintDimensionRatio="H,1:1"
        app:layout_constraintEnd_toEndOf="parent"
        app:layout_constraintStart_toStartOf="parent"
        app:layout_constraintTop_toTopOf="parent" />

    <TextView
        android:id="@+id/likesCount"
        android:background="@layout/rounded_border_textview"
        android:layout_width="wrap_content"
        android:layout_height="wrap_content"
        android:layout_marginBottom="8dp"
        android:layout_marginEnd="8dp"
        android:layout_marginRight="8dp"
        android:paddingTop="2dp"
        android:paddingBottom="2dp"
        android:paddingStart="4dp"
        android:paddingEnd="4dp"
        android:text="0"
        android:textColor="@android:color/white"
        android:textSize="14sp"
        android:textStyle="normal"
        android:textAlignment="center"
        android:shadowDx="0"
        android:shadowDy="0"
        android:shadowRadius="10"
        android:shadowColor="#000000"
        app:layout_constraintBottom_toBottomOf="@id/gridImageview"
        app:layout_constraintEnd_toEndOf="@id/gridImageview"
        />
</android.support.constraint.ConstraintLayout>
The second one will hold two square images, one above the other. Crate a new vertical_square_images.xml layout file in the same folder as above:
<android.support.constraint.ConstraintLayout xmlns:android="http://schemas.android.com/apk/res/android"
    xmlns:app="http://schemas.android.com/apk/res-auto"
    android:orientation="vertical"
    android:layout_width="match_parent"
    android:layout_height="wrap_content"
    android:gravity="center"
    android:layout_margin="1dp"
    >

    <ImageView
        android:id="@+id/gridImageview1"
        android:layout_width="0dp"
        android:layout_height="0dp"
        android:onClick="onImageClick"
        android:scaleType="centerCrop"
        app:layout_constraintDimensionRatio="H,1:1"
        app:layout_constraintEnd_toEndOf="parent"
        app:layout_constraintStart_toStartOf="parent"
        app:layout_constraintTop_toTopOf="parent" />

    <TextView
        android:id="@+id/likesCount1"
        android:background="@layout/rounded_border_textview"
        android:layout_width="wrap_content"
        android:layout_height="wrap_content"
        android:layout_marginBottom="8dp"
        android:layout_marginEnd="8dp"
        android:layout_marginRight="8dp"
        android:paddingTop="2dp"
        android:paddingBottom="2dp"
        android:paddingStart="4dp"
        android:paddingEnd="4dp"
        android:text="0"
        android:textColor="@android:color/white"
        android:textSize="14sp"
        android:textStyle="normal"
        android:textAlignment="center"
        android:shadowDx="0"
        android:shadowDy="0"
        android:shadowRadius="10"
        android:shadowColor="#000000"
        app:layout_constraintBottom_toBottomOf="@id/gridImageview1"
        app:layout_constraintEnd_toEndOf="@id/gridImageview1"
        />

    <ImageView
        android:id="@+id/gridImageview2"
        android:layout_width="0dp"
        android:layout_height="0dp"
        android:onClick="onImageClick"
        android:scaleType="centerCrop"
        android:layout_marginTop="2dp"
        app:layout_constraintTop_toBottomOf="@id/gridImageview1"
        app:layout_constraintDimensionRatio="H,1:1"
        app:layout_constraintEnd_toEndOf="parent"
        app:layout_constraintStart_toStartOf="parent" />

    <TextView
        android:id="@+id/likesCount2"
        android:background="@layout/rounded_border_textview"
        android:layout_width="wrap_content"
        android:layout_height="wrap_content"
        android:layout_marginBottom="8dp"
        android:layout_marginEnd="8dp"
        android:layout_marginRight="8dp"
        android:paddingTop="2dp"
        android:paddingBottom="2dp"
        android:paddingStart="4dp"
        android:paddingEnd="4dp"
        android:text="0"
        android:textColor="@android:color/white"
        android:textSize="14sp"
        android:textStyle="normal"
        android:textAlignment="center"
        android:shadowDx="0"
        android:shadowDy="0"
        android:shadowRadius="10"
        android:shadowColor="#000000"
        app:layout_constraintBottom_toBottomOf="@id/gridImageview2"
        app:layout_constraintEnd_toEndOf="@id/gridImageview2"
        />
</android.support.constraint.ConstraintLayout>
Both of the above layouts, use a blue rounded background for the number of reactions. Create the rounded_border_textview.xml file in the res/layout folder:
<?xml version="1.0" encoding="utf-8"?>
<selector xmlns:android="http://schemas.android.com/apk/res/android"
    android:layout_height="wrap_content"
    android:layout_width="wrap_content">
    <item>
        <shape android:shape="rectangle">
            <solid android:color="#3b5998"/>
            <corners android:radius="20dp" />
            <padding
                android:top="2dp"
                android:bottom="2dp"
                android:left="4dp"
                android:right="4dp" />
        </shape>
    </item>
</selector>
In the activity_images.xml layout, we need to add the RecyclerView widget:
<?xml version="1.0" encoding="utf-8"?>
<android.support.constraint.ConstraintLayout
    ...>

    <android.support.v7.widget.RecyclerView
        android:id="@+id/recyclerView"
        android:scrollbars="vertical"
        android:layout_width="match_parent"
        android:layout_height="match_parent"
        android:drawSelectorOnTop="true" />

</android.support.constraint.ConstraintLayout>
Now, to make all this work, add the following code in the ImageActivity:
public class ImagesActivity extends AppCompatActivity {
    // ...
    private RecyclerView recyclerView;

    @Override
    protected void onCreate(Bundle savedInstanceState) {
        // ...
        recyclerView = this.findViewById(R.id.recyclerView);
        final ImagesActivity activity = this;

        GraphRequest.Callback callback = new GraphRequest.Callback() {

            @Override
            public void onCompleted(GraphResponse response) {
                // ...

                if (fbPhotos.paging != null && fbPhotos.paging.cursors.after != null) {
                    GraphRequest request = new GraphRequest(AccessToken.getCurrentAccessToken(), "me/photos?fields=picture,reactions.limit(1).summary(true),link,images,created_time&type=uploaded&limit=500&after=" + fbPhotos.paging.cursors.after, null, HttpMethod.GET, this);
                    request.executeAsync();
                } else {
                    recyclerView.setAdapter(new ImageRecyclerViewAdapter(activity, images));
                }
            }
        };

        // ...
    }

    public void onImageClick(View view) {
        String link = (String) view.getTag();
        if (link != null) {
            Intent intent = new Intent(Intent.ACTION_VIEW, Uri.parse(link));
            if (intent.resolveActivity(getPackageManager()) != null) {
                startActivity(intent);
            }
        }
    }
}
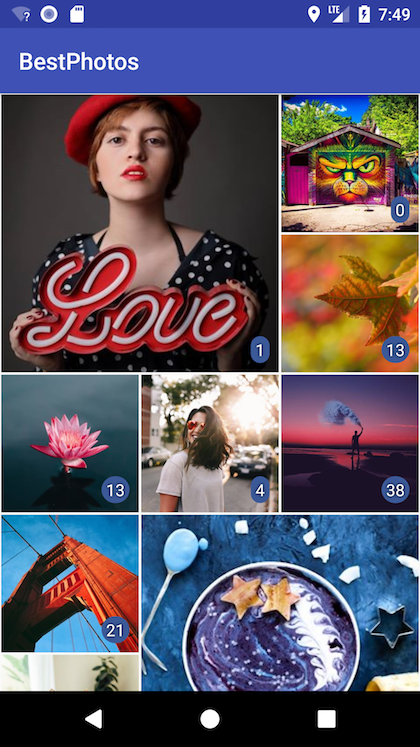
Run the app now and… after a few moments it should show you all the images you have uploaded to Facebook with their respective reactions count in the right-bottom corner. But… the images are not sorted. So let’s do that next.
Sort and Refresh Images
Sorting images is quite simple. In the ImagesActivity, after we get all the images from Facebook in our images ArrayList, we need the following code to sort them descending, by the number of reactions:
public class ImagesActivity extends AppCompatActivity {
    // ...

    @Override
    protected void onCreate(Bundle savedInstanceState) {
        // ...

        GraphRequest.Callback callback = new GraphRequest.Callback() {

            @Override
            public void onCompleted(GraphResponse response) {
                // ...

                if (fbPhotos.paging != null && fbPhotos.paging.cursors.after != null) {
                    GraphRequest request = new GraphRequest(AccessToken.getCurrentAccessToken(), "me/photos?fields=picture,reactions.limit(1).summary(true),link,images,created_time&type=uploaded&limit=500&after=" + fbPhotos.paging.cursors.after, null, HttpMethod.GET, this);
                    request.executeAsync();
                } else {
                    sortImages(images);
                    recyclerView.setAdapter(new ImageRecyclerViewAdapter(activity, images));
                }
            }
        };

        // ...
    }

    private void sortImages(ArrayList<FacebookImage> images) {
        Collections.sort(images, new Comparator<FacebookImage>() {
            @Override
            public int compare(FacebookImage i1, FacebookImage i2) {
                return ((Integer) i1.reactions).compareTo(i2.reactions);
            }
        });
        Collections.reverse(images);
    }

    // ...
}
Run the app now and check. All the images should be sorted so you first see your best Facebook images ever posted.
What if you add more images and you want to see them in the list? We could use some kind of mechanism to refresh our list, so let’s implement the swipe to refresh gesture.
First, in the activity_images.xml layout file, add a new SwipeRefreshLayout element:
<?xml version="1.0" encoding="utf-8"?>
<android.support.constraint.ConstraintLayout
    ...>

    <android.support.v4.widget.SwipeRefreshLayout
        xmlns:android="http://schemas.android.com/apk/res/android"
        android:id="@+id/swiperefresh"
        android:layout_width="match_parent"
        android:layout_height="match_parent">

        <android.support.v7.widget.RecyclerView
            ... />

    </android.support.v4.widget.SwipeRefreshLayout>

</android.support.constraint.ConstraintLayout>
Next, in the ImagesActivity, add the following to make it implement the SwipeRefreshLayout.OnRefreshListener interface and its onRefresh method:
public class ImagesActivity extends AppCompatActivity implements SwipeRefreshLayout.OnRefreshListener {
    // ...
    private SwipeRefreshLayout mRefreshlayout;
    private GraphRequest.Callback callback;

    @Override
    protected void onCreate(Bundle savedInstanceState) {
        // ...

        mRefreshlayout = findViewById(R.id.swiperefresh);
        mRefreshlayout.setOnRefreshListener(this);

        // ...

        callback = new GraphRequest.Callback() {

            @Override
            public void onCompleted(GraphResponse response) {
                // ...

                if (fbPhotos.paging != null && fbPhotos.paging.cursors.after != null) {
                    GraphRequest request = new GraphRequest(AccessToken.getCurrentAccessToken(), "me/photos?fields=picture,reactions.limit(1).summary(true),link,images,created_time&type=uploaded&limit=500&after=" + fbPhotos.paging.cursors.after, null, HttpMethod.GET, this);
                    request.executeAsync();
                } else {
                    mRefreshlayout.setRefreshing(false);
                    sortImages(images);
                    recyclerView.setAdapter(new ImageRecyclerViewAdapter(activity, images));
                }
            }
        };

        loadImages();
    }

    // ...

    @Override
    public void onRefresh() {
        loadImages();
    }

    private void loadImages() {
        images.clear();
        mRefreshlayout.setRefreshing(true);
        GraphRequest request = new GraphRequest(AccessToken.getCurrentAccessToken(), "me/photos?fields=picture,reactions.limit(1).summary(true),link,images,created_time&type=uploaded&limit=500", null, HttpMethod.GET, callback);
        request.executeAsync();
    }
}
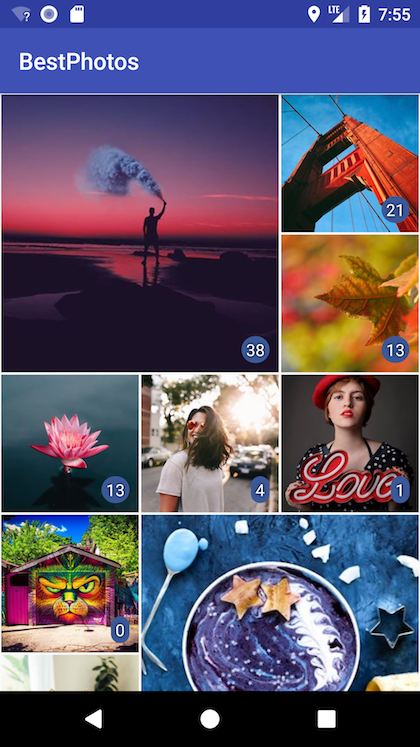
If you run the app now, you will be able to reload all the images from the Facebook Graph API and see new ones, if that’s the case. But there is one small issue: if you scroll down the list during the refresh process, when it finishes loading the images, the list will reload everything and you will be sent back to the top. We can avoid this, and only update the list with the new information, without reloading everything:
mRefreshlayout.setRefreshing(false);
sortImages(images);
ImageRecyclerViewAdapter adapter = (ImageRecyclerViewAdapter) recyclerView.getAdapter();
if (adapter != null) {
    adapter.updateData(images);
} else {
    recyclerView.setAdapter(new ImageRecyclerViewAdapter(activity, images));
}
Now, we just need to add the updateData method to the adapter:
public class ImageRecyclerViewAdapter extends RecyclerView.Adapter {
    // ...

    public void updateData(ArrayList<FacebookImage> images) {
        this.images.clear();
        distributeImages(images);
        notifyDataSetChanged();
    }
}
Filter Images by Year
It’s nice that we can see our best photos posted on Facebook, but it will be greater to see those who performed best each year. So let’s add a filter so we can find out this.
We’ll start by creating a menu to hold our dropdown filter list. Create a new menu resource file named android_action_bar_spinner_menu.xml in the res/menu directory:
<?xml version="1.0" encoding="utf-8"?>
<menu xmlns:android="http://schemas.android.com/apk/res/android"
    xmlns:app="http://schemas.android.com/apk/res-auto">
    <item android:id="@+id/spinner"
        android:title="Year"
        app:actionViewClass="android.widget.Spinner"
        app:showAsAction="always" />
</menu>
We will also a new layout file simple_spinner_dropdown_item.xml, for our dropdown item:
<CheckedTextView xmlns:android="http://schemas.android.com/apk/res/android"
    android:id="@android:id/text1"
    style="?android:attr/spinnerDropDownItemStyle"
    android:singleLine="true"
    android:layout_width="match_parent"
    android:layout_height="wrap_content"
    android:paddingTop="16dp"
    android:paddingBottom="16dp"
    android:paddingLeft="16dp"
    android:paddingRight="16dp"
    android:paddingStart="16dp"
    android:paddingEnd="16dp"
    android:textColor="#ffffff"
    android:background="@color/colorPrimary"
    android:ellipsize="marquee"/>
In the ImagesActivity, add the onCreateOptionsMenu method to configure the menu:
private Spinner yearsSpinner;
private ArrayList<String> filterYears = new ArrayList<>(Arrays.asList("All"));
private ArrayAdapter<CharSequence> yearsAdapter;

@Override
public boolean onCreateOptionsMenu(Menu menu) {
    getMenuInflater().inflate(R.menu.android_action_bar_spinner_menu, menu);

    MenuItem item = menu.findItem(R.id.spinner);
    yearsSpinner = (Spinner) MenuItemCompat.getActionView(item);
    yearsSpinner.setPadding(0, 0, 0, 0);
    yearsSpinner.setAdapter(yearsAdapter);

    yearsSpinner.setOnItemSelectedListener(new AdapterView.OnItemSelectedListener() {
        @Override
        public void onItemSelected(AdapterView<?> adapterView, View view, int i, long l) {
            selectedYearPosition = i;
            filterFacebookPhotos();
        }

        @Override
        public void onNothingSelected(AdapterView<?> adapterView) {

        }
    });

    return true;
}
The code above uses an array with all the years we can filter for, but we still need to build this:
// ...
image.createdAt = date.getTime();

// add years to filter by
String year = String.valueOf(date.getYear() + 1900);
if (!filterYears.contains(year)) {
    filterYears.add(year);
}

// find the closest image to 300x300px
FacebookPhotos.Datum.Image imageSource = null;
// ...
Also update the years adapter, when we’re done loading all the images, and use the filter method:
protected void onCreate(Bundle savedInstanceState) {
    super.onCreate(savedInstanceState);
    setContentView(R.layout.activity_images);

    yearsAdapter = new ArrayAdapter<>(this, R.layout.simple_spinner_dropdown_item);

    // ...

    } else {
        mRefreshlayout.setRefreshing(false);
        yearsAdapter.clear();
        yearsAdapter.addAll(filterYears);
        yearsAdapter.notifyDataSetChanged();
        sortImages(images);
        filterFacebookPhotos();
    }
Next, we need the method to actually filter by the selected year:
private int selectedYearPosition = 0;

private void filterFacebookPhotos() {
    ArrayList<FacebookImage> filteredImages = new ArrayList<>();

    if (selectedYearPosition == 0) {
        // all images
        filteredImages = images;
    } else {
        String year = filterYears.get(selectedYearPosition);
        for (FacebookImage image : images) {
            Date imDate = new Date(image.createdAt);
            if (imDate.getYear() + 1900 == Integer.valueOf(year)) {
                filteredImages.add(image);
            }
        }
    }

    ImageRecyclerViewAdapter adapter = (ImageRecyclerViewAdapter) recyclerView.getAdapter();
    if (adapter != null) {
        adapter.updateData(filteredImages);
    } else {
        recyclerView.setAdapter(new ImageRecyclerViewAdapter(this, filteredImages));
    }
}
That’s it. Try the app now and find out what were your best photos posted on Facebook each year.
Final Touches
There a some small issues to fix before we’re done. First of all, we need to restrict the ImagesActivity to portrait, as is the MainActivity. You should know by now that this is done in the AndroidManifest.xml file:
<application
    ...>
    ...

    <activity
        android:name=".ImagesActivity"
        android:screenOrientation="portrait" />
</application>
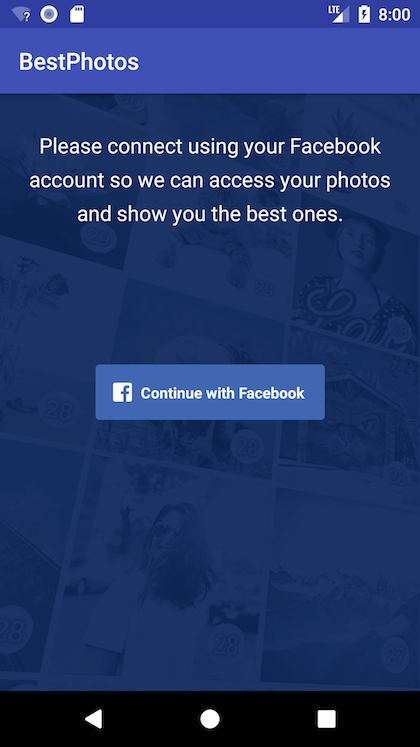
Second, let’s make the first screen look better by adding a background image, some text explaining why do we need the user to login using the Facebook account and by making the login button a little bigger:
<?xml version="1.0" encoding="utf-8"?>
<android.support.constraint.ConstraintLayout
    ...>

    <ImageView
        android:layout_width="0dp"
        android:layout_height="0dp"
        android:scaleType="centerCrop"
        app:layout_constraintBottom_toBottomOf="parent"
        app:layout_constraintEnd_toEndOf="parent"
        app:layout_constraintStart_toStartOf="parent"
        app:layout_constraintTop_toTopOf="parent"
        app:srcCompat="@drawable/background" />

    <com.facebook.login.widget.LoginButton
        android:id="@+id/login_button"
        android:layout_width="wrap_content"
        android:layout_height="wrap_content"
        app:layout_constraintBottom_toBottomOf="parent"
        app:layout_constraintLeft_toLeftOf="parent"
        app:layout_constraintRight_toRightOf="parent"
        app:layout_constraintTop_toTopOf="parent"
        android:paddingTop="15dp"
        android:paddingBottom="15dp"
        android:paddingLeft="15dp"
        android:paddingRight="15dp"/>

    <TextView
        android:id="@+id/textView2"
        android:layout_width="0dp"
        android:layout_height="wrap_content"
        android:layout_marginTop="16dp"
        android:lineSpacingExtra="8sp"
        android:padding="16dp"
        android:text="Please connect using your Facebook account so we can access your photos and show you the best ones."
        android:textAlignment="center"
        android:textColor="@android:color/white"
        android:textSize="18sp"
        app:layout_constraintLeft_toLeftOf="parent"
        app:layout_constraintRight_toRightOf="parent"
        app:layout_constraintTop_toTopOf="parent" />

</android.support.constraint.ConstraintLayout>
You can download the background images used from here. In the res folder, create new drawable directories for each screen density (drawable-ldpi, drawable-mdpi, drawable-hdpi, drawable-xhdpi, drawable-xxhdpi and drawable-xxxhdpi) and add the corresponding images.
Still on the first screen of our app, but this time in the MainActivity java code, let’s check if the user is already logged in when the app starts and redirect to the ImagesActivity if that’s true:
protected void onCreate(Bundle savedInstanceState) {
    super.onCreate(savedInstanceState);
    setContentView(R.layout.activity_main);

    boolean loggedIn = AccessToken.getCurrentAccessToken() != null;
    if (loggedIn) {
        Intent intent = new Intent(this, ImagesActivity.class);
        this.startActivity(intent);

        return;
    }

    // ...
That should be all. Run the app one more time and check if everything works as it should.
I hope you enjoyed building this and learned a lot along the way. Please let me know in the comments how it was for you, if you found any problems or if you have any improvements to suggest. Also, if this tutorial helped you build some other Android apps, please add some links in the comments and tell all of us about them.
You can get the final code from GitHub, in case something goes terribly wrong and you don’t manage to fix it. See you at the next tutorial!