
A lot of Android apps have face detection enabled for still images or even for the camera live video feed. In this tutorial I will show how you can implement this in your app.
Project Setup
Start by creating a new Android app from Android Studio. Name it AndroidFaceDetection, choose the Phone and Tablet form factor and set the minimum SDK to API 15. Choose the Empty Activity as the starting point and let its name to be the default MainActivity.
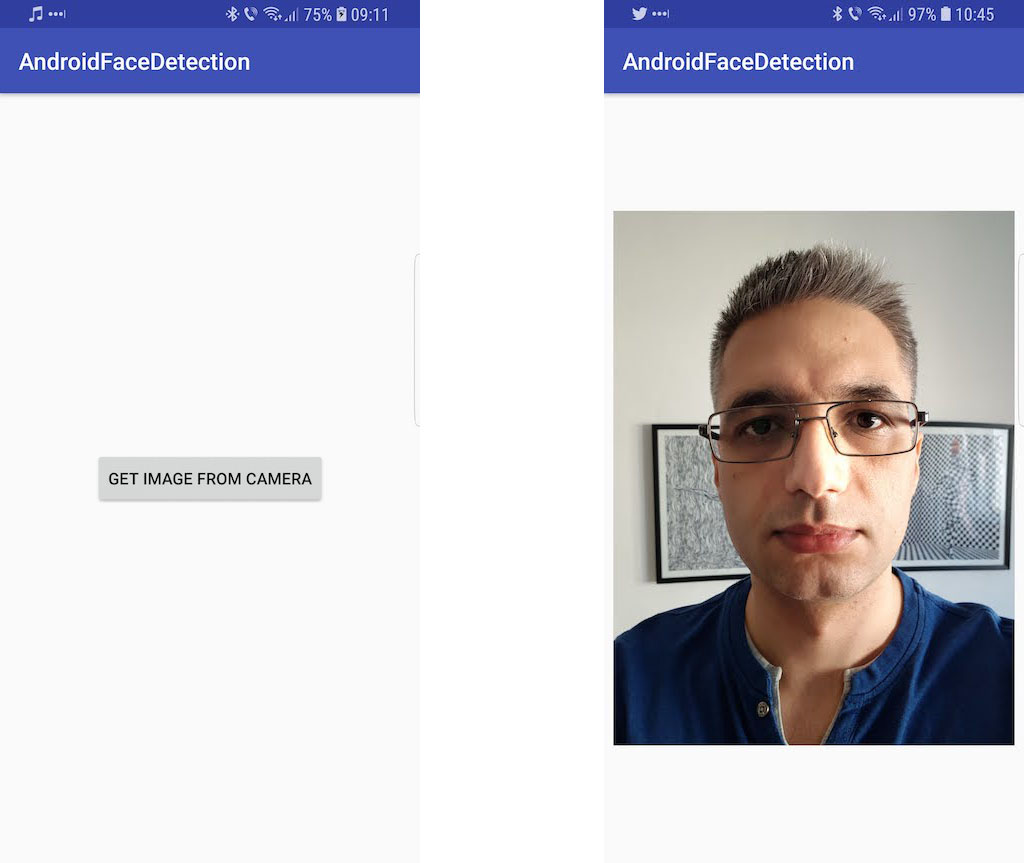
Get Image from Camera
We’ll continue by making the app able to take a photo using the front facing camera. In the next section, we will add the code to detect faces in this photo.
First, replace the Hello World! TextView from the activity_main.xml file with a button, to launch the camera:
<?xml version="1.0" encoding="utf-8"?>
<android.support.constraint.ConstraintLayout
    ...>

    <Button
        android:id="@+id/button"
        android:layout_width="wrap_content"
        android:layout_height="wrap_content"
        android:onClick="onImageFromCameraClick"
        android:text="Get Image from Camera"
        app:layout_constraintBottom_toBottomOf="parent"
        app:layout_constraintLeft_toLeftOf="parent"
        app:layout_constraintRight_toRightOf="parent"
        app:layout_constraintTop_toTopOf="parent" />

</android.support.constraint.ConstraintLayout>
In the MainActivity.java file, add the onImageFromCameraClick method that will do the job of opening the device’s camera for us:
public class MainActivity extends AppCompatActivity {

    private static final int REQUEST_IMAGE_CAPTURE = 1;

    // ...

    public void onImageFromCameraClick(View view) {
        Intent intent = new Intent(MediaStore.ACTION_IMAGE_CAPTURE);
        if (intent.resolveActivity(getPackageManager()) != null) {
            File photoFile = null;
            try {
                photoFile = createImageFile();
            } catch (IOException e) {
                Toast.makeText(this, e.getMessage(), Toast.LENGTH_LONG);
            }

            if (photoFile != null) {
                Uri photoUri = FileProvider.getUriForFile(this, getApplicationContext().getPackageName() + ".fileprovider", photoFile);
                intent.putExtra(MediaStore.EXTRA_OUTPUT, photoUri);
                startActivityForResult(intent, REQUEST_IMAGE_CAPTURE);
            }
        }
    }
}
This uses an Android Intent to open the camera and creates a file for the image to be saved to. This means we will need the permission to write on the phone’s external storage, so let’s add this to the AndroidManifest.xml file:
<?xml version="1.0" encoding="utf-8"?>
<manifest ...>

    <uses-permission android:name="android.permission.WRITE_EXTERNAL_STORAGE" />

    <application ...>
        <activity android:name=".MainActivity">
            ...
        </activity>

        <provider
            android:name="android.support.v4.content.FileProvider"
            android:authorities="${applicationId}.fileprovider"
            android:exported="false"
            android:grantUriPermissions="true">
            <meta-data
                android:name="android.support.FILE_PROVIDER_PATHS"
                android:resource="@xml/file_paths" />
        </provider>
    </application>
</manifest>
We also added a file provider. We need this to be able to get the file Uri, that is included in the camera intent. We also need to add a new xml file to define the path where the file should be saved. Create a new xml directory in the res folder and, in it, the new file_paths.xml file:
<?xml version="1.0" encoding="utf-8"?>
<paths xmlns:android="http://schemas.android.com/apk/res/android">
    <external-path name="my_images" path="." />
</paths>
Back in the MainActivity, add the createImageFile method that actually creates our new file:
public class MainActivity extends AppCompatActivity {

    String mCurrentPhotoPath;

    private static final int REQUEST_IMAGE_CAPTURE = 1;
    private static final int REQUEST_PERMISSION_WRITE_EXTERNAL_STORAGE = 2;

    // ...

    private File createImageFile() throws IOException {
        if (ContextCompat.checkSelfPermission(this, Manifest.permission.WRITE_EXTERNAL_STORAGE) != PackageManager.PERMISSION_GRANTED) {
            // permission not granted, initiate request
            ActivityCompat.requestPermissions(this, new String[]{Manifest.permission.WRITE_EXTERNAL_STORAGE}, REQUEST_PERMISSION_WRITE_EXTERNAL_STORAGE);
        } else {
            // Create an image file name
            String timeStamp = new SimpleDateFormat("yyyyMMdd_HHmmss").format(new Date());
            String imageFileName = "JPEG_" + timeStamp + "_";
            File storageDir = Environment.getExternalStoragePublicDirectory(Environment.DIRECTORY_PICTURES);
            File image = File.createTempFile(
                    imageFileName,  /* prefix */
                    ".jpg",         /* suffix */
                    storageDir      /* directory */
            );
            mCurrentPhotoPath = image.getAbsolutePath(); // save this to use in the intent

            return image;
        }

        return null;
    }
}
When the image is delivered back to us, we will open a new activity to show it to the user. So create a new one, named FaceDetectionActivity (a simple empty one), and add the code to start it:
public class MainActivity extends AppCompatActivity {

    // ...

    @Override
    protected void onActivityResult(int requestCode, int resultCode, Intent data) {
        if (requestCode == REQUEST_IMAGE_CAPTURE && resultCode == RESULT_OK) {
            Intent intent = new Intent(this, FaceDetectionActivity.class);
            intent.putExtra("mCurrentPhotoPath", mCurrentPhotoPath);
            startActivity(intent);
        }
    }
}
In the activity_face_detection.xml layout, we only need an ImageView widget, to show the captured image:
<?xml version="1.0" encoding="utf-8"?>
<android.support.constraint.ConstraintLayout ...>

    <ImageView
        android:id="@+id/imageView"
        android:layout_width="0dp"
        android:layout_height="0dp"
        android:layout_marginBottom="8dp"
        android:layout_marginRight="8dp"
        android:layout_marginLeft="8dp"
        android:layout_marginTop="8dp"
        app:layout_constraintBottom_toBottomOf="parent"
        app:layout_constraintEnd_toEndOf="parent"
        app:layout_constraintLeft_toLeftOf="parent"
        app:layout_constraintTop_toTopOf="parent" />

</android.support.constraint.ConstraintLayout>
The last thing left to do, in the FaceDetectionActivity, is to get the file Uri from the intent and load the image:
public class FaceDetectionActivity extends AppCompatActivity {

    @Override
    protected void onCreate(Bundle savedInstanceState) {
        super.onCreate(savedInstanceState);
        setContentView(R.layout.activity_face_detection);

        Intent intent = getIntent();
        final ImageView imageView = findViewById(R.id.imageView);
        final String mCurrentPhotoPath = intent.getStringExtra("mCurrentPhotoPath");

        // run image related code after the view was laid out
        // to have all dimensions calculated
        imageView.post(new Runnable() {
            @Override
            public void run() {
                if (mCurrentPhotoPath != null) {
                    Bitmap bitmap = getBitmapFromPathForImageView(mCurrentPhotoPath, imageView);
                    imageView.setImageBitmap(bitmap);
                }
            }
        });
    }

    private Bitmap getBitmapFromPathForImageView(String mCurrentPhotoPath, ImageView imageView) {
        // Get the dimensions of the View
        int targetW = imageView.getWidth();
        int targetH = imageView.getHeight();

        // Get the dimensions of the bitmap
        BitmapFactory.Options bmOptions = new BitmapFactory.Options();
        bmOptions.inJustDecodeBounds = true;
        BitmapFactory.decodeFile(mCurrentPhotoPath, bmOptions);
        int photoW = bmOptions.outWidth;
        int photoH = bmOptions.outHeight;

        // Determine how much to scale down the image
        int scaleFactor = Math.min(photoW/targetW, photoH/targetH);

        // Decode the image file into a Bitmap sized to fill the View
        bmOptions.inJustDecodeBounds = false;
        bmOptions.inSampleSize = scaleFactor;
        bmOptions.inPurgeable = true;

        Bitmap bitmap = BitmapFactory.decodeFile(mCurrentPhotoPath, bmOptions);
        Bitmap rotatedBitmap = bitmap;

        // rotate bitmap if needed
        try {
            ExifInterface ei = new ExifInterface(mCurrentPhotoPath);
            int orientation = ei.getAttributeInt(ExifInterface.TAG_ORIENTATION, ExifInterface.ORIENTATION_UNDEFINED);
            switch (orientation) {
                case ExifInterface.ORIENTATION_ROTATE_90:
                    rotatedBitmap = rotateImage(bitmap, 90);
                    break;
                case ExifInterface.ORIENTATION_ROTATE_180:
                    rotatedBitmap = rotateImage(bitmap, 180);
                    break;
                case ExifInterface.ORIENTATION_ROTATE_270:
                    rotatedBitmap = rotateImage(bitmap, 270);
                    break;
            }
        } catch (IOException e) {
            Toast.makeText(this, e.getMessage(), Toast.LENGTH_SHORT).show();
        }

        return rotatedBitmap;
    }

    public static Bitmap rotateImage(Bitmap source, float angle) {
        Matrix matrix = new Matrix();
        matrix.postRotate(angle);
        return Bitmap.createBitmap(source, 0, 0, source.getWidth(), source.getHeight(), matrix, true);
    }
}
That’s all for now. Run the app and you should be able to take a photo using the camera and see it in the second activity we just created.
Detect Faces and Face Features
To detect faces in our app, we will use the Mobile Vision API provided by Google, so let’s add it to our app’s build.gradle file:
dependencies {
    ...
    implementation 'com.google.android.gms:play-services-vision:11.8.0'
}
We also need to add this dependency in the AndroidManifest.xml file:
<?xml version="1.0" encoding="utf-8"?>
<manifest ...>

    ...

    <application ...>
        <meta-data
            android:name="com.google.android.gms.vision.DEPENDENCIES"
            android:value="face" />
        ...

    </application>

</manifest>
In the FaceDetectionActivity‘s onCreate method, we will initialize the face detector using the following code:
@Override
protected void onCreate(Bundle savedInstanceState) {
    super.onCreate(savedInstanceState);
    setContentView(R.layout.activity_face_detection);

    final FaceDetector detector = new FaceDetector.Builder(this)
            .setTrackingEnabled(false)
            .setLandmarkType(FaceDetector.ALL_LANDMARKS)
            .build();

    // ...
This will configure the face detector to detect all the face features in our image. We don’t need tracking to be enabled as we are only using a static image for the moment.
To actually detect the faces in our image, only 2 lines of code are needed:
private static final String TAG = "FaceDetection";

@Override
protected void onCreate(Bundle savedInstanceState) {
    // ...

    // run image related code after the view was laid out
    // to have all dimensions calculated
    imageView.post(new Runnable() {
        @Override
        public void run() {
            if (mCurrentPhotoPath != null) {
                Bitmap bitmap = getBitmapFromPathForImageView(mCurrentPhotoPath, imageView);
                imageView.setImageBitmap(bitmap);

                Frame frame = new Frame.Builder().setBitmap(bitmap).build();
                SparseArray<Face> faces = detector.detect(frame);

                Log.d(TAG, "Faces detected: " + String.valueOf(faces.size()));
            }
        }
    });
}
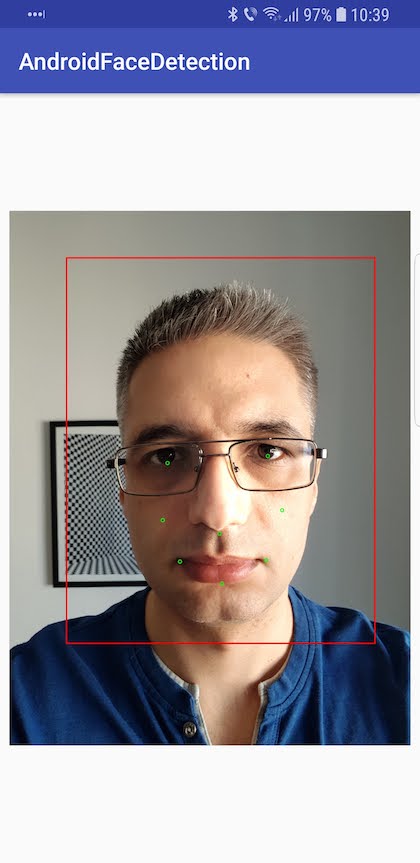
The last thing to do, is to use the information from the detected faces to draw over the image and show the user what we did:
@Override
protected void onCreate(Bundle savedInstanceState) {
    // ...

    // run image related code after the view was laid out
    // to have all dimensions calculated
    imageView.post(new Runnable() {
        @Override
        public void run() {
            if (mCurrentPhotoPath != null) {
                // ...

                Log.d(TAG, "Faces detected: " + String.valueOf(faces.size()));

                Paint paint = new Paint();
                paint.setColor(Color.GREEN);
                paint.setStyle(Paint.Style.STROKE);
                paint.setStrokeWidth(5);

                Bitmap mutableBitmap = bitmap.copy(Bitmap.Config.ARGB_8888, true);
                Canvas canvas = new Canvas(mutableBitmap);

                for (int i = 0; i < faces.size(); ++i) {
                    Face face = faces.valueAt(i);
                    for (Landmark landmark : face.getLandmarks()) {
                        int cx = (int) (landmark.getPosition().x);
                        int cy = (int) (landmark.getPosition().y);
                        canvas.drawCircle(cx, cy, 10, paint);
                    }

                    Path path = new Path();
                    path.moveTo(face.getPosition().x, face.getPosition().y);
                    path.lineTo(face.getPosition().x + face.getWidth(), face.getPosition().y);
                    path.lineTo(face.getPosition().x + face.getWidth(), face.getPosition().y + face.getHeight());
                    path.lineTo(face.getPosition().x, face.getPosition().y + face.getHeight());
                    path.close();

                    Paint redPaint = new Paint();
                    redPaint.setColor(0XFFFF0000);
                    redPaint.setStyle(Paint.Style.STROKE);
                    redPaint.setStrokeWidth(8.0f);
                    canvas.drawPath(path, redPaint);
                }

                imageView.setImageBitmap(mutableBitmap);
            }
        }
    });
}
Run the app and take some selfies to check how everything works. The app should be able to detect your face and its associated facial landmarks (e.g., eyes, nose, etc.). Here’s one example of mine:
If you want to find out what more you can find out about the detected face, check out the Google’s documentation.
Detect Faces in Video
In this last part of the tutorial we will show the video preview from the camera to the user and detect and track faces as they appear and move into the frame. For this, we need a slightly complicated setup, so let’s begin. We will go quite fast through the setup, but you can find out more about how it all works on Google’s developer website.
First, we need to add the CAMERA permission to the AndroidManifest.xml file. That’s because this time we will directly use the camera hardware instead of letting the operating system handle it.
<uses-permission android:name="android.permission.CAMERA" />
Next, we need to have a preview class that will show the images from the camera. Create a new CameraPreview Java class:
public class CameraPreview extends ViewGroup {
    private static final String TAG = "CameraPreview";

    private Context mContext;
    private SurfaceView mSurfaceView;
    private boolean mStartRequested;
    private boolean mSurfaceAvailable;
    private CameraSource mCameraSource;

    private GraphicOverlay mOverlay;

    public CameraPreview(Context context, AttributeSet attrs) {
        super(context, attrs);
        mContext = context;
        mStartRequested = false;
        mSurfaceAvailable = false;

        mSurfaceView = new SurfaceView(context);
        mSurfaceView.getHolder().addCallback(new SurfaceCallback());
        addView(mSurfaceView);
    }

    public void start(CameraSource cameraSource) throws IOException {
        if (cameraSource == null) {
            stop();
        }

        mCameraSource = cameraSource;

        if (mCameraSource != null) {
            mStartRequested = true;
            startIfReady();
        }
    }

    public void start(CameraSource cameraSource, GraphicOverlay overlay) throws IOException {
        mOverlay = overlay;
        start(cameraSource);
    }

    public void stop() {
        if (mCameraSource != null) {
            mCameraSource.stop();
        }
    }

    public void release() {
        if (mCameraSource != null) {
            mCameraSource.release();
            mCameraSource = null;
        }
    }

    @SuppressLint("MissingPermission")
    private void startIfReady() throws IOException {
        if (mStartRequested && mSurfaceAvailable) {
            mCameraSource.start(mSurfaceView.getHolder());
            if (mOverlay != null) {
                Size size = mCameraSource.getPreviewSize();
                int min = Math.min(size.getWidth(), size.getHeight());
                int max = Math.max(size.getWidth(), size.getHeight());
                if (isPortraitMode()) {
                    // Swap width and height sizes when in portrait, since it will be rotated by
                    // 90 degrees
                    mOverlay.setCameraInfo(min, max, mCameraSource.getCameraFacing());
                } else {
                    mOverlay.setCameraInfo(max, min, mCameraSource.getCameraFacing());
                }
                mOverlay.clear();
            }
            mStartRequested = false;
        }
    }

    private class SurfaceCallback implements SurfaceHolder.Callback {
        @Override
        public void surfaceCreated(SurfaceHolder surface) {
            mSurfaceAvailable = true;
            try {
                startIfReady();
            } catch (IOException e) {
                Log.e(TAG, "Could not start camera source.", e);
            }
        }

        @Override
        public void surfaceDestroyed(SurfaceHolder surface) {
            mSurfaceAvailable = false;
        }

        @Override
        public void surfaceChanged(SurfaceHolder holder, int format, int width, int height) {
        }
    }

    @Override
    protected void onLayout(boolean changed, int left, int top, int right, int bottom) {
        int width = 320;
        int height = 240;
        if (mCameraSource != null) {
            Size size = mCameraSource.getPreviewSize();
            if (size != null) {
                width = size.getWidth();
                height = size.getHeight();
            }
        }

        // Swap width and height sizes when in portrait, since it will be rotated 90 degrees
        if (isPortraitMode()) {
            int tmp = width;
            width = height;
            height = tmp;
        }

        final int layoutWidth = right - left;
        final int layoutHeight = bottom - top;

        // Computes height and width for potentially doing fit width.
        int childWidth = layoutWidth;
        int childHeight = (int)(((float) layoutWidth / (float) width) * height);

        // If height is too tall using fit width, does fit height instead.
        if (childHeight > layoutHeight) {
            childHeight = layoutHeight;
            childWidth = (int)(((float) layoutHeight / (float) height) * width);
        }

        for (int i = 0; i < getChildCount(); ++i) {
            getChildAt(i).layout(0, 0, childWidth, childHeight);
        }

        try {
            startIfReady();
        } catch (IOException e) {
            Log.e(TAG, "Could not start camera source.", e);
        }
    }

    private boolean isPortraitMode() {
        int orientation = mContext.getResources().getConfiguration().orientation;
        if (orientation == Configuration.ORIENTATION_LANDSCAPE) {
            return false;
        }
        if (orientation == Configuration.ORIENTATION_PORTRAIT) {
            return true;
        }

        Log.d(TAG, "isPortraitMode returning false by default");
        return false;
    }
}
Next, we need some additional classes: one GraphicFaceTracker that holds the data for each detected face, one FaceGraphic which renders the graphics for each face and one GraphicOverlay class that will take care of rendering objects, faces in our case, to be overlayed on top of the camera preview.
class GraphicFaceTracker extends Tracker<Face> {
    private GraphicOverlay mOverlay;
    private FaceGraphic mFaceGraphic;

    GraphicFaceTracker(GraphicOverlay overlay) {
        mOverlay = overlay;
        mFaceGraphic = new FaceGraphic(overlay);
    }

    /**
     * Start tracking the detected face instance within the face overlay.
     */
    @Override
    public void onNewItem(int faceId, Face item) {
        mFaceGraphic.setId(faceId);
    }

    /**
     * Update the position/characteristics of the face within the overlay.
     */
    @Override
    public void onUpdate(FaceDetector.Detections<Face> detectionResults, Face face) {
        mOverlay.add(mFaceGraphic);
        mFaceGraphic.updateFace(face);
    }

    /**
     * Hide the graphic when the corresponding face was not detected.  This can happen for
     * intermediate frames temporarily (e.g., if the face was momentarily blocked from
     * view).
     */
    @Override
    public void onMissing(FaceDetector.Detections<Face> detectionResults) {
        mOverlay.remove(mFaceGraphic);
    }

    /**
     * Called when the face is assumed to be gone for good. Remove the graphic annotation from
     * the overlay.
     */
    @Override
    public void onDone() {
        mOverlay.remove(mFaceGraphic);
    }
}
The FaceGraphic class is defined below:
class FaceGraphic extends GraphicOverlay.Graphic {
    private static final float FACE_POSITION_RADIUS = 10.0f;
    private static final float ID_TEXT_SIZE = 40.0f;
    private static final float ID_Y_OFFSET = 50.0f;
    private static final float ID_X_OFFSET = -50.0f;
    private static final float BOX_STROKE_WIDTH = 5.0f;

    private static final int COLOR_CHOICES[] = {
            Color.BLUE,
            Color.CYAN,
            Color.GREEN,
            Color.MAGENTA,
            Color.RED,
            Color.WHITE,
            Color.YELLOW
    };
    private static int mCurrentColorIndex = 0;

    private Paint mFacePositionPaint;
    private Paint mIdPaint;
    private Paint mBoxPaint;

    private volatile Face mFace;
    private int mFaceId;

    FaceGraphic(GraphicOverlay overlay) {
        super(overlay);

        mCurrentColorIndex = (mCurrentColorIndex + 1) % COLOR_CHOICES.length;
        final int selectedColor = COLOR_CHOICES[mCurrentColorIndex];

        mFacePositionPaint = new Paint();
        mFacePositionPaint.setColor(selectedColor);

        mIdPaint = new Paint();
        mIdPaint.setColor(selectedColor);
        mIdPaint.setTextSize(ID_TEXT_SIZE);

        mBoxPaint = new Paint();
        mBoxPaint.setColor(selectedColor);
        mBoxPaint.setStyle(Paint.Style.STROKE);
        mBoxPaint.setStrokeWidth(BOX_STROKE_WIDTH);
    }

    void setId(int id) {
        mFaceId = id;
    }


    /**
     * Updates the face instance from the detection of the most recent frame.  Invalidates the
     * relevant portions of the overlay to trigger a redraw.
     */
    void updateFace(Face face) {
        mFace = face;
        postInvalidate();
    }

    /**
     * Draws the face annotations for position on the supplied canvas.
     */
    @Override
    public void draw(Canvas canvas) {
        Face face = mFace;
        if (face == null) {
            return;
        }

        // Draws a circle at the position of the detected face, with the face's track id below.
        float x = translateX(face.getPosition().x + face.getWidth() / 2);
        float y = translateY(face.getPosition().y + face.getHeight() / 2);
        canvas.drawCircle(x, y, FACE_POSITION_RADIUS, mFacePositionPaint);
        canvas.drawText("id: " + mFaceId, x + ID_X_OFFSET, y + ID_Y_OFFSET, mIdPaint);

        // Draws a bounding box around the face.
        float xOffset = scaleX(face.getWidth() / 2.0f);
        float yOffset = scaleY(face.getHeight() / 2.0f);
        float left = x - xOffset;
        float top = y - yOffset;
        float right = x + xOffset;
        float bottom = y + yOffset;
        canvas.drawRect(left, top, right, bottom, mBoxPaint);

        // Draws a circle for each face feature detected
        for (Landmark landmark : face.getLandmarks()) {
            // the preview display of front-facing cameras is flipped horizontally
            float cx = canvas.getWidth() - scaleX(landmark.getPosition().x);
            float cy = scaleY(landmark.getPosition().y);
            canvas.drawCircle(cx, cy, 10, mIdPaint);
        }
    }
}
Finally, the GraphicOverlay:
public class GraphicOverlay extends View {
    private final Object mLock = new Object();
    private int mPreviewWidth;
    private float mWidthScaleFactor = 1.0F;
    private int mPreviewHeight;
    private float mHeightScaleFactor = 1.0F;
    private int mFacing = 0;
    private Set<GraphicOverlay.Graphic> mGraphics = new HashSet();

    public GraphicOverlay(Context context, AttributeSet attrs) {
        super(context, attrs);
    }

    public void clear() {
        Object var1 = this.mLock;
        synchronized(this.mLock) {
            this.mGraphics.clear();
        }

        this.postInvalidate();
    }

    public void add(GraphicOverlay.Graphic graphic) {
        Object var2 = this.mLock;
        synchronized(this.mLock) {
            this.mGraphics.add(graphic);
        }

        this.postInvalidate();
    }

    public void remove(GraphicOverlay.Graphic graphic) {
        Object var2 = this.mLock;
        synchronized(this.mLock) {
            this.mGraphics.remove(graphic);
        }

        this.postInvalidate();
    }

    public void setCameraInfo(int previewWidth, int previewHeight, int facing) {
        Object var4 = this.mLock;
        synchronized(this.mLock) {
            this.mPreviewWidth = previewWidth;
            this.mPreviewHeight = previewHeight;
            this.mFacing = facing;
        }

        this.postInvalidate();
    }

    protected void onDraw(Canvas canvas) {
        super.onDraw(canvas);
        Object var2 = this.mLock;
        synchronized(this.mLock) {
            if (this.mPreviewWidth != 0 && this.mPreviewHeight != 0) {
                this.mWidthScaleFactor = (float)canvas.getWidth() / (float)this.mPreviewWidth;
                this.mHeightScaleFactor = (float)canvas.getHeight() / (float)this.mPreviewHeight;
            }

            Iterator var3 = this.mGraphics.iterator();

            while(var3.hasNext()) {
                GraphicOverlay.Graphic graphic = (GraphicOverlay.Graphic)var3.next();
                graphic.draw(canvas);
            }

        }
    }

    public abstract static class Graphic {
        private GraphicOverlay mOverlay;

        public Graphic(GraphicOverlay overlay) {
            this.mOverlay = overlay;
        }

        public abstract void draw(Canvas var1);

        public float scaleX(float horizontal) {
            return horizontal * this.mOverlay.mWidthScaleFactor;
        }

        public float scaleY(float vertical) {
            return vertical * this.mOverlay.mHeightScaleFactor;
        }

        public float translateX(float x) {
            return this.mOverlay.mFacing == 1 ? (float)this.mOverlay.getWidth() - this.scaleX(x) : this.scaleX(x);
        }

        public float translateY(float y) {
            return this.scaleY(y);
        }

        public void postInvalidate() {
            this.mOverlay.postInvalidate();
        }
    }
}
All the stuff we created above will be used in a new VideoFaceDetectionActivity, so create a new, empty one. Then add the preview and the overlay in its layout file:
<?xml version="1.0" encoding="utf-8"?>
<android.support.constraint.ConstraintLayout ...>

    <com.dragosholban.androidfacedetection.CameraPreview
        android:id="@+id/preview"
        android:layout_width="match_parent"
        android:layout_height="match_parent">

        <com.dragosholban.androidfacedetection.GraphicOverlay
            android:id="@+id/faceOverlay"
            android:layout_width="match_parent"
            android:layout_height="match_parent" />

    </com.dragosholban.androidfacedetection.CameraPreview>
</android.support.constraint.ConstraintLayout>
Now, in the VideoFaceDetectionActivity, add the code to start the camera and setup the preview class we created earlier:
public class VideoFaceDetectionActivity extends AppCompatActivity {

    private CameraPreview mPreview;
    private GraphicOverlay mGraphicOverlay;
    private CameraSource mCameraSource = null;

    private static final String TAG = "VideoFaceDetection";
    private static final int REQUEST_CAMERA_PERMISSION = 1;
    private static final int RC_HANDLE_GMS = 2;

    @Override
    protected void onCreate(Bundle savedInstanceState) {
        super.onCreate(savedInstanceState);
        setContentView(R.layout.activity_video_face_detection);

        mPreview = findViewById(R.id.preview);
        mGraphicOverlay = findViewById(R.id.faceOverlay);

        if (ContextCompat.checkSelfPermission(this, Manifest.permission.CAMERA) != PackageManager.PERMISSION_GRANTED) {
            // permission not granted, initiate request
            ActivityCompat.requestPermissions(this, new String[]{Manifest.permission.CAMERA}, REQUEST_CAMERA_PERMISSION);
        } else {
            createCameraSource();
        }
    }

    @Override
    protected void onActivityResult(int requestCode, int resultCode, Intent data) {
        if (requestCode == REQUEST_CAMERA_PERMISSION && resultCode == RESULT_OK) {
            createCameraSource();
        }
    }

    private void createCameraSource() {
        Context context = getApplicationContext();
        FaceDetector detector = new FaceDetector.Builder(context)
                .setClassificationType(FaceDetector.ALL_CLASSIFICATIONS)
                .build();

        detector.setProcessor(
                new MultiProcessor.Builder<>(new GraphicFaceTrackerFactory())
                        .build());

        mCameraSource = new CameraSource.Builder(context, detector)
                .setRequestedPreviewSize(640, 480)
                .setFacing(CameraSource.CAMERA_FACING_FRONT)
                .setRequestedFps(30.0f)
                .build();
    }

    /**
     * Restarts the camera.
     */
    @Override
    protected void onResume() {
        super.onResume();

        startCameraSource();
    }

    /**
     * Stops the camera.
     */
    @Override
    protected void onPause() {
        super.onPause();
        mPreview.stop();
    }

    /**
     * Releases the resources associated with the camera source, the associated detector, and the
     * rest of the processing pipeline.
     */
    @Override
    protected void onDestroy() {
        super.onDestroy();
        if (mCameraSource != null) {
            mCameraSource.release();
        }
    }

    private void startCameraSource() {
        // check that the device has play services available.
        int code = GoogleApiAvailability.getInstance().isGooglePlayServicesAvailable(getApplicationContext());
        if (code != ConnectionResult.SUCCESS) {
            Dialog dlg = GoogleApiAvailability.getInstance().getErrorDialog(this, code, RC_HANDLE_GMS);
            dlg.show();
        }

        if (mCameraSource != null) {
            try {
                mPreview.start(mCameraSource, mGraphicOverlay);
            } catch (IOException e) {
                Log.e(TAG, "Unable to start camera source.", e);
                mCameraSource.release();
                mCameraSource = null;
            }
        }
    }

    /**
     * Factory for creating a face tracker to be associated with a new face.  The multiprocessor
     * uses this factory to create face trackers as needed -- one for each individual.
     */
    private class GraphicFaceTrackerFactory implements MultiProcessor.Factory<Face> {
        @Override
        public Tracker<Face> create(Face face) {
            return new GraphicFaceTracker(mGraphicOverlay);
        }
    }
}
The last thing remaining is to add a new button in the activity_main.xml layout and the code in the MainActivity class to open this new VideoFaceDetectionActivity.
<?xml version="1.0" encoding="utf-8"?>
<android.support.constraint.ConstraintLayout ...>

    <Button
        ... />

    <Button
        android:layout_width="wrap_content"
        android:layout_height="wrap_content"
        android:onClick="onVideoFromCameraClick"
        android:text="Get Video from Camera"
        app:layout_constraintTop_toBottomOf="@id/button"
        app:layout_constraintLeft_toLeftOf="parent"
        app:layout_constraintRight_toRightOf="parent" />

</android.support.constraint.ConstraintLayout>
In the MainActivity, just add the following method:
public void onVideoFromCameraClick(View view) {
    Intent intent = new Intent(this, VideoFaceDetectionActivity.class);
    startActivity(intent);
}
Run the app one more time and try the new feature. Try asking some friends to pose with you so you can see how all the faces are detected.
I hope you enjoyed building this and learned a lot along the way. Please let me know in the comments how it was for you, if you found any problems or if you have any improvements to suggest. Also, if this tutorial helped you build some other Android apps, please add some links in the comments and tell all of us about them.
You can get the final code from GitHub, in case something goes terribly wrong and you don’t manage to fix it. See you at the next tutorial!
I keep getting this error: 07-03 13:35:03.633 17032-17032/com.example.a40058058.androidfacedetection E/AndroidRuntime: FATAL EXCEPTION: main
Process: com.example.a40058058.androidfacedetection, PID: 17032
java.lang.ArithmeticException: divide by zero
at com.example.a40058058.androidfacedetection.FaceDetectionActivity.getBitmapFromPathForImageView(FaceDetectionActivity.java:52)
at com.example.a40058058.androidfacedetection.FaceDetectionActivity.access$000(FaceDetectionActivity.java:15)
at com.example.a40058058.androidfacedetection.FaceDetectionActivity$1.run(FaceDetectionActivity.java:32)
Any ideas as to why this might be? Thanks for the great tutorial!
In activity_face_detection.xml , in ImageView section, try to change those two lines:
android:layout_width=”0dp”
android:layout_height=”0dp”
by
android:layout_width=”411dp”
android:layout_height=”589dp”
Hi i tried this i have few queries
how to store the detected face in sqlite db?
can storing format be a string?
in second activity i have used same code to detect the face but now how to compare the captured face in second activity with captured face in first activity which is stored in sqlite DB?
Hello,
This tutorial is about face detection, not face recognition. There is nothing to store, it only detects faces in the images.
Do somebody have example for face recognition?
How can I count the number of faces in the live video…knowing this will really help for my app… Thanks
how emojies are applied in facedeection in vedio and than how vedio is saved??
How can can use the source code to use my own model to detect eye region landmarks?
hi thank you for you app . how can i show “face detected” in textview when face detected in your app