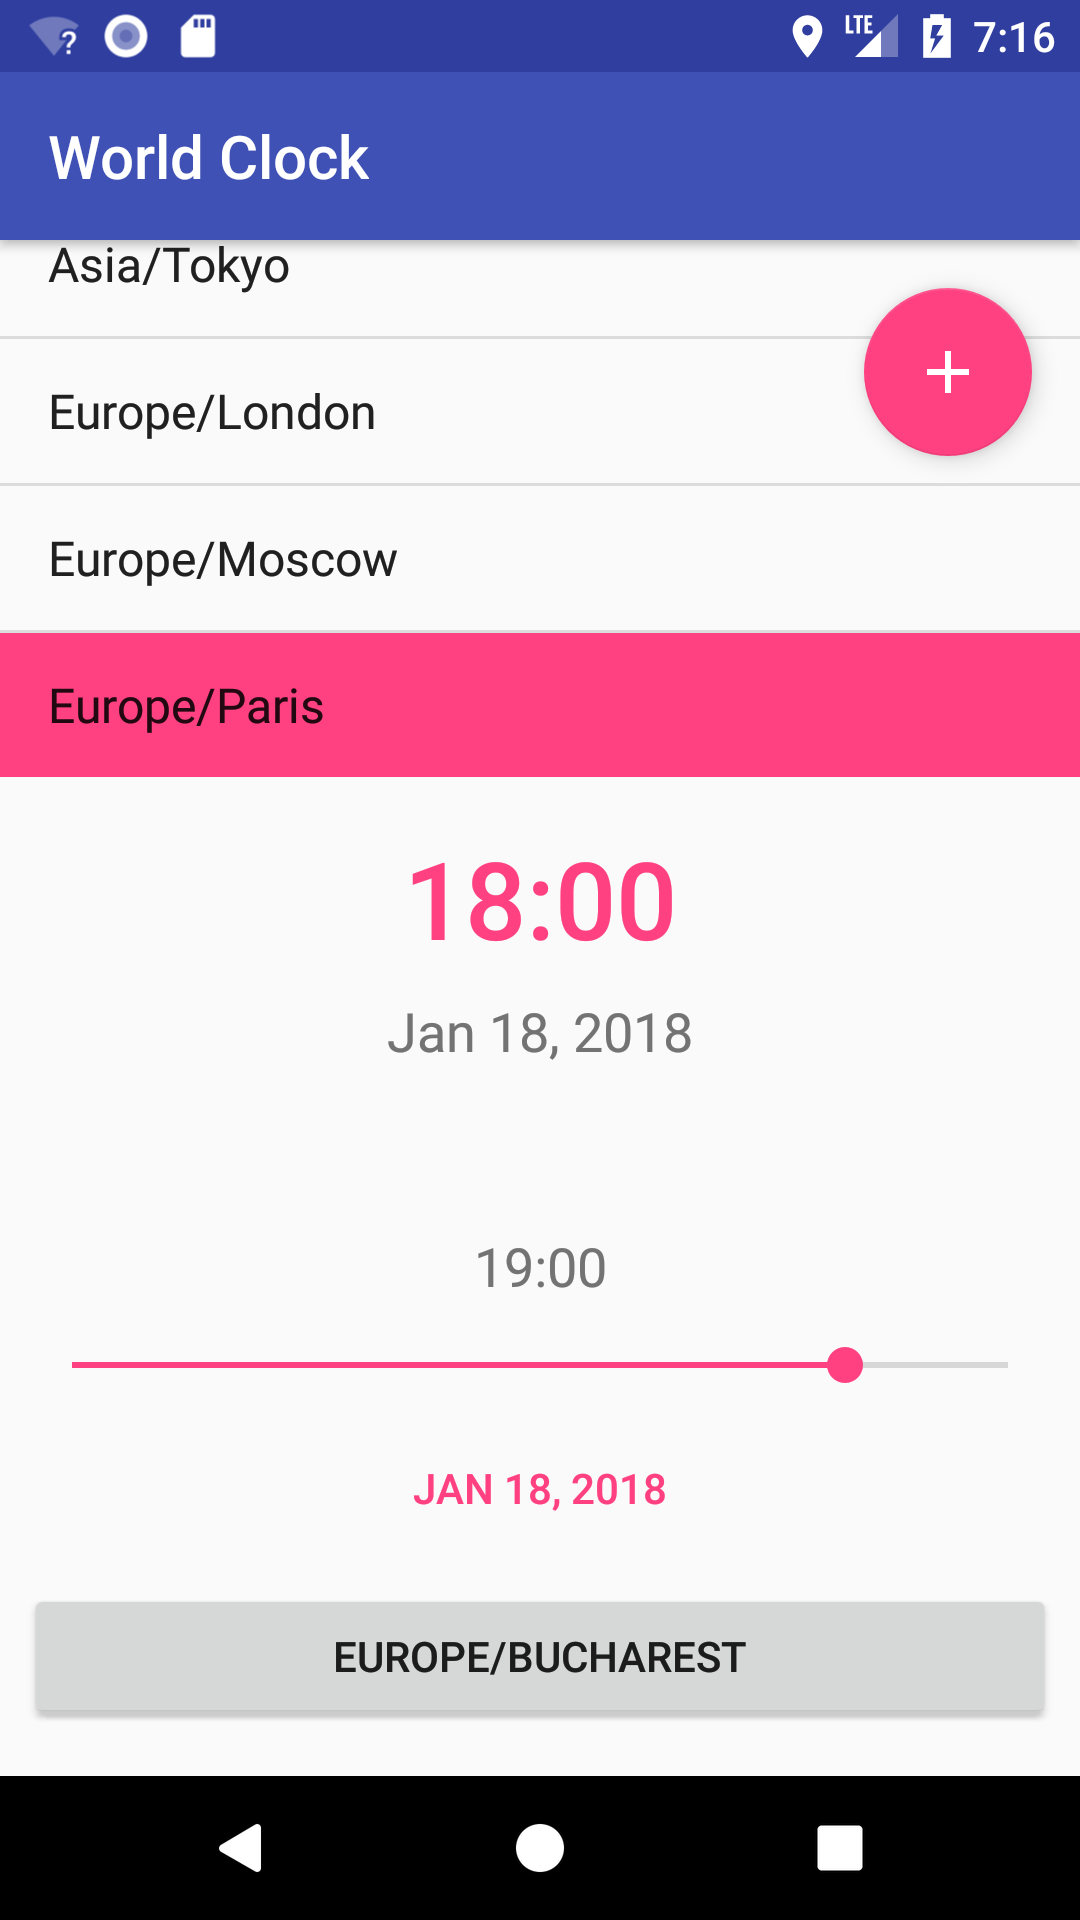
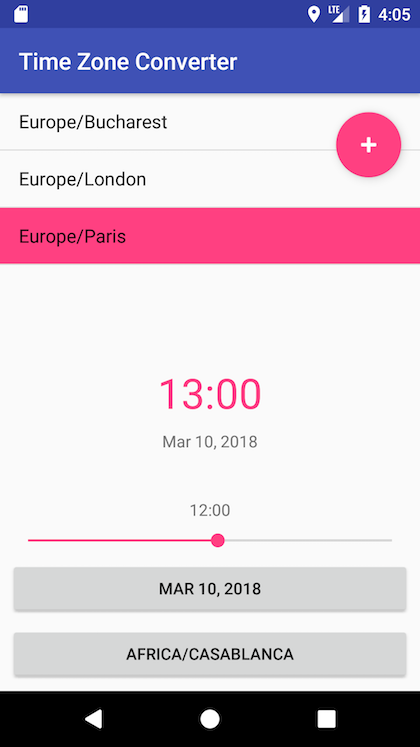
In this Android tutorial we will build a time zone converter app. This will help users find out the time in different places around the globe by selecting their time zone and the time zone to which they want to convert to. Everything will be configurable by the user: the source time zone, the destination time zone, the date and the time of the conversion. The final app will look like this:
If you want to test it before you build it, you can download it from the Google Play Store right now: World Clock – Time Zone Converter
If you have no previous experience with Android development, I recommend you stop here and take the quick first tutorial from the Android Developers website before continuing: Build Your First App
Project Setup
Let’s start by installing the latest version of Android Studio. When you’re done, create a new project:
- Fill in the project name: Time Zone Converter
- Add your company or personal domain in reverse order (com.dragosholban)
- Select the location for you new project and click Next
In the next screen you will have to choose the device type and the minimum Android version for your application. Just select the Phone and Tablet form factor. For the minimum SDK, I chose API 16: Android 4.1 (Jelly Bean) which, at the moment of writing, covers 99% of the active devices.
Click Next, then select the Empty Activity option. We will add everything we need later in the project.
Click Next once again, then, on this last screen, leave the default options and click on Finish.
Android Studio will take some time to build you project, then you’ll be ready to run the awesome Hello World Android app.
Building the User Interface
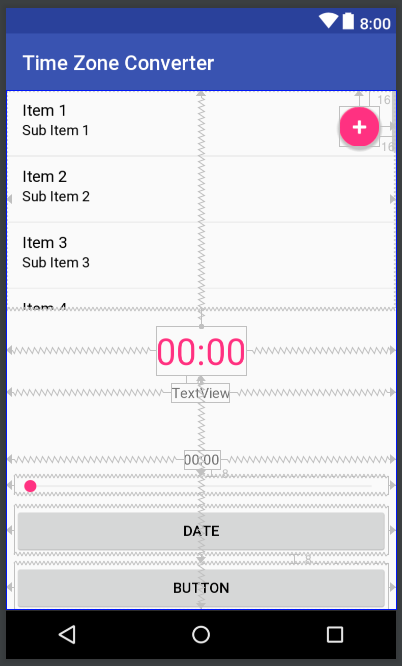
It’s now time to start changing the starter boilerplate to match our needs. Open the activity_main.xml layout file, from the res/layout folder, and select the Design tab if not already selected. You can also build the interface in the XML code (the Text tab) but let’s start by using the visual tools.
First, select and remove the Hello World! text by clicking on it and pressing delete.
Now, from the Palette, drag a Button to the bottom-center of the screen. From the sides, drag to the side of the screen to create left and right constraints of 8dp. Then drag from the bottom of the button to the bottom of the screen to create another 8dp constraint. Then change its layout_with to match_constraint and the ID to timeZoneButton.
Next, drag another Button on top of the first one. Create the same constraints to the sides and one from its bottom to the first button’s top. Don’t forget to set the layout_with to match_constraint here too. Give it an ID of dateButton. Double click this button and change the text to Date.
Now continue with a SeekBar, that will allow the user to set the time to be converted. Drag it on top of the last button, and create the same constraints as above, to the sides and from the bottom to the top of the dateButton. Set its ID to seekBar.
A TextView comes next, on top of the SeekBar. This will show the time that will be converted, so you can make it now show 00:00. The ID should be userTime. Be sure to center this horizontally (watch for the guide line) and add only the bottom constraint to the top of the SeekBar.
Right in the middle of the screen (watch again for the guide lines), drag another TextView. This will show the converted time so let’s make it bigger and colorful. Select it and set the textSize to 36dp and the textColor to @color/colorAccent (click on the tree dots to open the Resources dialog, then select the Color section and colorAccent from it). Set the text to 00:00 as before and the ID to convertedTime.
Under it, put another TextView to show the converted date. Set the top constraint to the above text, to be sure it stays in the right place. As always, set the ID to convertedDate.
Finally, for the top of the screen, drag a ListView that will contain a small list of time zones so the user can quickly select the one to convert to. Create left, top and right constraints to the margin of the screen of 0dp, and the bottom one, to the big convertedTime text, of 16dp. Change the layout_width and layout_height attributes to match_constraint and the ID to listView. We will also change the choiceMode to singleChoice to make the list highlight the selected item.
Only one element is left, a FloatingActionButton with the + sign. This will allow the user to add (or remove) time zones to the short list visible on the main screen. Drag it from the palette (be sure to drag it below the list) and, when prompted, search for and choose the ic_input_add icon. Wait a few moments for Android Studio to import the needed library for this, then select the button and change the tint attribute to white color so the + sign will be white instead of green. Move it to the top-right corner of the screen so it has a 16dp top and right margin.
That’s it. Now the main screen of the app should look like this:
As I previously mentioned, everything we did so far can be done from the code, editing the activity_main.xml source. Here is the resulting code, in case you had some hard time making everything fit:
<?xml version="1.0" encoding="utf-8"?>
<android.support.constraint.ConstraintLayout xmlns:android="http://schemas.android.com/apk/res/android"
    xmlns:app="http://schemas.android.com/apk/res-auto"
    xmlns:tools="http://schemas.android.com/tools"
    android:layout_width="match_parent"
    android:layout_height="match_parent"
    tools:context="dragosholban.com.timezoneconverter.MainActivity">

    <Button
        android:id="@+id/timeZoneButton"
        android:layout_width="0dp"
        android:layout_height="wrap_content"
        android:layout_marginBottom="8dp"
        android:layout_marginEnd="8dp"
        android:layout_marginStart="8dp"
        android:text="Button"
        app:layout_constraintBottom_toBottomOf="parent"
        app:layout_constraintEnd_toEndOf="parent"
        app:layout_constraintLeft_toLeftOf="parent"
        app:layout_constraintRight_toRightOf="parent"
        app:layout_constraintStart_toStartOf="parent" />

    <Button
        android:id="@+id/dateButton"
        android:layout_width="0dp"
        android:layout_height="wrap_content"
        android:layout_marginBottom="8dp"
        android:layout_marginEnd="8dp"
        android:layout_marginStart="8dp"
        android:text="Date"
        app:layout_constraintBottom_toTopOf="@+id/timeZoneButton"
        app:layout_constraintEnd_toEndOf="parent"
        app:layout_constraintLeft_toLeftOf="parent"
        app:layout_constraintRight_toRightOf="parent"
        app:layout_constraintStart_toStartOf="parent" />

    <SeekBar
        android:id="@+id/seekBar"
        android:layout_width="0dp"
        android:layout_height="wrap_content"
        android:layout_marginBottom="8dp"
        android:layout_marginEnd="8dp"
        android:layout_marginStart="8dp"
        app:layout_constraintBottom_toTopOf="@+id/dateButton"
        app:layout_constraintEnd_toEndOf="parent"
        app:layout_constraintLeft_toLeftOf="parent"
        app:layout_constraintRight_toRightOf="parent"
        app:layout_constraintStart_toStartOf="parent" />

    <TextView
        android:id="@+id/userTime"
        android:layout_width="wrap_content"
        android:layout_height="wrap_content"
        android:layout_marginBottom="8dp"
        android:text="00:00"
        app:layout_constraintBottom_toTopOf="@+id/seekBar"
        app:layout_constraintLeft_toLeftOf="parent"
        app:layout_constraintRight_toRightOf="parent" />

    <TextView
        android:id="@+id/convertedTime"
        android:layout_width="wrap_content"
        android:layout_height="wrap_content"
        android:text="00:00"
        android:textColor="@color/colorAccent"
        android:textSize="36dp"
        app:layout_constraintBottom_toBottomOf="parent"
        app:layout_constraintLeft_toLeftOf="parent"
        app:layout_constraintRight_toRightOf="parent"
        app:layout_constraintTop_toTopOf="parent" />

    <TextView
        android:id="@+id/convertedDate"
        android:layout_width="wrap_content"
        android:layout_height="wrap_content"
        android:layout_marginTop="8dp"
        android:text="TextView"
        app:layout_constraintLeft_toLeftOf="parent"
        app:layout_constraintRight_toRightOf="parent"
        app:layout_constraintTop_toBottomOf="@+id/convertedTime" />

    <ListView
        android:id="@+id/listView"
        android:layout_width="0dp"
        android:layout_height="0dp"
        android:layout_marginBottom="16dp"
        android:choiceMode="singleChoice"
        app:layout_constraintBottom_toTopOf="@+id/convertedTime"
        app:layout_constraintEnd_toEndOf="parent"
        app:layout_constraintLeft_toLeftOf="parent"
        app:layout_constraintRight_toRightOf="parent"
        app:layout_constraintStart_toStartOf="parent"
        app:layout_constraintTop_toTopOf="parent" />

    <android.support.design.widget.FloatingActionButton
        android:id="@+id/floatingActionButton"
        android:layout_width="wrap_content"
        android:layout_height="wrap_content"
        android:layout_marginRight="16dp"
        android:layout_marginTop="16dp"
        android:clickable="true"
        android:tint="@android:color/white"
        app:layout_constraintRight_toRightOf="parent"
        app:layout_constraintTop_toTopOf="parent"
        app:srcCompat="@android:drawable/ic_input_add" />
</android.support.constraint.ConstraintLayout>
Set the Time
Now that we have our layout set up, let’s start to add some code to our app. Open the MainActivity.java file and add, to the end of the onCreate method, the code to get a hold of the SeekBar and the userTime TextView we just added:
SeekBar seekBar = findViewById(R.id.seekBar);
TextView userTime = findViewById(R.id.userTime);
Now we will add a listener to the seekBar that will show its progress value in the userTime text each time the the user will drag the thumb around:
seekBar.setOnSeekBarChangeListener(new SeekBar.OnSeekBarChangeListener() {
  @Override
  public void onProgressChanged(SeekBar seekBar, int i, boolean fromUser) {
    userTime.setText(Integer.toString(seekBar.getProgress()));
  }

  @Override
  public void onStartTrackingTouch(SeekBar seekBar) {

  }

  @Override
  public void onStopTrackingTouch(SeekBar seekBar) {

  }
});
For this to work, you will need to go back and add the final keyword to the textView definition (you’ll see an error if you don’t do this):
final TextView userTime = findViewById(R.id.userTime);
Run the app again in the simulator or on your phone. If you drag the seek bar’s thumb around, you will see that the text view shows numbers from 0 to 100. These are the default limits set for the SeekBar. But we need this to be the time (hours) to be converted, so let’s make a few more changes: select the SeekBar from the main layout and change its max attribute to 23. Then replace the code from the onProgressChanged SeekBar‘s listener to:
seekBar.setOnSeekBarChangeListener(new SeekBar.OnSeekBarChangeListener() {
    @Override
    public void onProgressChanged(SeekBar seekBar, int i, boolean fromUser) {
        userTime.setText((seekBar.getProgress() < 10 ? "0" + Integer.toString(seekBar.getProgress()) : Integer.toString(seekBar.getProgress())) + ":00");
    }
    // ...
Now, when you move the SeekBar‘s thumb again, the time will be updated from 00:00 to 23:00.
Let’s also create a class variable to hold the local date and time to be converted, set its default value to the current date and change the time as the user moves the SeekBar:
public class MainActivity extends AppCompatActivity {
    Date localDate = new Date();
    // ...

    @Override
    protected void onCreate(Bundle savedInstanceState) {
        // ...

        seekBar.setOnSeekBarChangeListener(new SeekBar.OnSeekBarChangeListener() {
            @Override
            public void onProgressChanged(SeekBar seekBar, int i, boolean fromUser) {
                userTime.setText((seekBar.getProgress() < 10 ? "0" + Integer.toString(seekBar.getProgress()) : Integer.toString(seekBar.getProgress())) + ":00");
                localDate.setHours(seekBar.getProgress());
                if (fromUser) {
                    localDate.setMinutes(0);
                }
            }
            // ...
Also, let’s start with the SeekBar positioned so it matches the current time we have in the localDate variable. Add the following line after you set the listener (so it will trigger the userTime text update too):
seekBar.setProgress(localDate.getHours());
Change the Date
To change the date of the conversion, we will use the default Android date picker. Add the showDatePicker method to your MainActivity class and set the Date button’s onClick attribute to it.
public void showDatePicker(View view) {
    DialogFragment dialog = new DatePickerFragment();
    dialog.show(getFragmentManager(), "datePicker");
}
This uses the DatePickerFragment class that we need to create. From the File menu Choose New -> Java Class and create a new DatePickerFragment class with the following content (replace the package name with your own):
package dragosholban.com.timezoneconverter;

import android.app.DatePickerDialog;
import android.app.Dialog;
import android.app.DialogFragment;
import android.os.Bundle;
import android.widget.DatePicker;

import java.util.Calendar;
import java.util.Date;

public class DatePickerFragment extends DialogFragment implements DatePickerDialog.OnDateSetListener {

    @Override
    public Dialog onCreateDialog(Bundle savedInstanceState) {
        Calendar c = Calendar.getInstance();
        int year = c.get(Calendar.YEAR);
        int month = c.get(Calendar.MONTH);
        int day = c.get(Calendar.DAY_OF_MONTH);

        return new DatePickerDialog(getActivity(), this, year, month, day);
    }

    @Override
    public void onDateSet(DatePicker datePicker, int year, int month, int day) {
        ((MainActivity) getActivity()).setLocalDate(new Date(year - 1900, month, day));
    }
}
The last missing piece is the setLocalDate method from the MainActivity class that will be called when the user finishes choosing the date:
public void setLocalDate(Date date) {
    // we need to keep the time on the date unchanged
    int hours = localDate.getHours();
    int minutes = localDate.getMinutes();
    localDate = date;
    localDate.setHours(hours);
    localDate.setMinutes(minutes);
    Button dateBtn = findViewById(R.id.dateButton);
    dateBtn.setText(DateFormat.getDateInstance().format(localDate));
}
Run the app now to see how you can choose the desired date from the calendar.
One small thing we forgot: we should set the Date button to show the current date from the start. So define the dateBtn class variable and set the button’s text in the onCreate method. You can also remove the button definition from the setLocalDate method and use the variable we just defined.
public class MainActivity extends AppCompatActivity {
    Button dateBtn;
    // ...

    @Override
    protected void onCreate(Bundle savedInstanceState) {
        // ...

        dateBtn = findViewById(R.id.dateButton);
        dateBtn.setText(DateFormat.getDateInstance().format(localDate));
    }
Add a New Activity
Let’s now add a new activity (screen) to our app. We will use this to choose the user’s time zone (or the source time zone) from which we will make the conversion.
From the File menu, choose New -> Activity -> Empty Activity. Name this TimeZoneActivity and click Finish. You’ll get a new TimeZoneActivity.java file and one activity_time_zone.xml layout file.
We will open this new activity when the user clicks the selectTimeZone button in the main screen. In the MainActivity.java file, add a new method:
public void chooseTimezone(View view) {
    Intent intent = new Intent(this, TimeZoneActivity.class);
    startActivity(intent);
}
As you can probably imagine, this will open the TimeZoneActivity we added earlier. All that’s left to do is to make the button call this method when clicked.
Back to the activity_main.xml layout file, select the timeZoneButton button then, from its properties, set the onClick one to the chooseTimezone method we defined above (select it from the dropdown). If you run the app now and click the button, you should be sent to the new, empty activity.
Build a List of Time Zones
To list all the available time zones we will use a ListView widget. Open the time zone activity layout and, from the palette, drag one into the screen. Create top, right, bottom and left constraints to the layout margins (8dp). Then set its layout_width and layout_height properties to match_constraint. It should now fill up the entire screen.
Give the list an ID of listView to be able to access it from the code.
Now open the TimeZoneActivity.java file and, at the end of the onCreate method add the code to get a hold of the list:
ListView listView = findViewById(R.id.listView);
We will need now al the available time zones. We can get those from the TimeZone java class:
ArrayList<String> timezones = new ArrayList<>(Arrays.asList(TimeZone.getAvailableIDs()));
Having the list and the time zones, we will use an adapter to add the time zones to the list:
ArrayAdapter<String> adapter = new ArrayAdapter<>(this, android.R.layout.simple_list_item_1, android.R.id.text1, timezones);
listView.setAdapter(adapter);
Run the app again. Go to the second screen and voilà… All the available time zones are listed beautifully and scrollable for your pleasure. Take a break and play around with them if you like.

Back to Main Activity with the Selected Time Zone
Ok, so we now have all the time zones listed in our app. We need to be able to choose one and tell the main activity about it.
To do this, we will use a special listener for our list view. In the TimeZoneActivity.java file, at the end of the onCreated method, add the following:
listView.setOnItemClickListener(new AdapterView.OnItemClickListener() {
    @Override
    public void onItemClick(AdapterView<?> adapterView, View view, int i, long l) {
        Intent result = new Intent(getApplicationContext(), MainActivity.class);
        result.putExtra("timezone", timezones.get(i));
        setResult(RESULT_OK, result);
        finish();
    }
});
You should be familiar now with the error Android Studio gives you telling that the timezones array of Strings should be declared final:
final ArrayList<String> timezones = new ArrayList<>(Arrays.asList(TimeZone.getAvailableIDs()));
Having this in place, head over to the MainActivity.java file to receive the selected time zone.
In the chooseTimezone method, replace the startActivity(intent) line with:
startActivityForResult(intent, CHOOSE_TIME_ZONE_REQUEST_CODE);
You need to define the CHOOSE_TIME_ZONE_REQUEST_CODE on top of the MainActivity class:
private static int CHOOSE_TIME_ZONE_REQUEST_CODE = 1;
The startActivityForResult method will tell Android that we want to start the TimeZone activity and we expect something from it, in our case the selected time zone. When the user comes back the following method will be called (add it to the MainActivity class):
@Override
protected void onActivityResult(int requestCode, int resultCode, Intent data) {
    if(requestCode == CHOOSE_TIME_ZONE_REQUEST_CODE && resultCode == RESULT_OK) {
        String timezone = data.getStringExtra("timezone");
        selectTimeZoneBtn.setText(timezone);
        userTimeZone = TimeZone.getTimeZone(timezone);
    }
}
As you can see, here we set the button’s text to the selected time zone and also the userTimeZone variable to it, but we still have to define them on the top of the class and set the button’s value in the onCreate method:
public class MainActivity extends AppCompatActivity {
    Button selectTimeZoneBtn;
    TimeZone userTimeZone;
    // ...

    protected void onCreate(Bundle savedInstanceState) {
        // ...
        selectTimeZoneBtn = findViewById(R.id.timeZoneButton);
You can now run the app and see how the button’s text changes to the time zone you choose from the list.
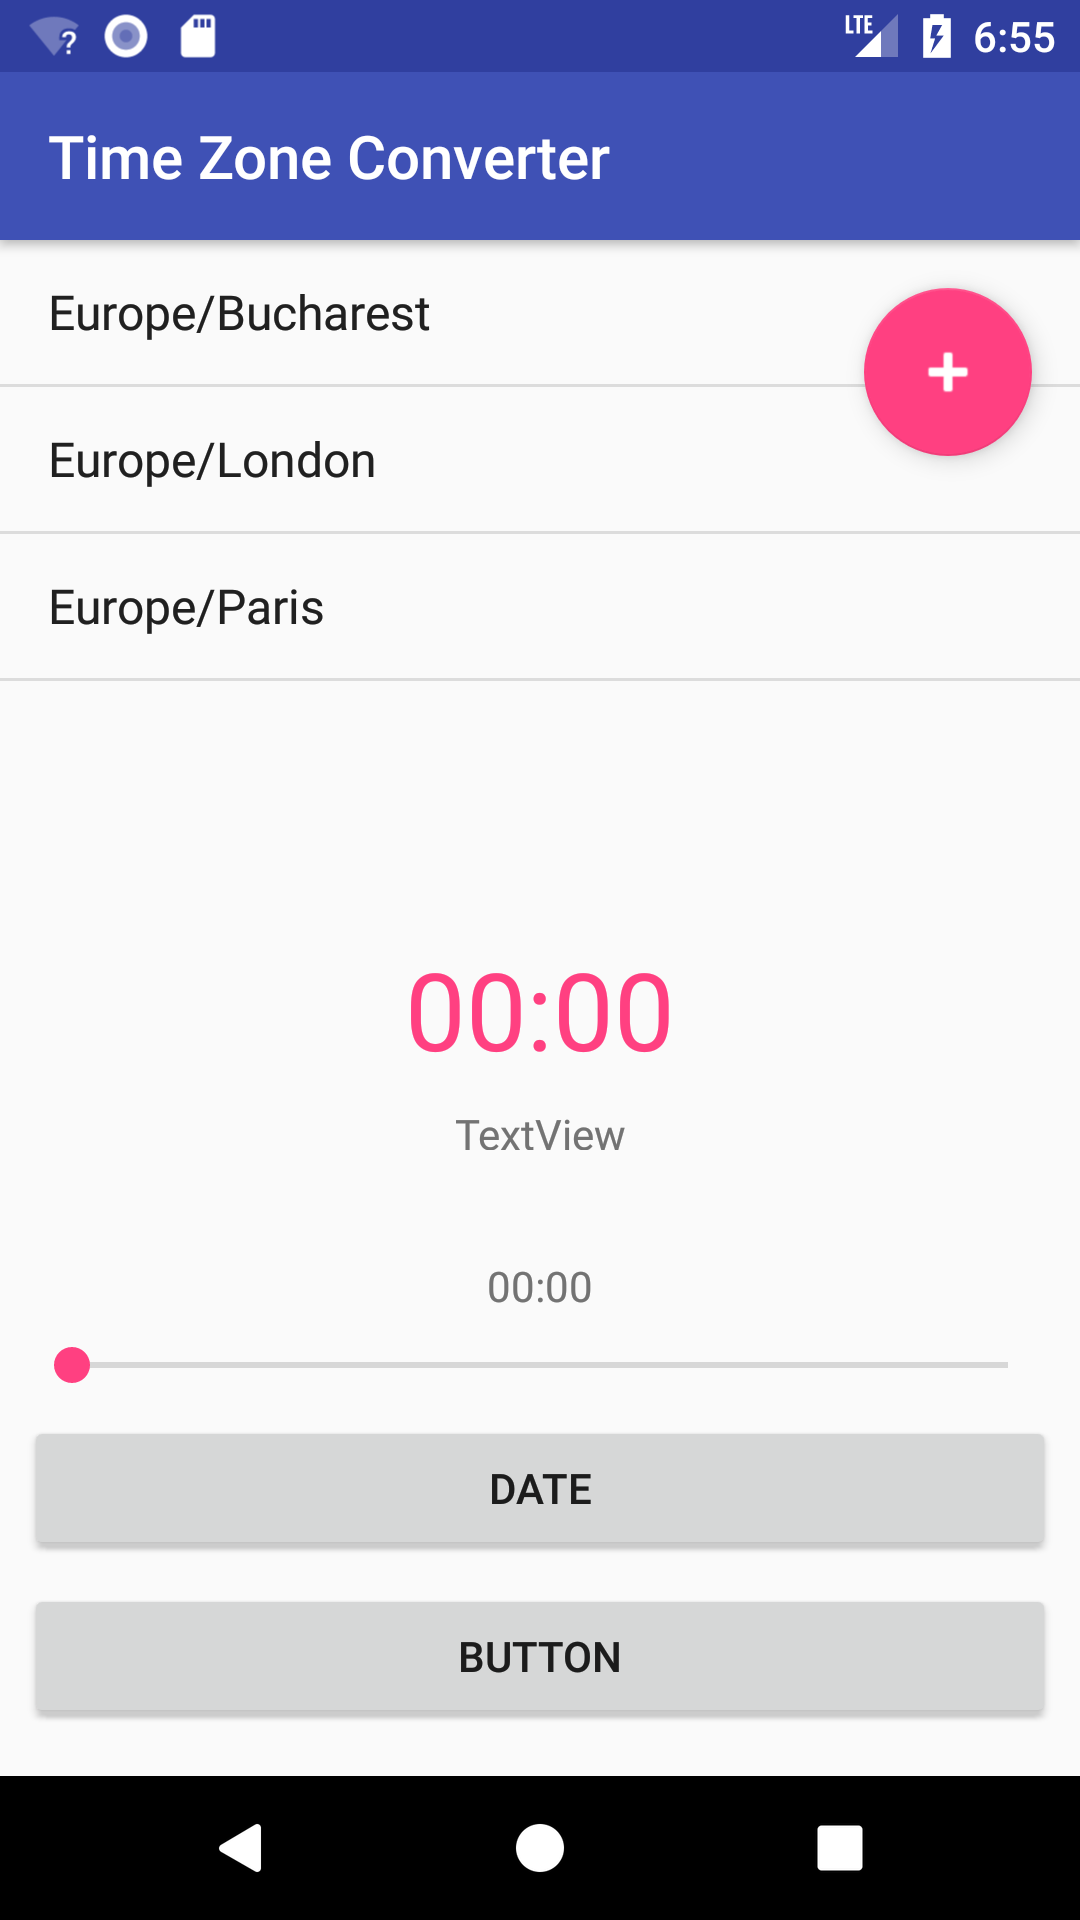
Add More Time Zones
Now, that we have the source time zone, we need to be able to select the time zone to convert to. We will use the ListView we added earlier to the main screen to show a few options and, later, we will add the possibility to change this list as the user desires.
For now, just add the following time zones to the MainActivity class:
String[] selectedTimezones = new String[] {"Europe/Bucharest", "Europe/London", "Europe/Paris"};
Then, populate the list with them, in the onCreate method::
ArrayAdapter<String> adapter = new ArrayAdapter<>(this, android.R.layout.simple_list_item_activated_1, android.R.id.text1, selectedTimezones);
ListView listView = findViewById(R.id.listView);
listView.setAdapter(adapter);
We also need to save the selected time zone from this list in a variable of the MainActivity class:
public class MainActivity extends AppCompatActivity {
    TimeZone selectedTimeZone;
    // ...

    @Override
    protected void onCreate(Bundle savedInstanceState) {
        // ...
        listView.setOnItemClickListener(new AdapterView.OnItemClickListener() {
            @Override
            public void onItemClick(AdapterView<?> adapterView, View view, int i, long l) {
                selectedTimeZone = TimeZone.getTimeZone(selectedTimezones[i]);
            }
        });
    }
Converting the Date and Time
Now, that we can select the source time zone, date and time, and the time zone to convert to, let’s add the main functionality of our app: the code to actually convert one date and time from a given time zone to another. Add the following method to the MainActivity class:
private void convertDate(TimeZone fromTimeZone, TimeZone toTimeZone) {
    if (fromTimeZone != null && toTimeZone != null) {
        long fromOffset = fromTimeZone.getOffset(localDate.getTime());
        long toOffset = toTimeZone.getOffset(localDate.getTime());
        long convertedTime = localDate.getTime() - (fromOffset - toOffset);
        Date convertedDate = new Date(convertedTime);
        int hours = convertedDate.getHours();
        int minutes = convertedDate.getMinutes();
        String time = (hours < 10 ? "0" + Integer.toString(hours) : Integer.toString(hours))
                + ":" + (minutes < 10 ? "0" + Integer.toString(minutes) : Integer.toString(minutes));
        convertedTimeTv.setText(time);
        convertedDateTv.setText(DateFormat.getDateInstance().format(convertedDate));
    }
}
To show the result, we need to define and set variables for the remaining text views from the main screen:
public class MainActivity extends AppCompatActivity {
    TextView convertedTimeTv;
    TextView convertedDateTv;
    // ...

    @Override
    protected void onCreate(Bundle savedInstanceState) {
        // ...
        final TextView userTime = findViewById(R.id.userTime);
        convertedTimeTv = findViewById(R.id.convertedTime);
        convertedDateTv = findViewById(R.id.convertedDate);
        // ...
    }
Now, all that’s left is to call the convertDate method every time the user changes the time, the date, or the time zones involved in the conversion. Add the following at the end of the SeekBar’s onProgressChanged listener method, at the end of the onItemClick listener method of the list view that holds the short list of time zones o convert to, at the end of the setLocalDate method and at the end of the onActivityResult method too.
convertDate(userTimeZone, selectedTimeZone);
If you test the app now, you will see that every time you make a change to the data, a conversion will be triggered and the result will be visible to the user.
Customize the Time Zones List
Earlier we hard coded some time zones in the short list visible on the main screen of our app. Let’s now allow the user to choose which time zones should be visible here. We will use the + floating button to open another activity from where we will be able to do this.
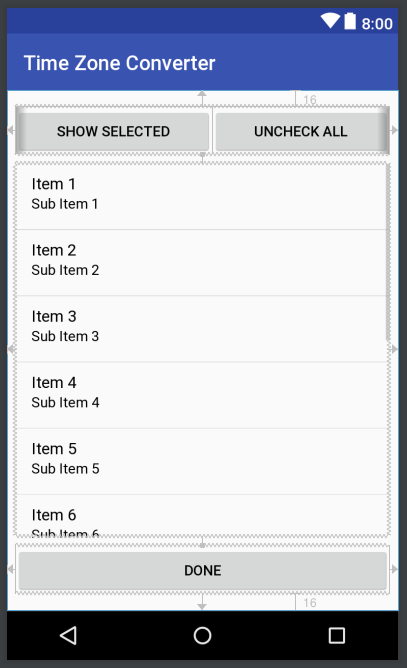
First, create a new empty activity, like we did before, and name it SelectTimezonesActivity. Then, open the activity_select_timezones.xml layout file and using the design or the text editor make it look like this:
Here’s the resulting XML code, to help you in case you have any trouble doing all the setup yourself:
<?xml version="1.0" encoding="utf-8"?>
<android.support.constraint.ConstraintLayout xmlns:android="http://schemas.android.com/apk/res/android"
    xmlns:app="http://schemas.android.com/apk/res-auto"
    xmlns:tools="http://schemas.android.com/tools"
    android:layout_width="match_parent"
    android:layout_height="match_parent"
    tools:context="dragosholban.com.timezoneconverter.SelectTimezonesActivity">

    <LinearLayout
        android:id="@+id/linearLayout"
        android:layout_width="0dp"
        android:layout_height="wrap_content"
        android:layout_marginEnd="8dp"
        android:layout_marginStart="8dp"
        android:layout_marginTop="16dp"
        android:orientation="horizontal"
        app:layout_constraintEnd_toEndOf="parent"
        app:layout_constraintStart_toStartOf="parent"
        app:layout_constraintTop_toTopOf="parent">

        <Button
            android:layout_width="wrap_content"
            android:layout_height="wrap_content"
            android:layout_weight="1"
            android:onClick="showChecked"
            android:text="Show Selected" />

        <Button
            android:layout_width="wrap_content"
            android:layout_height="wrap_content"
            android:layout_weight="1"
            android:onClick="uncheckAll"
            android:text="Uncheck All" />

    </LinearLayout>

    <ListView
        android:id="@+id/listView"
        android:layout_width="0dp"
        android:layout_height="0dp"
        android:layout_marginBottom="8dp"
        android:layout_marginEnd="8dp"
        android:layout_marginStart="8dp"
        android:layout_marginTop="8dp"
        android:choiceMode="multipleChoice"
        app:layout_constraintBottom_toTopOf="@+id/doneButton"
        app:layout_constraintEnd_toEndOf="parent"
        app:layout_constraintLeft_toLeftOf="parent"
        app:layout_constraintRight_toRightOf="parent"
        app:layout_constraintStart_toStartOf="parent"
        app:layout_constraintTop_toBottomOf="@+id/linearLayout" />

    <Button
        android:id="@+id/doneButton"
        android:layout_width="0dp"
        android:layout_height="wrap_content"
        android:layout_marginBottom="16dp"
        android:layout_marginEnd="8dp"
        android:layout_marginStart="8dp"
        android:onClick="done"
        android:text="Done"
        app:layout_constraintBottom_toBottomOf="parent"
        app:layout_constraintEnd_toEndOf="parent"
        app:layout_constraintLeft_toLeftOf="parent"
        app:layout_constraintRight_toRightOf="parent"
        app:layout_constraintStart_toStartOf="parent" />

</android.support.constraint.ConstraintLayout>
As before, we used a list view that we will populate with available time zones. We also added two buttons at the top of the screen to help the user with the selection of items and a bottom Done button for the user to press when he finishes the selection of time zones.
Back in our MainActivity class, create the selectTimeZones method :
public void selectTimezones(View view) {
    Bundle bundle = new Bundle();
    bundle.putStringArrayList("selectedTimezones", new ArrayList<String>(Arrays.asList(selectedTimezones)));
    Intent intent = new Intent(this, SelectTimezonesActivity.class);
    intent.putExtra("selectedTimezonesBundle", bundle);
    startActivityForResult(intent, 2);
}
This will start the new activity and will also send the currently selected time zones to it using a Bundle. In the activity_main.xml layout, set the onClick attribute for the floating button to this method so we can open the new activity when needed.
Now, let’s setup our new activity in the SelectTimezonesActivity.java file:
public class SelectTimezonesActivity extends AppCompatActivity {
    ArrayList<String> selectedTimezones = new ArrayList<>();
    ArrayAdapter<String> adapter;
    ArrayList<String> timezones;
    ListView listView;
    boolean showAll = true;

    @Override
    protected void onCreate(Bundle savedInstanceState) {
        super.onCreate(savedInstanceState);
        setContentView(R.layout.activity_select_timezones);

        setTitle("Choose Time Zones");

        Intent intent = getIntent();
        Bundle bundle = intent.getBundleExtra("selectedTimezonesBundle");
        selectedTimezones = bundle.getStringArrayList("selectedTimezones");
        timezones = new ArrayList<>(Arrays.asList(TimeZone.getAvailableIDs()));

        listView = findViewById(R.id.listView);
        adapter = new ArrayAdapter<>(this, android.R.layout.simple_list_item_multiple_choice, android.R.id.text1, timezones);
        listView.setAdapter(adapter);

        listView.setOnItemClickListener(new AdapterView.OnItemClickListener() {
            @Override
            public void onItemClick(AdapterView<?> adapterView, View view, int i, long l) {
                if (listView.isItemChecked(i)) {
                    selectedTimezones.add(adapter.getItem(i));
                } else {
                    selectedTimezones.remove(adapter.getItem(i));
                }
            }
        });

        checkSelectedTimezones();
    }

    public void done(View view) {
        Bundle bundle = new Bundle();
        bundle.putStringArrayList("selectedTimezones", selectedTimezones);
        Intent result = new Intent(this, MainActivity.class);
        result.putExtra("selectedTimezonesBundle", bundle);
        setResult(RESULT_OK, result);
        finish();
    }

    public void showChecked(View view) {
        Button button = (Button) view;
        adapter.clear();
        if (showAll) {
            for (String timezone : selectedTimezones) {
                adapter.add(timezone);
            }
            adapter.notifyDataSetChanged();

            button.setText("Show All");
            showAll = false;
        } else {
            for (String timezone : TimeZone.getAvailableIDs()) {
                adapter.add(timezone);
            }
            adapter.notifyDataSetChanged();

            button.setText("Show Checked");
            showAll = true;
        }

        checkSelectedTimezones();
    }

    public void uncheckAll(View view) {
        selectedTimezones.clear();
        checkSelectedTimezones();
    }

    private void checkSelectedTimezones() {
        for(int j = 0; j < adapter.getCount(); j++) {
            if (selectedTimezones.contains(adapter.getItem(j))) {
                listView.setItemChecked(j, true);
            } else {
                listView.setItemChecked(j, false);
            }
        }
    }
}
As you can see, here we first populated the list view with all the available timezones then, every time the user clicks on one item, we add or remove the time zone from the selectedTimezones list. The checkSelectedTimezones method is called to update all the time zones from the list with the checked/unchecked status depending if the time zone is found in the selectedTimezones array list.
We also added the methods to be called when the user presses on the buttons from the interface, the most important one being the done method, which will send the selected time zones back to the main activity and end the current one.
To retrieve the selected time zones, in the main activity, we need to add to the onActivityResult method the following:
public class MainActivity extends AppCompatActivity {
    private static int SELECT_TIME_ZONES_REQUEST_CODE = 2;
    // ...

    @Override
    protected void onActivityResult(int requestCode, int resultCode, Intent data) {
        // ...

        if (requestCode == SELECT_TIME_ZONES_REQUEST_CODE && resultCode == RESULT_OK) {
            Bundle bundle = data.getBundleExtra("selectedTimezonesBundle");
            ArrayList<String> selectedTimezonesArrayList = bundle.getStringArrayList("selectedTimezones");
            Collections.sort(selectedTimezonesArrayList, new Comparator<String>() {
                @Override
                public int compare(String s, String t1) {
                    return s.compareToIgnoreCase(t1);
                }
            });
            selectedTimezones = new String[selectedTimezonesArrayList.size()];
            selectedTimezonesArrayList.toArray(selectedTimezones);
            setupAdapter();
        }

        convertDate(userTimeZone, selectedTimeZone);
    }
This will handle the case when we return from the SelectTimezonesActivity and get the results and put them in the selectedTimezones array after being sorted alphabetically. We also need to update the adapter for the list view after making this changes, so we call the new method setupAdapter that we define below:
private void setupAdapter() {
    adapter = new ArrayAdapter<>(this, android.R.layout.simple_list_item_activated_1, android.R.id.text1, selectedTimezones);
    listView.setAdapter(adapter);
}
This method will also be called from the onCreate method, instead of the current code, so we avoid duplicating it. Also the listView and the adapter variables will need to be declared as class variables:
public class MainActivity extends AppCompatActivity {
    ListView listView;
    ArrayAdapter<String> adapter;

    // ...

    @Override
    protected void onCreate(Bundle savedInstanceState) {
        // ...

        listView = findViewById(R.id.listView);
        setupAdapter();

        // ...
Run the app now to see everything working and try to change the initial list of time zones to which you can convert the date.
Adding Search
You probably noticed that is pretty hard to find exactly the time zones you are interested in, in both the activities that let you do this. There is a lot of scrolling involved and it will be easier if we could just search for the items we are interested in. So let’s add a search to each of the time zones list.
We’ll start with the TimeZoneActivity. First we have to create a menu layout named options_menu.xml, in a new res/menu directory:
<?xml version="1.0" encoding="utf-8"?>
<menu xmlns:android="http://schemas.android.com/apk/res/android"
    xmlns:app="http://schemas.android.com/apk/res-auto">
    <item android:id="@+id/action_search"
        android:icon="@android:drawable/ic_menu_search"
        app:showAsAction="ifRoom|collapseActionView"
        app:actionViewClass="android.support.v7.widget.SearchView"
        android:title="@string/app_name" />
</menu>
This contains the search icon and view that will be added to the title bar. Adding the menu is done in the onCreateOptionsMenu method of the TimeZoneActivity class:
public class TimeZoneActivity extends AppCompatActivity {
    // ...

    @Override
    public boolean onCreateOptionsMenu(Menu menu) {
        getMenuInflater().inflate(R.menu.options_menu, menu);

        MenuItem searchItem = menu.findItem(R.id.action_search);
        SearchView searchView = (SearchView) MenuItemCompat.getActionView(searchItem);

        searchView.setOnQueryTextListener(new SearchView.OnQueryTextListener() {
            @Override
            public boolean onQueryTextSubmit(String s) {
                return false;
            }

            @Override
            public boolean onQueryTextChange(String s) {
                adapter.getFilter().filter(s);

                return true;
            }
        });

        return true;
    }
}
Here we inflate the menu from the resource file, then we get the search view and add a listener that will be called every time the user changes the text in the search input.
One thing is left to do for this to work: we need the time zone adapter to be able to search and filter for the strings the user types. We’ll create a new class for our adapter, the TimeZoneAdapter, that inherits from ArrayAdapter<String> and adds this filter functionality:
public class TimeZoneAdapter extends ArrayAdapter<String> {

    private ArrayList<String> original;
    private Filter filter;

    public TimeZoneAdapter(@NonNull Context context, int resource, int textViewResourceId, @NonNull ArrayList<String> objects) {
        super(context, resource, textViewResourceId, objects);
        original = new ArrayList<>(objects);
    }

    @NonNull
    @Override
    public Filter getFilter() {
        return new TimeZoneFilter();
    }

    private class TimeZoneFilter extends Filter {

        @Override
        protected FilterResults performFiltering(CharSequence charSequence) {
            FilterResults results = new FilterResults();
            ArrayList<String> filtered = new ArrayList<>();
            String search = charSequence.toString().toLowerCase();

            if (search == null || search.length() == 0) {
                filtered = new ArrayList<>(original);
            } else {
                for (int i = 0; i < original.size(); i++) {
                    if (original.get(i).toLowerCase().contains(charSequence)) {
                        filtered.add(original.get(i));
                    }
                }
            }

            results.values = filtered;
            results.count = filtered.size();

            return results;
        }

        @Override
        protected void publishResults(CharSequence charSequence, FilterResults filterResults) {
            ArrayList<String> items = (ArrayList<String>) filterResults.values;
            clear();
            for (int i = 0; i < items.size(); i++) {
                add(items.get(i));
            }

            notifyDataSetChanged();
        }
    }
}
Now, back in the TimeZoneActivity, use this adapter type instead of the original ArrayAdapter<String>:
public class TimeZoneActivity extends AppCompatActivity {
    TimeZoneAdapter adapter;

    @Override
    protected void onCreate(Bundle savedInstanceState) {
        // ...

        adapter = new TimeZoneAdapter(this, android.R.layout.simple_list_item_1, android.R.id.text1, timezones);
        listView.setAdapter(adapter);

        // ...
Run the app now and see how easier it is to find you desired time zone.

Let’s do the same for the other list from the SelectTimezonesActivity class. We already have the menu resource, so we’ll jump right into the java code:
public class SelectTimezonesActivity extends AppCompatActivity {
    // ...

    @Override
    public boolean onCreateOptionsMenu(Menu menu) {
        getMenuInflater().inflate(R.menu.options_menu, menu);

        MenuItem searchItem = menu.findItem(R.id.action_search);
        SearchView searchView = (SearchView) MenuItemCompat.getActionView(searchItem);

        searchView.setOnQueryTextListener(new SearchView.OnQueryTextListener() {
            @Override
            public boolean onQueryTextSubmit(String s) {
                return false;
            }

            @Override
            public boolean onQueryTextChange(String s) {
                adapter.getFilter().filter(s, new Filter.FilterListener() {
                    @Override
                    public void onFilterComplete(int i) {
                        checkSelectedTimezones();
                    }
                });

                return true;
            }
        });

        return true;
    }
We will use the same adapter we build earlier, so change the adapter definition to this:
public class SelectTimezonesActivity extends AppCompatActivity {
    TimeZoneAdapter adapter;
    // ...

    @Override
    protected void onCreate(Bundle savedInstanceState) {
        // ...

        adapter = new TimeZoneAdapter(this, android.R.layout.simple_list_item_multiple_choice, android.R.id.text1, timezones);

        // ...
That’s it! You can now test the app again to see how everything works.

Saving User Preferences
You probably noticed that if you close the app and open it again, you will lose all the settings you made. We can save everything we need in the SharedPreferences object so it will be accessible next time the app starts.
For this, we will add two new methods in the MainActivity class, one to save and one to load the saved settings:
private void savePreferences() {
    SharedPreferences preferences = this.getPreferences(Context.MODE_PRIVATE);
    SharedPreferences.Editor editor = preferences.edit();

    if (userTimeZone != null) {
        editor.putString("userTimezone", userTimeZone.getID());
    }

    if (selectedTimeZone != null) {
        editor.putString("selectedTimezone", selectedTimeZone.getID());
    }

    editor.putStringSet("selectedTimezones", new HashSet<>(Arrays.asList(selectedTimezones)));

    editor.commit();
}

private void loadPreferences() {
    SharedPreferences preferences = this.getPreferences(Context.MODE_PRIVATE);

    String userTimezone = preferences.getString("userTimezone", TimeZone.getDefault().getID());
    this.userTimeZone = TimeZone.getTimeZone(userTimezone);

    Set<String> defaultSelectedTimezones = new HashSet<>(Arrays.asList(new String[] {"America/Los_Angeles", "America/New_York", "Asia/Hong_Kong", "Asia/Tokyo", "Europe/London", "Europe/Moscow", "Europe/Paris"}));
    Set<String> selectedTimezones = preferences.getStringSet("selectedTimezones", defaultSelectedTimezones);
    ArrayList<String> selectedTimezonesArrayList = new ArrayList<>(selectedTimezones);
    Collections.sort(selectedTimezonesArrayList, new Comparator<String>() {
        @Override
        public int compare(String s, String t1) {
            return s.compareToIgnoreCase(t1);
        }
    });
    this.selectedTimezones = selectedTimezonesArrayList.toArray(new String[selectedTimezonesArrayList.size()]);

    String selectedTimezoneID = preferences.getString("selectedTimezone", null);
    if (selectedTimezoneID != null) {
        if (selectedTimezones.contains(selectedTimezoneID)) {
            this.selectedTimeZone = TimeZone.getTimeZone(selectedTimezoneID);
        }
    }
}
Here we save, then load, the time zone selected to be converted, the currently selected timezone from the short list on top of the screen and the list of time zones to show in the same short list. We still have to call these methods from the code. Add the savePreferences call to the code executed when the user selects a time zone from the short list:
listView.setOnItemClickListener(new AdapterView.OnItemClickListener() {
    @Override
    public void onItemClick(AdapterView<?> adapterView, View view, int i, long l) {
        selectedTimeZone = TimeZone.getTimeZone(selectedTimezones[i]);
        convertDate(userTimeZone, selectedTimeZone);
        savePreferences();
    }
});
And when the activity receives the results from the other activities:
protected void onActivityResult(int requestCode, int resultCode, Intent data) {
    // ...

    savePreferences();
}
The loadPreferences method needs to be called only when the app starts, in the onCreate method:
protected void onCreate(Bundle savedInstanceState) {
    super.onCreate(savedInstanceState);
    setContentView(R.layout.activity_main);

    loadPreferences();

    // ...
Now that we load the saved values from the shared preferences, we have to set some of the widgets to reflect this. To do this, add the following code at the end of the onCreate method:
if (userTimeZone != null) {
    selectTimeZoneBtn.setText(userTimeZone.getID());
}
if (selectedTimezones.length > 0 && selectedTimeZone != null) {
    int selectedTimeZonePosition = 0;
    for (int i = 0; i < this.selectedTimezones.length; i++) {
        if (selectedTimeZone.getID().equals(this.selectedTimezones[i])) {
            selectedTimeZonePosition = i;
            break;
        }
    }
    listView.setItemChecked(selectedTimeZonePosition, true);
    listView.setSelection(selectedTimeZonePosition);
    selectedTimeZone = TimeZone.getTimeZone(selectedTimezones[selectedTimeZonePosition]);
}
convertDate(userTimeZone, selectedTimeZone);
Run the app again, make some changes, close it, then open again. You should now have everything as you left before you closed the app.
Final Touches
Our app is almost ready. There some things to improve though. The date button does not look like in the initial image, so let’s fix this first. Select the dateButton, from the main layout, and set the background attribute to @android:color/transparent and the textColor to @color/colorAccent.
You probably noticed that, when the app opens for the first time, you get the current time converted between the two selected time zones. But there is no way to see the current time again after that. Let’s fix this too.
Open the MainActivity class and add anew convertCurrentDate method:
public class MainActivity extends AppCompatActivity {
    SeekBar seekBar;
    // ...

    @Override
    protected void onCreate(Bundle savedInstanceState) {
        // ...

        seekBar = findViewById(R.id.seekBar);
        // ...
    }

    public void convertCurrentDate(View view) {
        localDate = new Date();
        convertDate(userTimeZone, selectedTimeZone);
        seekBar.setProgress(localDate.getHours());
    }
Next, select the convertedTime TextView and set the onClick attribute to the convertCurrentDate we defined above. Now, every time the you press the convertedTime TextView, the app will reset the time to the current time of the system and you can see the conversion result on screen.
Lest thing we need to do is to restrict the activities to portrait mode. If you rotate not the device in landscape you will see that everything repositions according to the constraints we defined, but there is not enough space. To do this, we need to adit the AndroidManifest.xml file and add the following:
<?xml version="1.0" encoding="utf-8"?>
<manifest ... >

    <application
        ... >
        <activity android:name=".MainActivity"
            android:screenOrientation="portrait">
            ...
        </activity>
        <activity android:name=".TimeZoneActivity"
            android:screenOrientation="portrait"/>
        <activity android:name=".SelectTimezonesActivity"
            android:screenOrientation="portrait"></activity>
    </application>

</manifest>
That’s it, our app is ready. I hope you enjoyed building it and learned a lot doing that. Please let me know in the comments how it was for you, if you found any problems or if you have any improvements to suggest. Also, if this tutorial helped you build some other Android apps, please add some links in the comments and tell us about them.
You can get the final code from GitHub, in case something goes terribly wrong and you don’t manage to fix it. See you at the next tutorial!
Your effort is commendable. It would be great if you can replace the ListView with RecyclerView. since most of the programmers are migrated to RecyclerView.
Thank you for your appreciation!
I don’t see the need for a RecyclerView, I wanted to use the simplest component for this first tutorial, but I plan another one which will use a RecyclerView to list some images. You can see it in action here: https://play.google.com/store/apps/details?id=ro.bestphotos.bestphotos
Nice to see that common sense still prevail for some people, I’m saying that because you used Java and not Kotlin!
Thanks Stephane! Can you detail why do you have this opinion? I am curious as I don’t had time to learn Kotlin yet, but I was planning to.
This is great Dragos, thanks for this. Do you know if it would be possible to add a custom time zone to this app? i.e. say you wanted to have a GMT+09:20 time zone for argument’s sake, and it wasn’t in Android’s standard list of time zones.