All the kids love drawing, so let’s see how to make such an app for them.
Project Setup
Start by creating a new Android Studio project, I’ll name it AndroidDrawing. Use the API 15 as the minimum SDK and the Phone & Tablet form factor. We’ll only have one, empty, activity, the MainActivity.
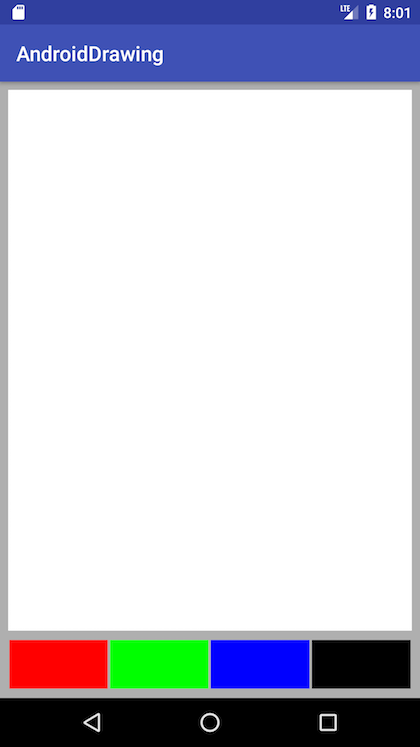
The layout of our app will be quite simple: we’ll have some colors to choose from and a white canvas to draw on. Below is the activity_main.xml layout file:
<?xml version="1.0" encoding="utf-8"?>
<android.support.constraint.ConstraintLayout xmlns:android="http://schemas.android.com/apk/res/android"
    xmlns:app="http://schemas.android.com/apk/res-auto"
    xmlns:tools="http://schemas.android.com/tools"
    android:layout_width="match_parent"
    android:layout_height="match_parent"
    android:background="#AFAFAF"
    tools:context=".MainActivity">
    <View
        android:id="@+id/canvas"
        android:layout_width="0dp"
        android:layout_height="0dp"
        android:layout_marginTop="8dp"
        android:layout_marginLeft="8dp"
        android:layout_marginStart="8dp"
        android:layout_marginRight="8dp"
        android:layout_marginEnd="8dp"
        android:layout_marginBottom="8dp"
        app:layout_constraintTop_toTopOf="parent"
        app:layout_constraintStart_toStartOf="parent"
        app:layout_constraintEnd_toEndOf="parent"
        app:layout_constraintBottom_toTopOf="@id/colorPicker"
        android:background="#FFFFFF"/>
    <LinearLayout
        android:id="@+id/colorPicker"
        android:layout_width="0dp"
        android:layout_height="50dp"
        android:layout_marginBottom="8dp"
        android:layout_marginEnd="8dp"
        android:layout_marginLeft="8dp"
        android:layout_marginRight="8dp"
        android:layout_marginStart="8dp"
        android:orientation="horizontal"
        app:layout_constraintBottom_toBottomOf="parent"
        app:layout_constraintEnd_toEndOf="parent"
        app:layout_constraintStart_toStartOf="parent">
        <View
            android:layout_width="0dp"
            android:layout_height="match_parent"
            android:layout_weight="1"
            android:layout_margin="1dp"
            android:background="#FF0000"/>
        <View
            android:layout_width="0dp"
            android:layout_height="match_parent"
            android:layout_weight="1"
            android:layout_margin="1dp"
            android:background="#00FF00"/>
        <View
            android:layout_width="0dp"
            android:layout_height="match_parent"
            android:layout_weight="1"
            android:layout_margin="1dp"
            android:background="#0000FF"/>
        <View
            android:layout_width="0dp"
            android:layout_height="match_parent"
            android:layout_weight="1"
            android:layout_margin="1dp"
            android:background="#000000"/>
    </LinearLayout>
</android.support.constraint.ConstraintLayout>
As you can see, we started with four colors, red, green, blue and black, and an empty white view as our canvas.
Drawing Paths
The drawing process works as follows: every time the users touches the canvas view, we will create a new path and, with every user move, we will add a line from the previous point to the current one. The path will be drawn to the canvas as soon as possible by the system. We tell Android that it needs to redraw the canvas view by calling the invalidate method each time we make a change to the path. You should not call the onDraw method of the canvas view, that’s the system’s job.
Let’s start implementing the above by creating a TouchListener class to handle user touches:
public class TouchListener implements View.OnTouchListener {

    @Override
    public boolean onTouch(View view, MotionEvent event) {
        float x = event.getX();
        float y = event.getY();
        DrawingView drawingView = (DrawingView) view;
        Path path;

        switch (event.getAction() & MotionEvent.ACTION_MASK) {
            case MotionEvent.ACTION_DOWN:
                path = new Path();
                path.moveTo(x, y);
                drawingView.addPath(path);
                break;
            case MotionEvent.ACTION_MOVE:
                path = drawingView.getLastPath();
                if (path != null) {
                    path.lineTo(x, y);
                }
                break;
        }

        drawingView.invalidate();

        return true;
    }
}
This TouchListener class needs a “special” view to be able to create and alter paths in it as the user interacts with the screen. We will create a new DrawingView class for this purpose:
public class DrawingView extends View {

    private ArrayList<Path> paths = new ArrayList<>();

    public DrawingView(Context context) {
        super(context);
    }

    public DrawingView(Context context, @Nullable AttributeSet attrs) {
        super(context, attrs);
    }

    public DrawingView(Context context, @Nullable AttributeSet attrs, int defStyleAttr) {
        super(context, attrs, defStyleAttr);
    }

    @RequiresApi(api = Build.VERSION_CODES.LOLLIPOP)
    public DrawingView(Context context, @Nullable AttributeSet attrs, int defStyleAttr, int defStyleRes) {
        super(context, attrs, defStyleAttr, defStyleRes);
    }

    public void addPath(Path path) {
        paths.add(path);
    }

    public Path getLastPath() {
        if (paths.size() > 0) {
            return paths.get(paths.size() - 1);
        }

        return null;
    }

    @Override
    protected void onDraw(Canvas canvas) {
        super.onDraw(canvas);

        for (Path path : paths) {
            Paint paint = new Paint();
            paint.setColor(0X80000000);
            paint.setStyle(Paint.Style.STROKE);
            paint.setStrokeWidth(3f);
            canvas.drawPath(path, paint);
        }
    }
}
This new DrawigView class extents the base Android View class and adds some methods we need to create new paths. It also has to define new constructors that simply call the View‘s constructors. The drawing of out custom path objects is done in the onDraw method that will be called by the system when needed.
Next, we need to change the canvas view in our layout to be this new DrawingView class:
<?xml version="1.0" encoding="utf-8"?>
<android.support.constraint.ConstraintLayout ...>
    <com.dragosholban.androiddrawing.DrawingView
        ... />
    <LinearLayout ...>
        ...
    </LinearLayout>
</android.support.constraint.ConstraintLayout>
Finally, to be able to draw, we need to add the touch listener class to our view, in the ManActivity class:
public class MainActivity extends AppCompatActivity {

    DrawingView drawingView;

    @Override
    protected void onCreate(Bundle savedInstanceState) {
        super.onCreate(savedInstanceState);
        setContentView(R.layout.activity_main);

        drawingView = findViewById(R.id.canvas);
        drawingView.setOnTouchListener(new TouchListener());
    }
}
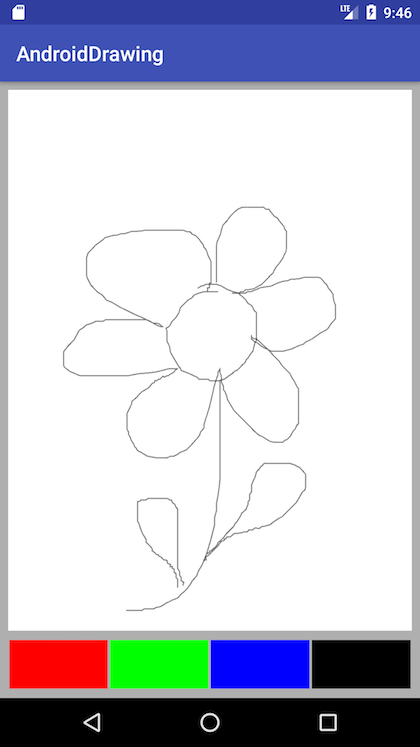
Run the app now and draw something on the screen using your finger. It should work like you can see below:
Changing the Color
To change the color we need to add a new method in our MainActivity class, to be called when the user taps on one of the color buttons:
<?xml version="1.0" encoding="utf-8"?>
<android.support.constraint.ConstraintLayout ...>
    <com.dragosholban.androiddrawing.DrawingView .../>
    <LinearLayout ...>
        <View
            android:layout_width="0dp"
            android:layout_height="match_parent"
            android:layout_weight="1"
            android:layout_margin="1dp"
            android:background="#FF0000"
            android:onClick="setColor"/>
        <View
            android:layout_width="0dp"
            android:layout_height="match_parent"
            android:layout_weight="1"
            android:layout_margin="1dp"
            android:background="#00FF00"
            android:onClick="setColor"/>
        <View
            android:layout_width="0dp"
            android:layout_height="match_parent"
            android:layout_weight="1"
            android:layout_margin="1dp"
            android:background="#0000FF"
            android:onClick="setColor"/>
        <View
            android:layout_width="0dp"
            android:layout_height="match_parent"
            android:layout_weight="1"
            android:layout_margin="1dp"
            android:background="#000000"
            android:onClick="setColor"/>
    </LinearLayout>
</android.support.constraint.ConstraintLayout>
public class MainActivity extends AppCompatActivity {

    DrawingView drawingView;

    // ...

    public void setColor(View view) {
        ColorDrawable buttonColor = (ColorDrawable) view.getBackground();
        drawingView.setCurrentColor(buttonColor.getColor());
    }
}
This method will get the background color of the view and set it as the curent color of our drawingView. The drawingView will need to use the currentColor variable to draw the paths, until a new color is set.
public class DrawingView extends View {

    private ArrayList<Path> paths = new ArrayList<>();
    private ArrayList<Integer> colors = new ArrayList<>();
    private int currentColor = 0xFF000000;

    // ...

    public void addPath(Path path) {
        paths.add(path);
        colors.add(currentColor);
    }

    // ...

    @Override
    protected void onDraw(Canvas canvas) {
        super.onDraw(canvas);

        int i = 0;
        for (Path path : paths) {
            Paint paint = new Paint();
            paint.setColor(colors.get(i));
            paint.setStyle(Paint.Style.STROKE);
            paint.setStrokeWidth(3f);
            canvas.drawPath(path, paint);
            i++;
        }
    }

    public void setCurrentColor(int color) {
        currentColor = color;
    }
}
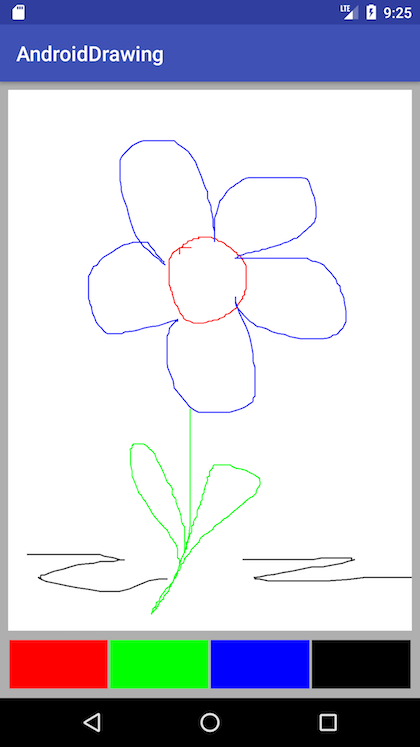
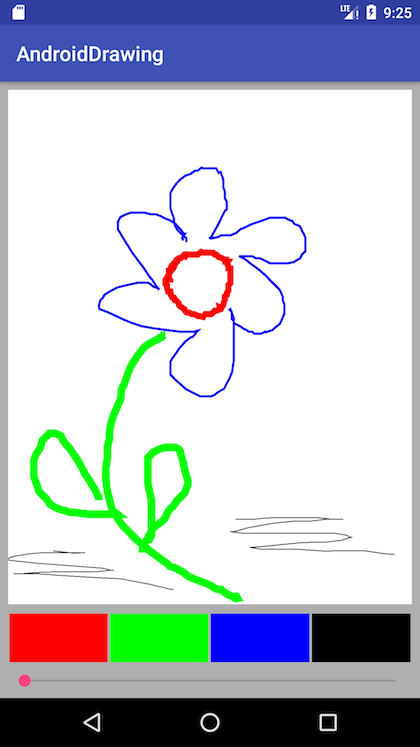
Run the app again now and start using the power of colors in your drawings:
Changing the Brush Size
Now, that we can draw using multiple colors, let’s add a way to change the thickness of the paths we draw. To set this new parameter of our app, we will use an Android SeekBar widget:
<?xml version="1.0" encoding="utf-8"?>
<android.support.constraint.ConstraintLayout ...>
    <com.dragosholban.androiddrawing.DrawingView .../>
    <LinearLayout
        android:id="@+id/colorPicker"
        android:layout_width="0dp"
        android:layout_height="50dp"
        android:layout_marginBottom="8dp"
        android:layout_marginEnd="8dp"
        android:layout_marginLeft="8dp"
        android:layout_marginRight="8dp"
        android:layout_marginStart="8dp"
        android:orientation="horizontal"
        app:layout_constraintBottom_toTopOf="@+id/seekBar"
        app:layout_constraintEnd_toEndOf="parent"
        app:layout_constraintStart_toStartOf="parent">
        ...
    </LinearLayout>

    <SeekBar
        android:id="@+id/seekBar"
        android:layout_width="match_parent"
        android:layout_height="wrap_content"
        android:layout_marginBottom="8dp"
        android:layout_marginEnd="8dp"
        android:layout_marginLeft="8dp"
        android:layout_marginRight="8dp"
        android:layout_marginStart="8dp"
        android:max="9"
        android:progress="2"
        app:layout_constraintBottom_toBottomOf="parent" />
</android.support.constraint.ConstraintLayout>
The next code will set our line width to the value of the seekBar‘s current progress, using an OnSeekBarChangeListener class:
public class MainActivity extends AppCompatActivity {

    DrawingView drawingView;
    SeekBar seekBar;

    @Override
    protected void onCreate(Bundle savedInstanceState) {
        // ...

        seekBar = findViewById(R.id.seekBar);
        seekBar.setOnSeekBarChangeListener(new SeekBar.OnSeekBarChangeListener() {
            @Override
            public void onProgressChanged(SeekBar seekBar, int progress, boolean fromUser) {
                drawingView.setCurrentWidth(progress);
            }

            @Override
            public void onStartTrackingTouch(SeekBar seekBar) {

            }

            @Override
            public void onStopTrackingTouch(SeekBar seekBar) {

            }
        });
    }

    // ...
}
The DrawingView class will use the width values set by the user to draw of each of the paths. To make things a little more visible, we will add 1 to the raw value of the width and multiply the result by 2:
public class DrawingView extends View {

    // ...
    private ArrayList<Integer> widths = new ArrayList<>();
    private int currentWidth = 6;

    // ...

    public void addPath(Path path) {
        paths.add(path);
        colors.add(currentColor);
        widths.add(currentWidth);
    }

    // ...

    @Override
    protected void onDraw(Canvas canvas) {
        super.onDraw(canvas);

        int i = 0;
        for (Path path : paths) {
            Paint paint = new Paint();
            paint.setColor(colors.get(i));
            paint.setStyle(Paint.Style.STROKE);
            paint.setStrokeWidth(widths.get(i));
            canvas.drawPath(path, paint);
            i++;
        }
    }

    // ...

    public void setCurrentWidth(int width) {
        currentWidth = (width + 1) * 2;
    }
}
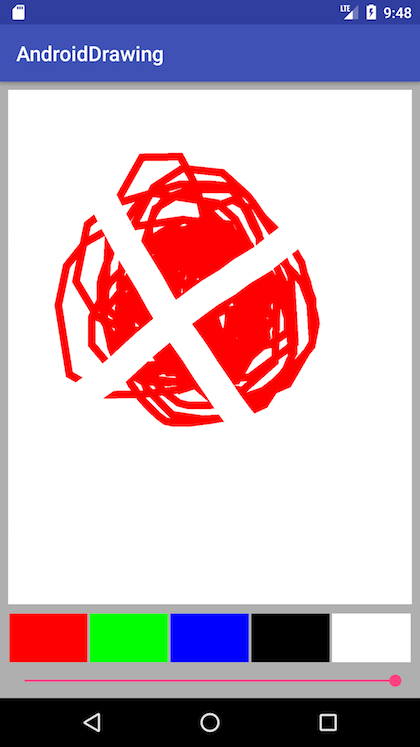
You can run the app again now and make more complex drawings, using different widths for the brush:
Adding an Eraser and Starting a New Drawing
In the last part of this tutorial, we will add an eraser brush to delete parts of the drawing and a new button to delete everything and start over.
Both are quite simple to implement. Let’s start with the eraser. This will be just another color button using white. This way, every time the user draws using it, it will just cover whatever is behind it with the background color and it will look like it was erased.
<?xml version="1.0" encoding="utf-8"?>
<android.support.constraint.ConstraintLayout ...>
    <com.dragosholban.androiddrawing.DrawingView
        ... />
    <LinearLayout ...>
        ...
        <View
            android:layout_width="0dp"
            android:layout_height="match_parent"
            android:layout_weight="1"
            android:layout_margin="1dp"
            android:background="#FFFFFF"
            android:onClick="setColor"/>
    </LinearLayout>

    <SeekBar
        ... />
</android.support.constraint.ConstraintLayout>
If you try to use it now, you will notice that it is quite thin for an eraser. Let’s make it a lot thicker by giving it a tag and making the width four times bigger in it’s case.
<View
    android:layout_width="0dp"
    android:layout_height="match_parent"
    android:layout_weight="1"
    android:layout_margin="1dp"
    android:background="#FFFFFF"
    android:onClick="setColor"
    android:tag="eraser" />
The setColor method from the MainActivity will check for the above eraser tag and set the current width of the drawing accordingly:
public void setColor(View view) {
    ColorDrawable buttonColor = (ColorDrawable) view.getBackground();
    drawingView.setCurrentColor(buttonColor.getColor());
    if (view.getTag() != null && view.getTag().equals("eraser")) {
        drawingView.setCurrentWidth(seekBar.getProgress() * 4);
    } else {
        drawingView.setCurrentWidth(seekBar.getProgress());
    }
}
Try now and you should be able to use the eraser to fix small imperfections of your drawing.
The last button will clear everything so the user can start over with a new drawing:
<?xml version="1.0" encoding="utf-8"?>
<android.support.constraint.ConstraintLayout ...>
    <com.dragosholban.androiddrawing.DrawingView
        .../>
    <LinearLayout ...>
        ...
        <Button
            android:id="@+id/button"
            android:layout_width="0dp"
            android:layout_height="wrap_content"
            android:layout_weight="1"
            android:background="@android:drawable/ic_menu_delete"
            android:onClick="deleteDrawing" />
    </LinearLayout>
    ...
</android.support.constraint.ConstraintLayout>
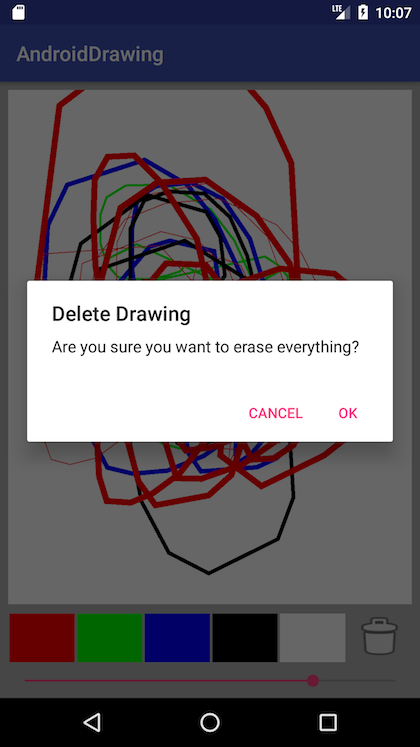
The deleteDrawing method from the MainActivity, will show an alert asking the user to confirm the deletion of the current drawing, and delete everything if the user confirms.
public void deleteDrawing(View view) {
    AlertDialog.Builder builder = new AlertDialog.Builder(this);
    builder.setMessage("Are you sure you want to erase everything?")
            .setTitle("Delete Drawing")
            .setPositiveButton("OK", new DialogInterface.OnClickListener() {
                public void onClick(DialogInterface dialog, int id) {
                    drawingView.erase();
                }
            })
            .setNegativeButton("Cancel", new DialogInterface.OnClickListener() {
                public void onClick(DialogInterface dialog, int id) {

                }
            });
    AlertDialog dialog = builder.create();
    dialog.show();
}
The erase method from our DrawingView, will just clear all the paths, colors and widths and call the invalidate method to inform the system that the view needs to be redrawn.
public void erase() {
    paths.clear();
    colors.clear();
    widths.clear();
    invalidate();
}
That’s it! Try to run the app one more time and enjoy making drawings after drawings now that you are able to erase everything and start over any time you want.
I hope you enjoyed building this and learned a lot along the way. Please let me know in the comments how it was for you, if you found any problems or if you have any improvements to suggest. Also, if this tutorial helped you build some other Android apps, please add some links in the comments and tell all of us about them.
You can get the final code from GitHub, in case something goes terribly wrong and you don’t manage to fix it. See you at the next Android tutorial!
Hey. I sent a screenshot. Did you get it?